Runo v8.2 introduces customer-level AI intelligence, conditional workflow automation, enhanced analytics visibility, and improved platform controls, helping teams prioritize better, automate smarter, and operate with greater confidence.
Move beyond call-level analysis with AI-powered customer intelligence. Runo now analyzes recent customer conversations to provide a consolidated view of conversion likelihood, customer health, sentiment, scores, and recommended next actions.
What's New
How to Use
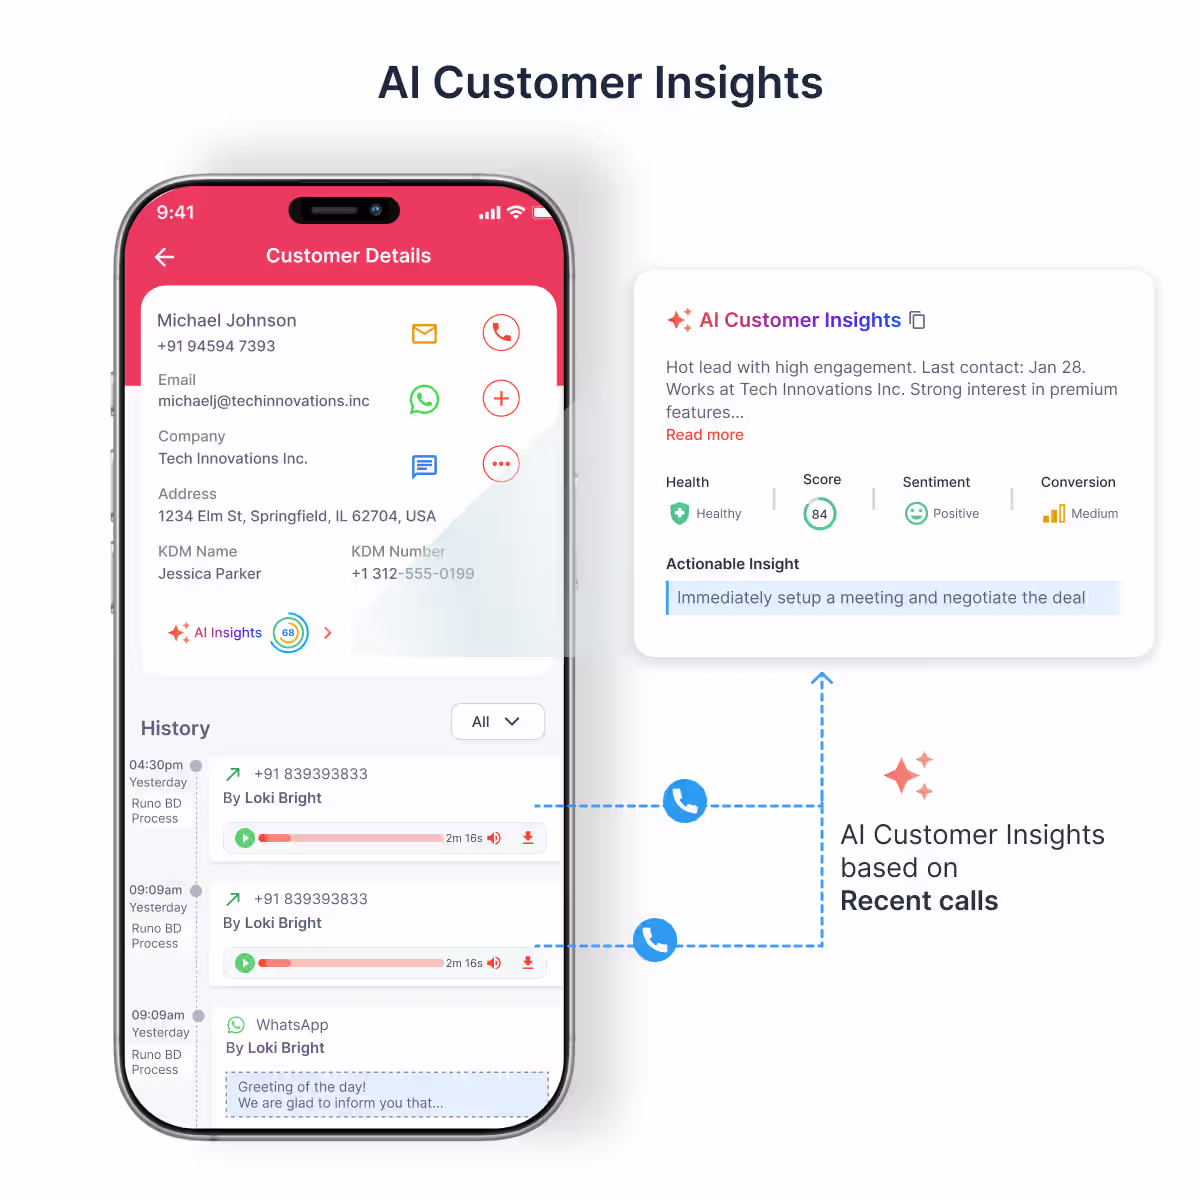
Use these insights to identify high-priority customers, anticipate conversion opportunities, and take the right next action.
*Enjoy this feature at no cost until September 30, 2026
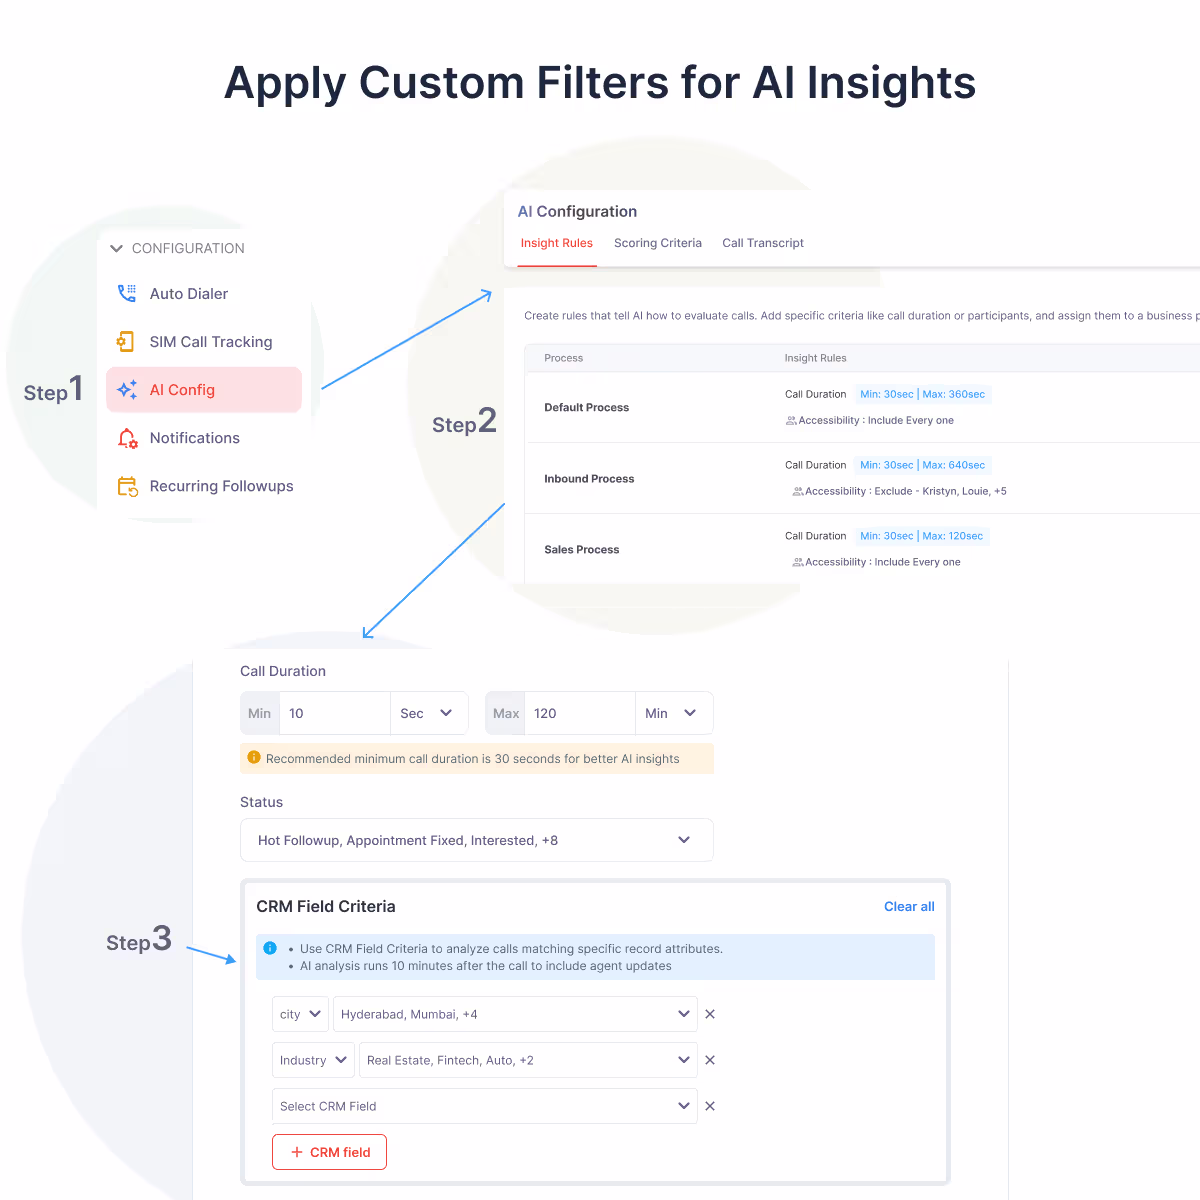
Improve the relevance of AI-generated insights by analyzing only the conversations that meet specific CRM criteria.
What's New
How to Use
Standardize AI transcript outputs across your organization by setting a default transcript script at the account level. Admins can also choose to automatically convert all transcripts to English for greater consistency and easier analysis.
What's New
How to Use
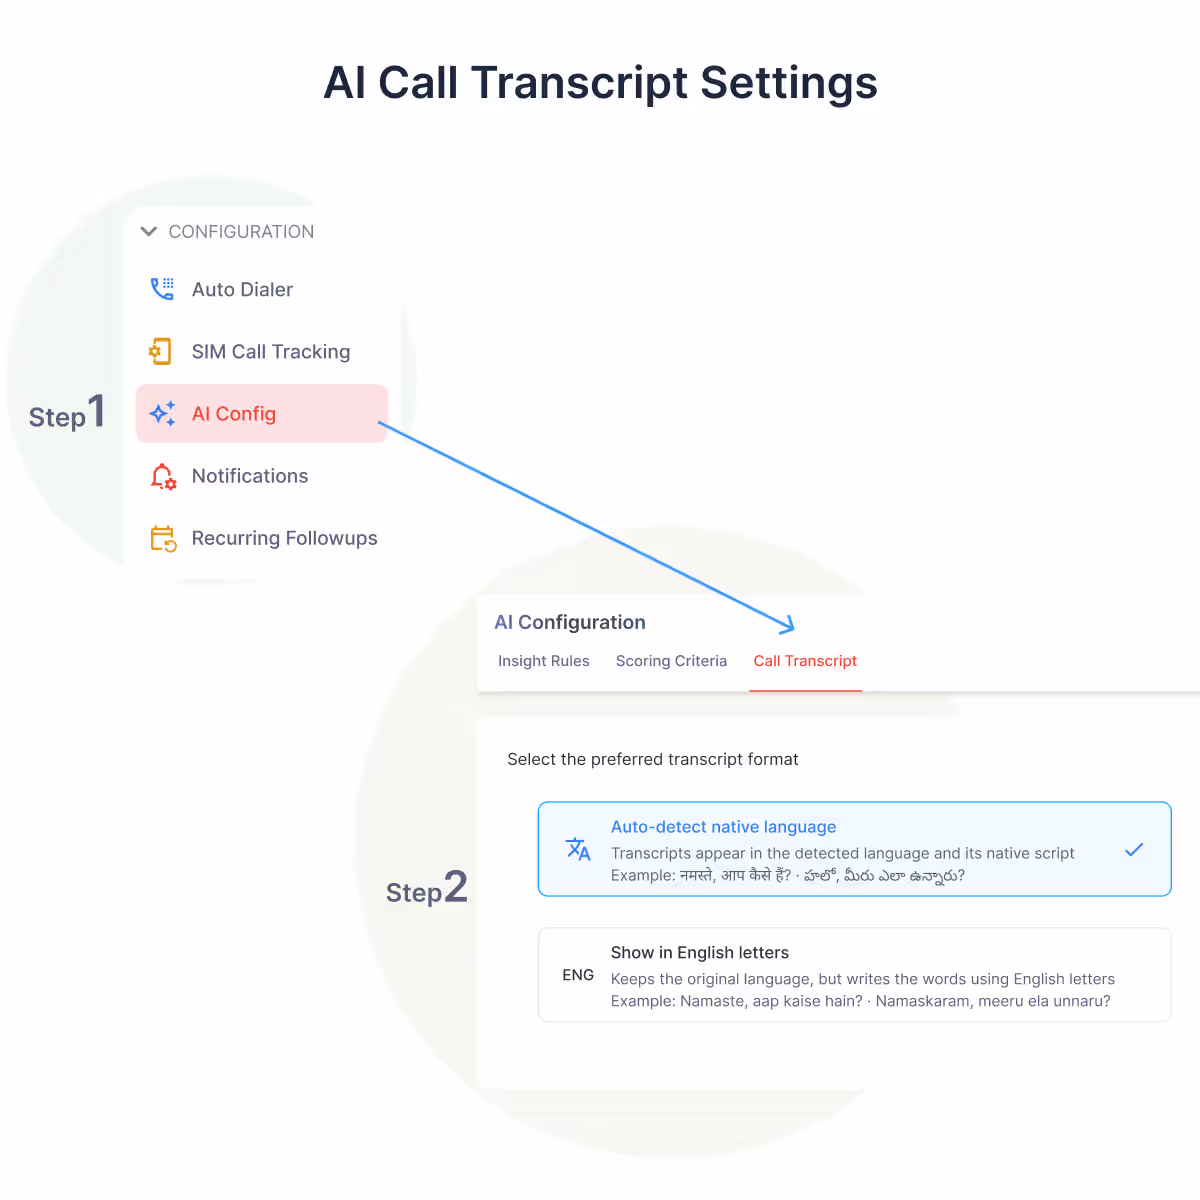
Use consistent transcript formats and language across teams for easier review, analysis, and collaboration.
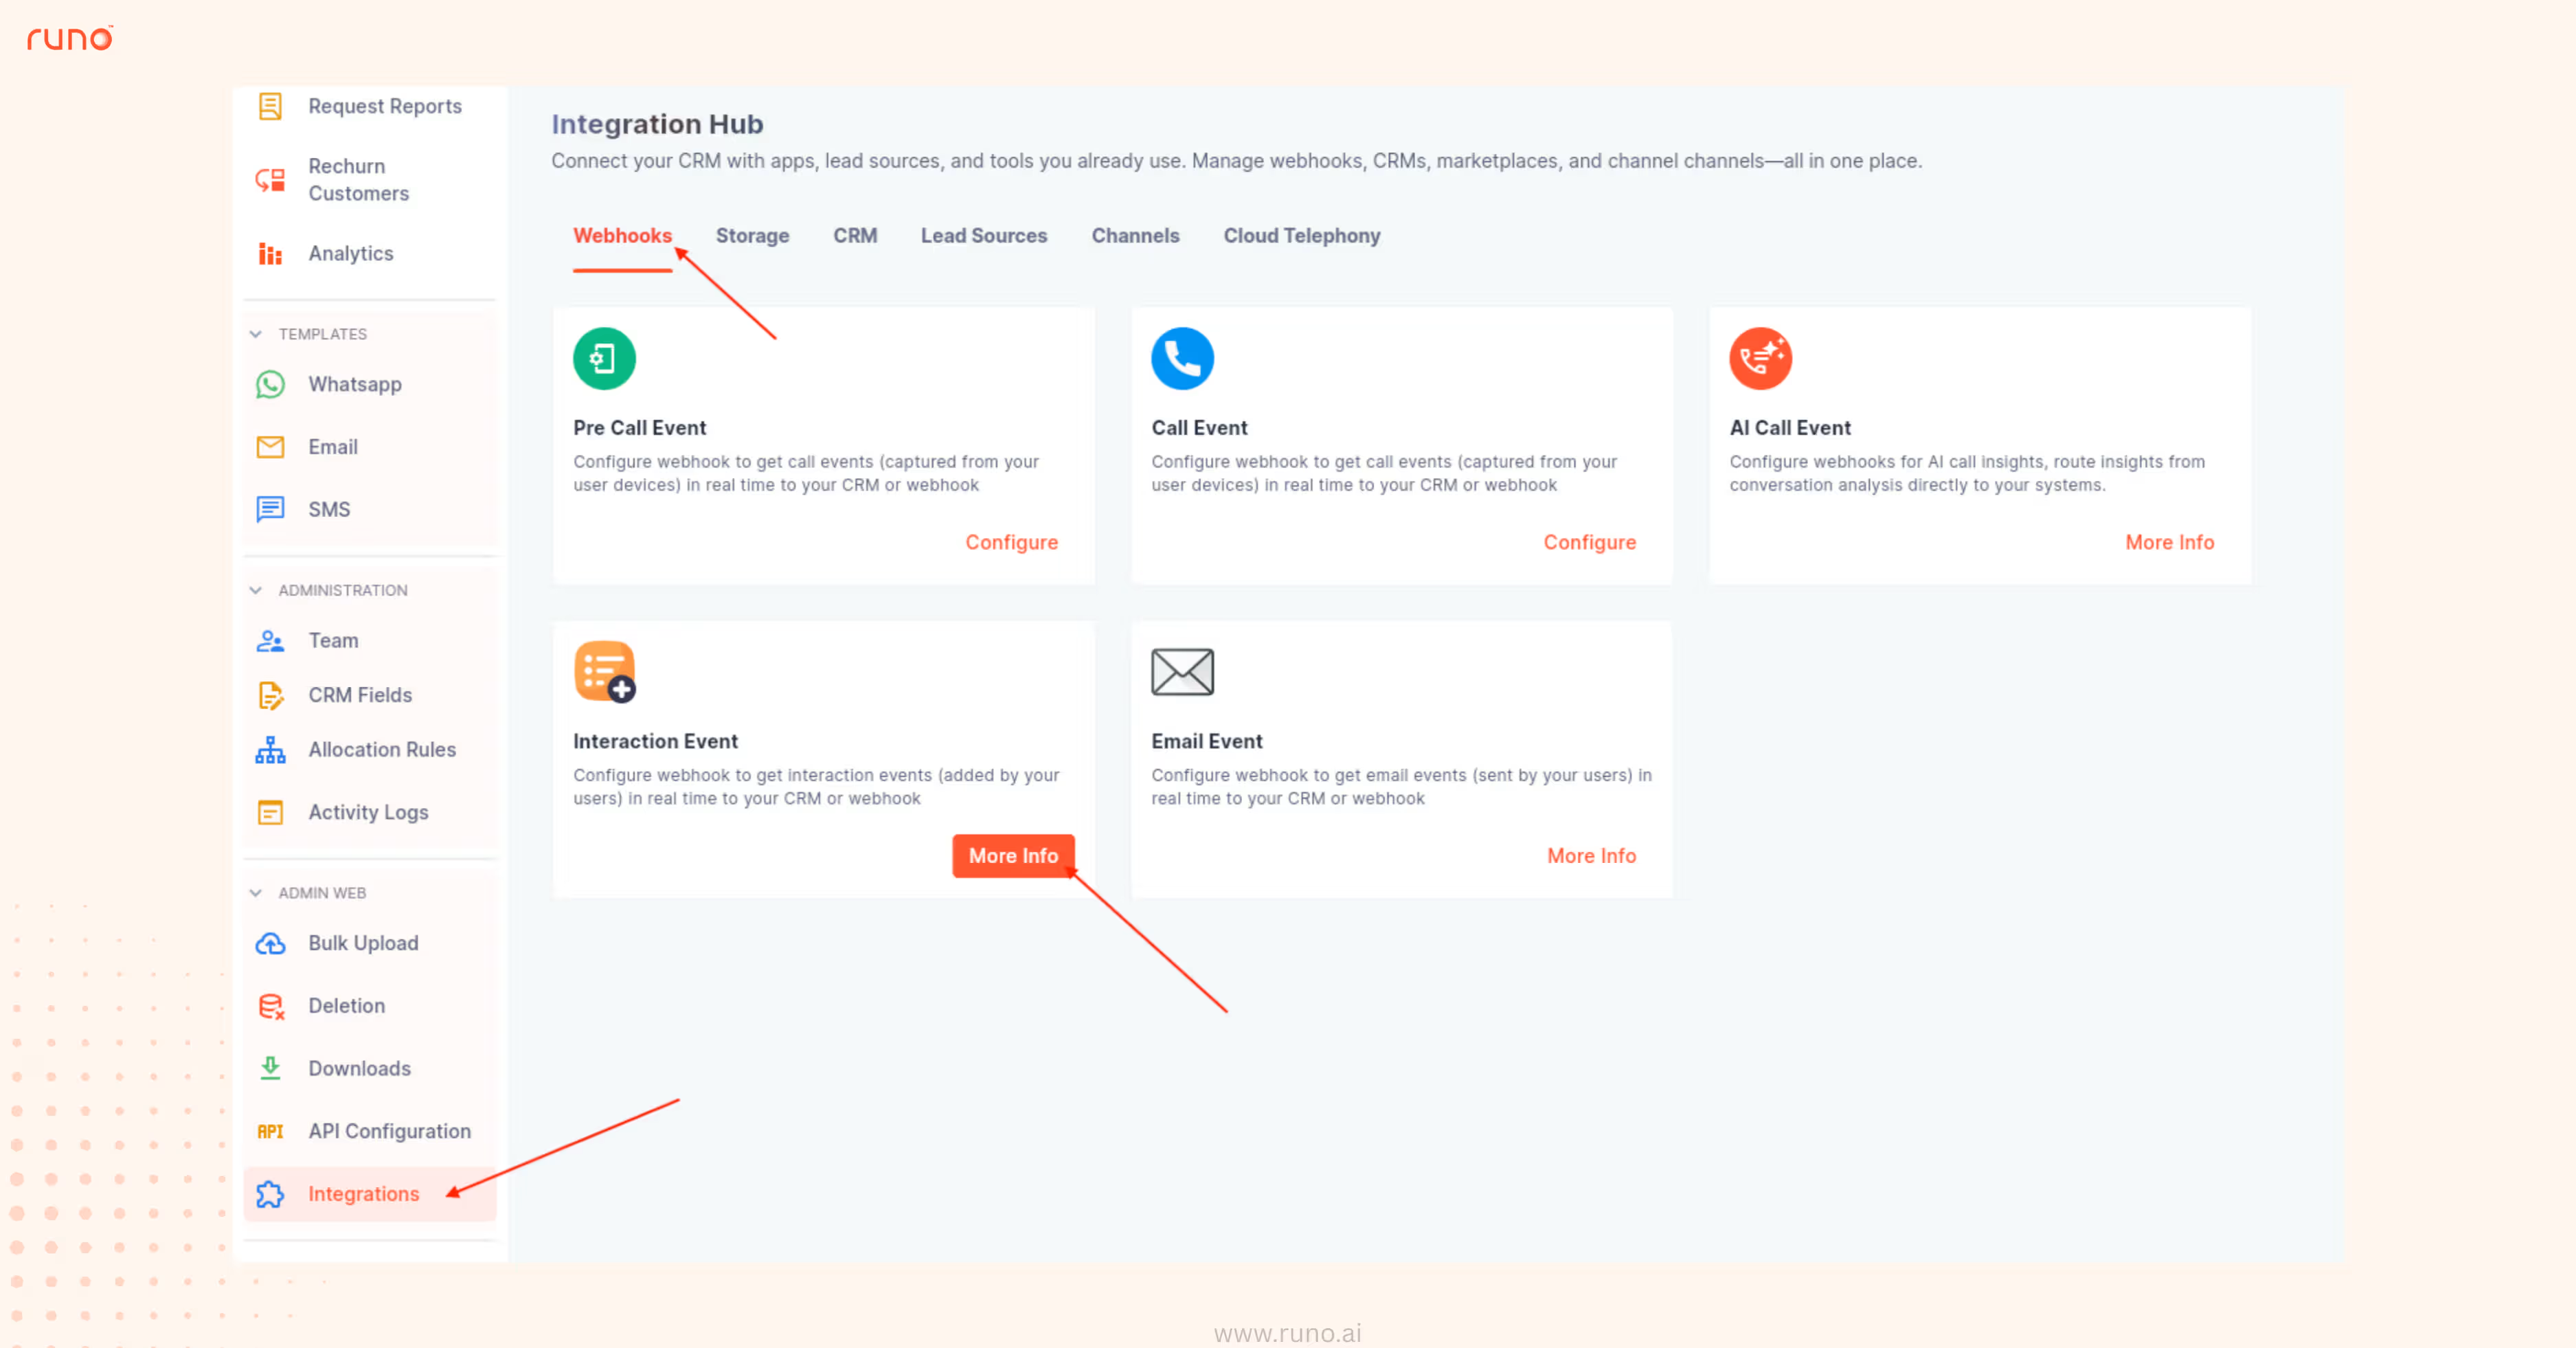
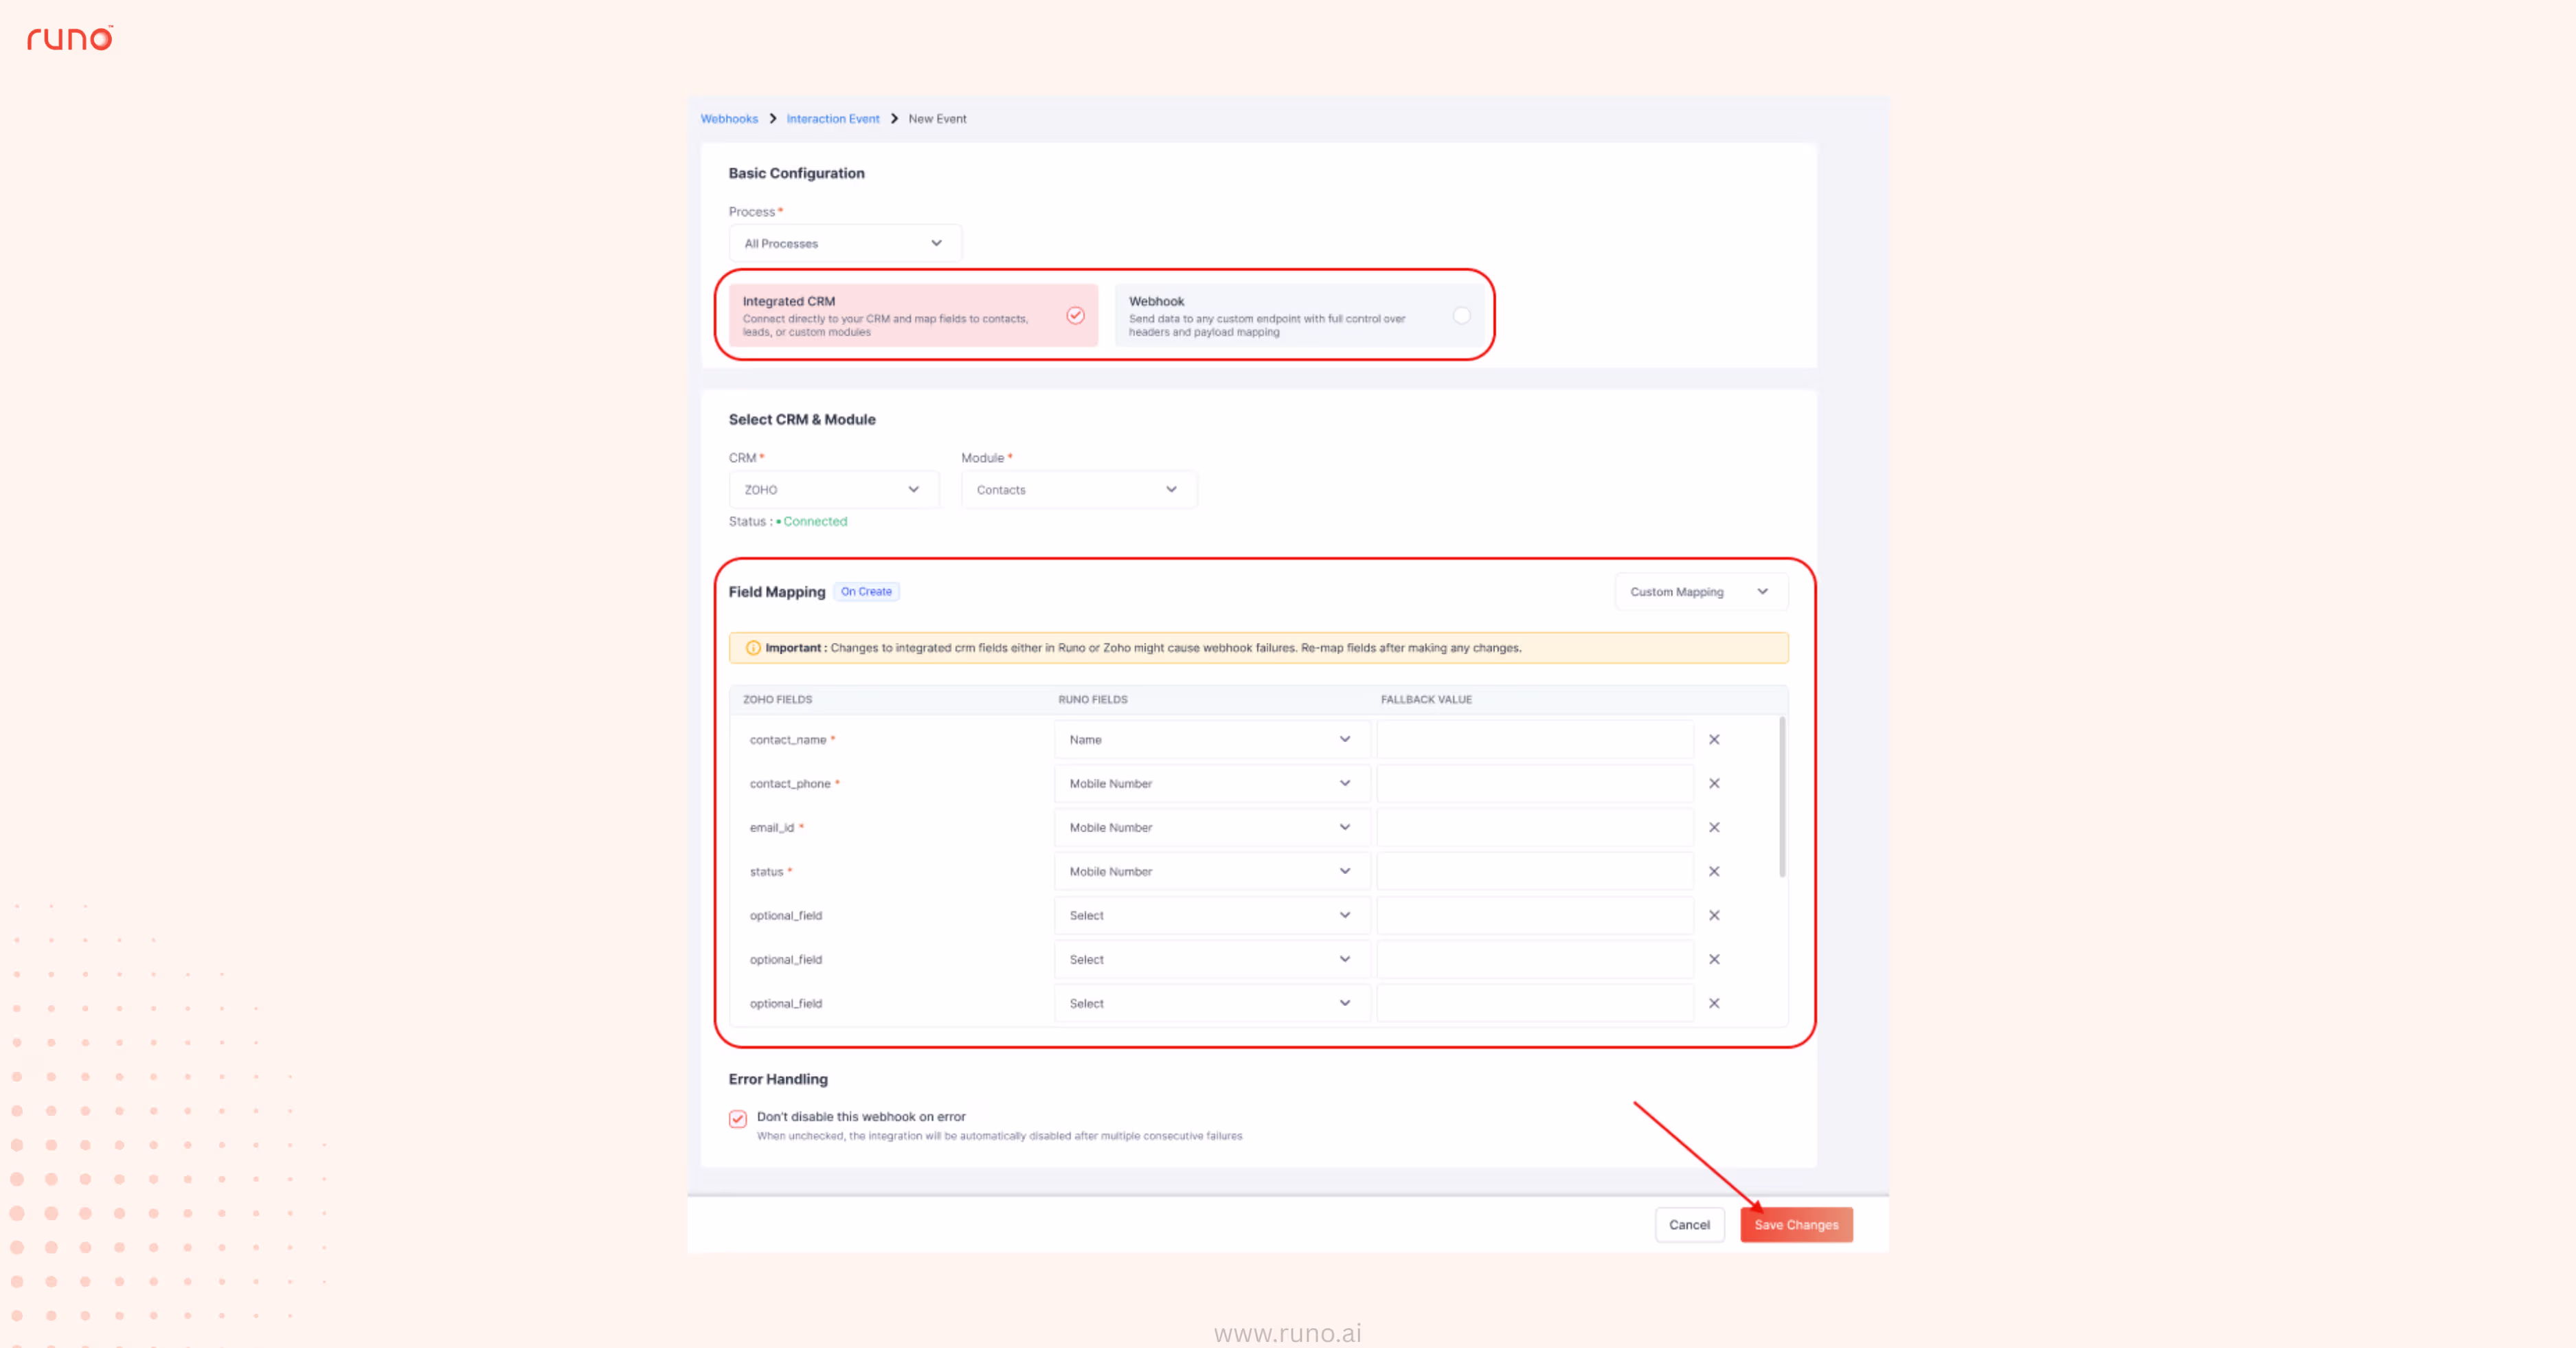
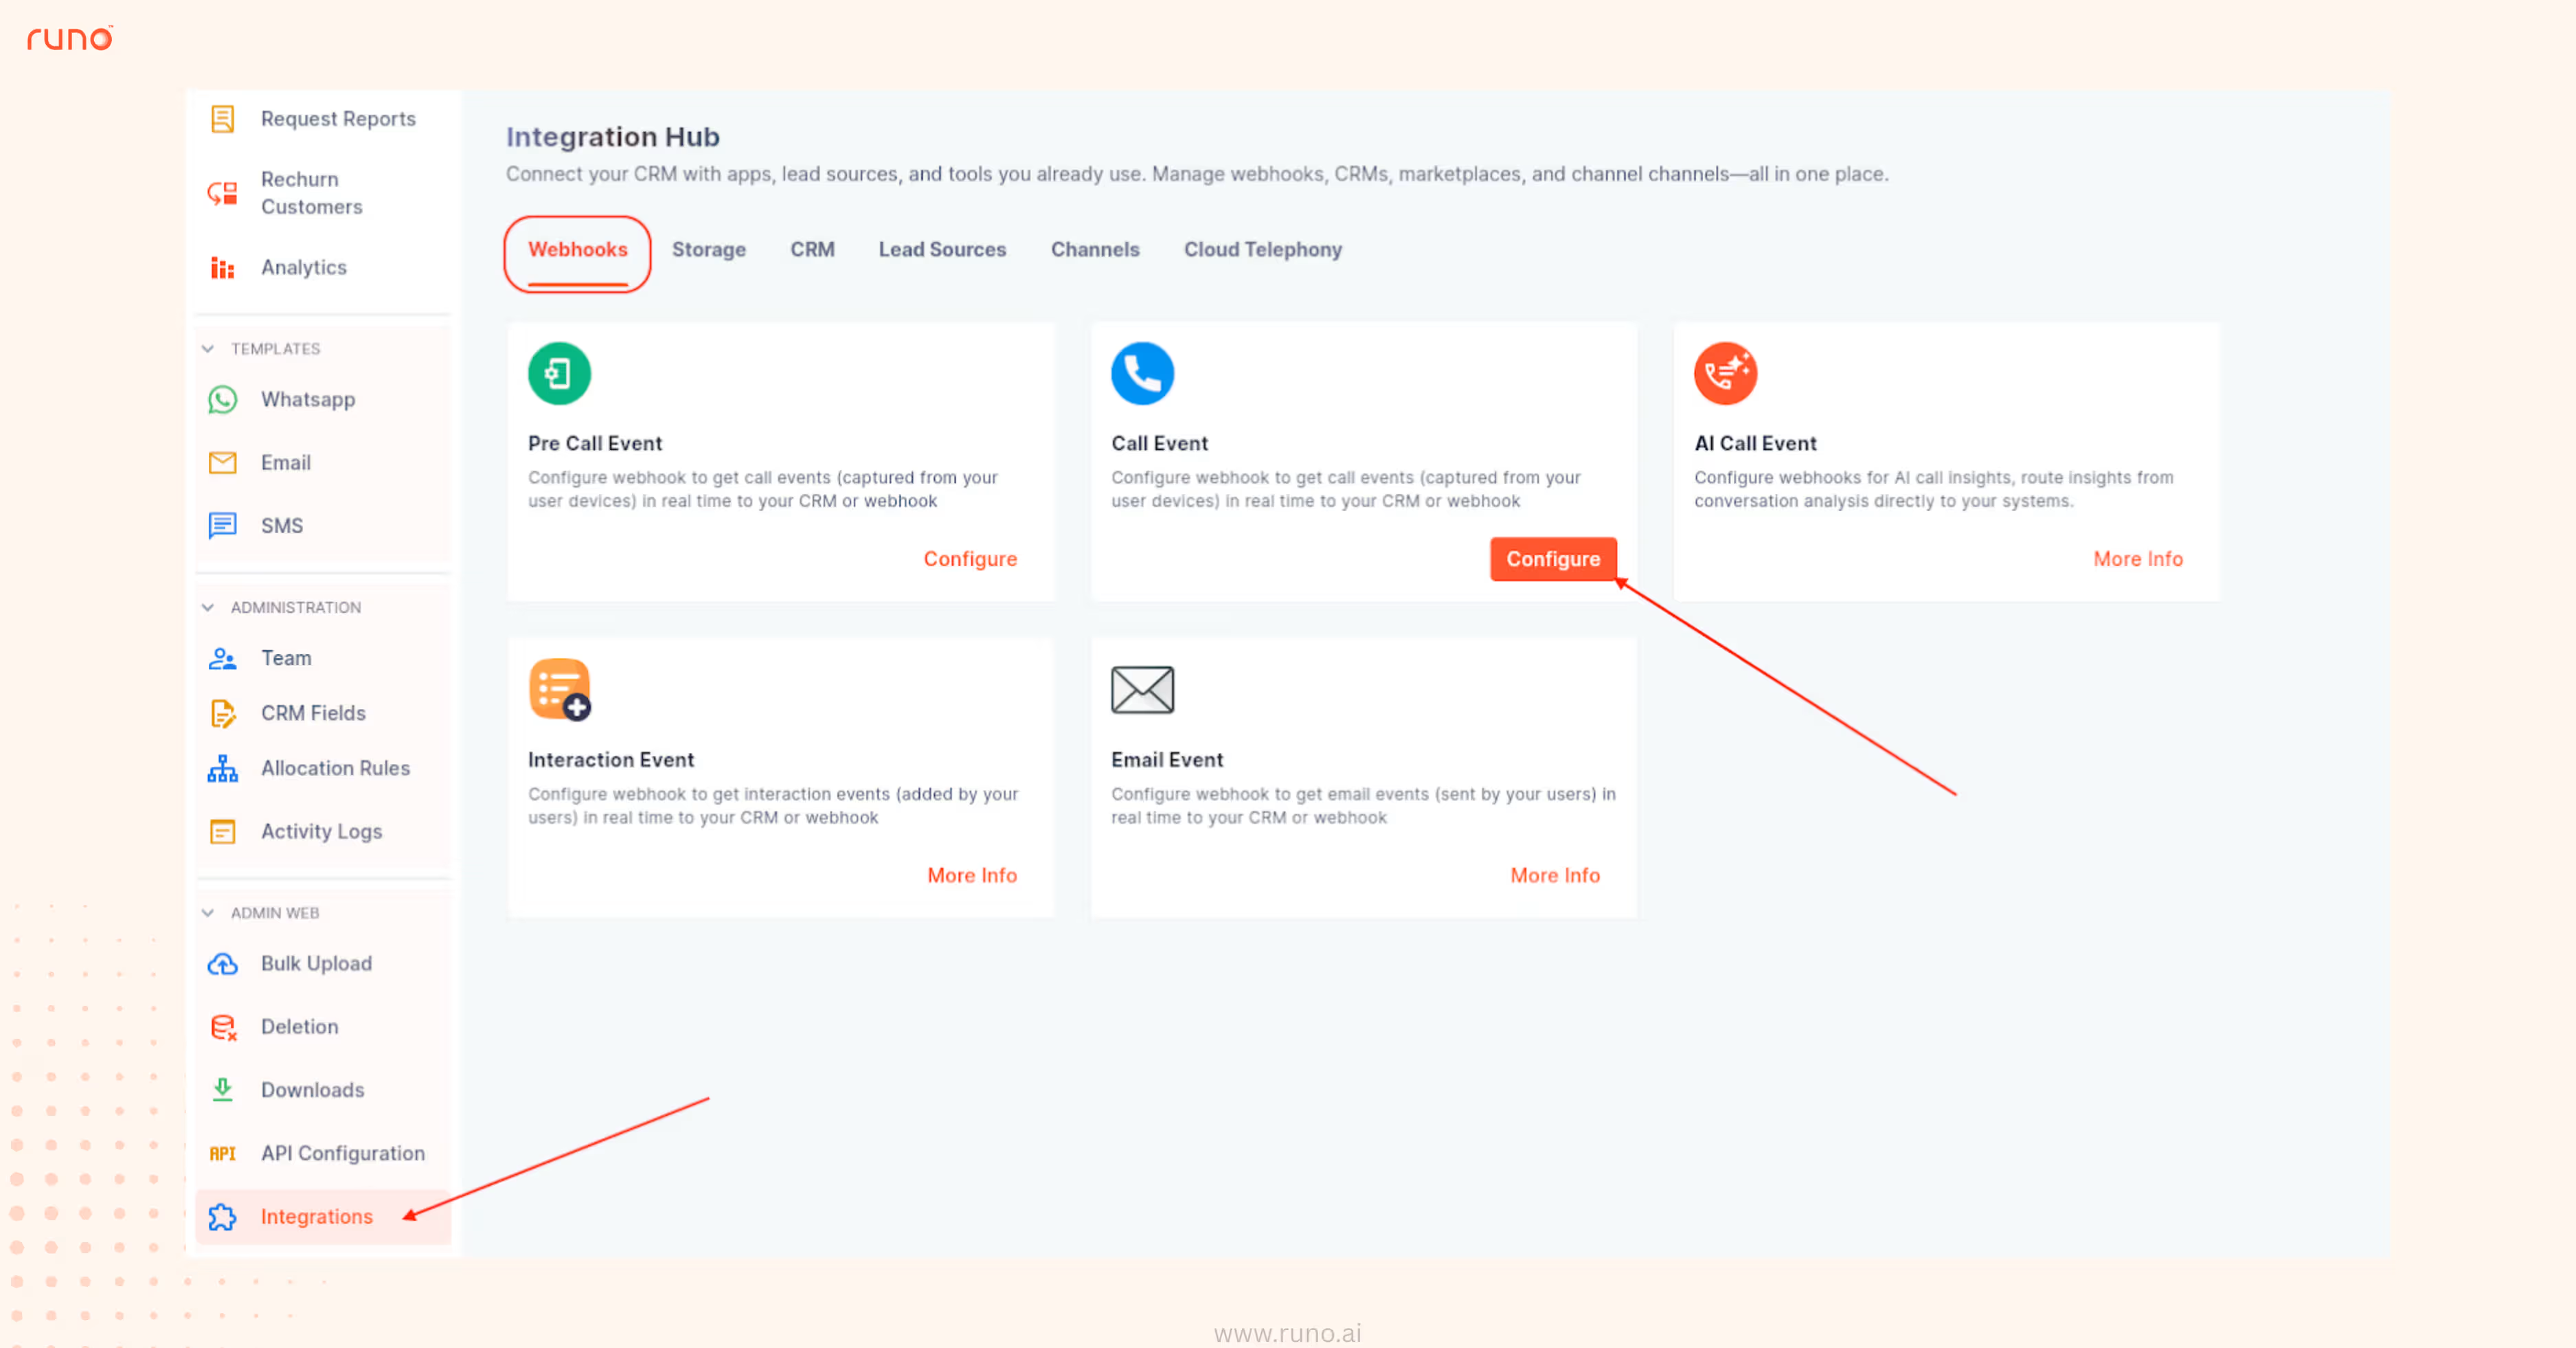
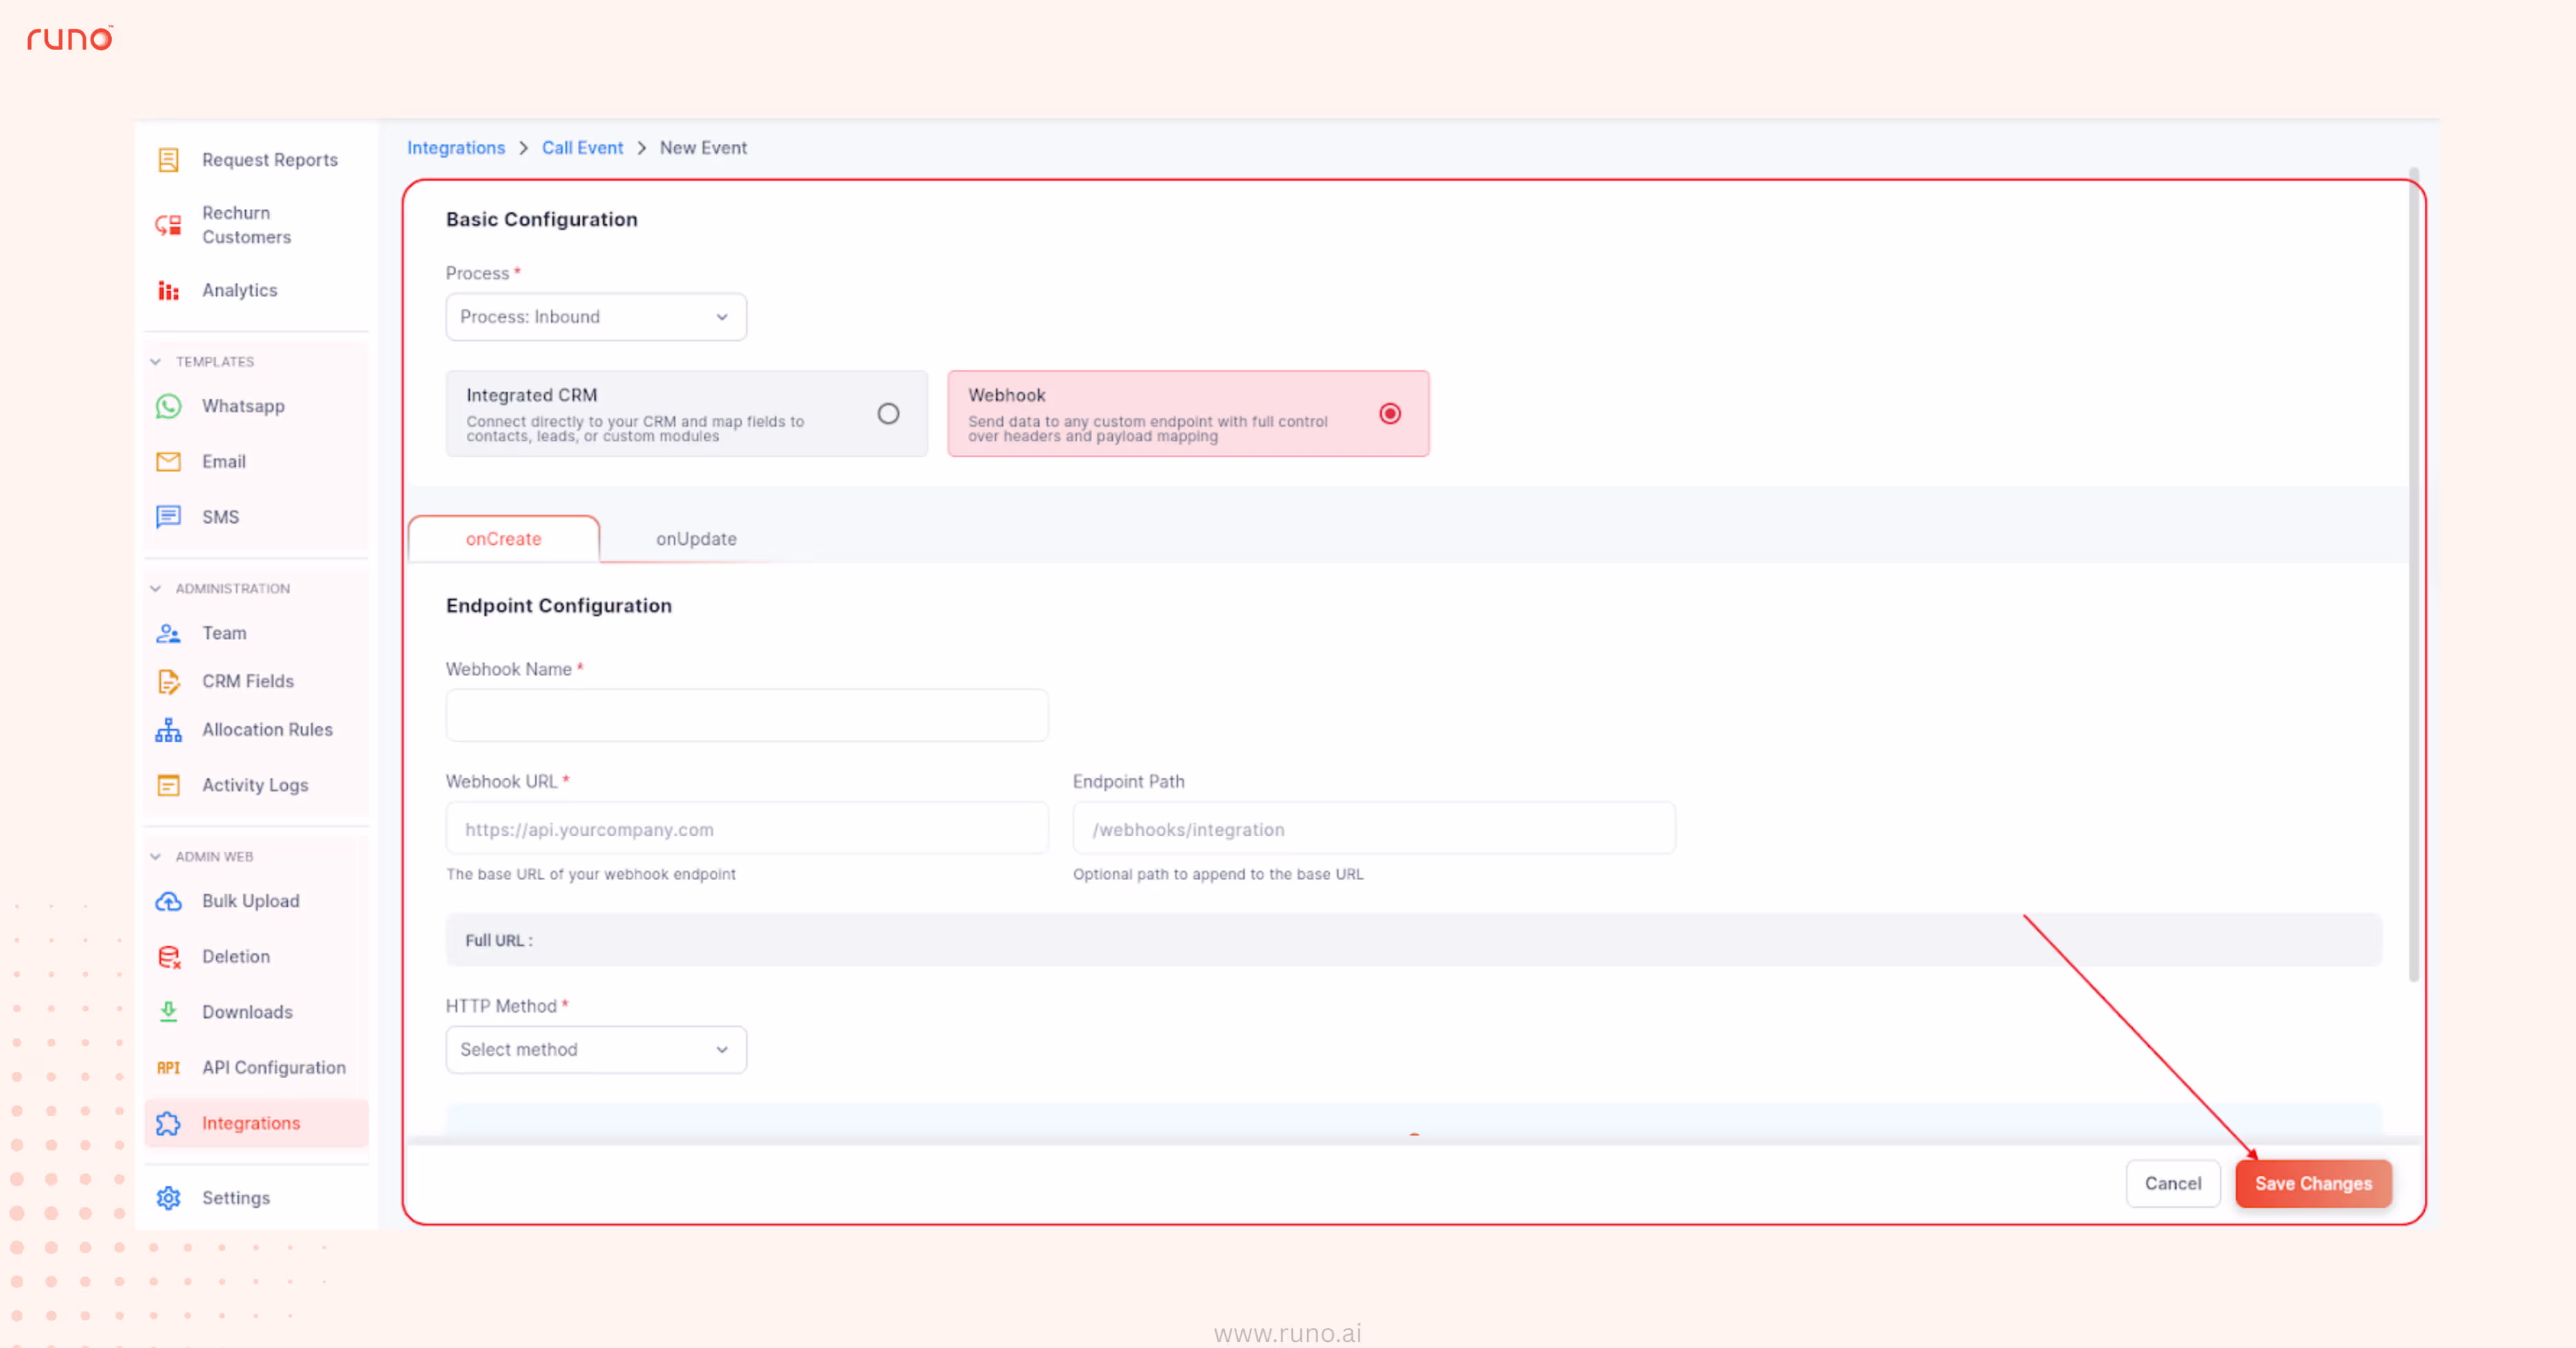
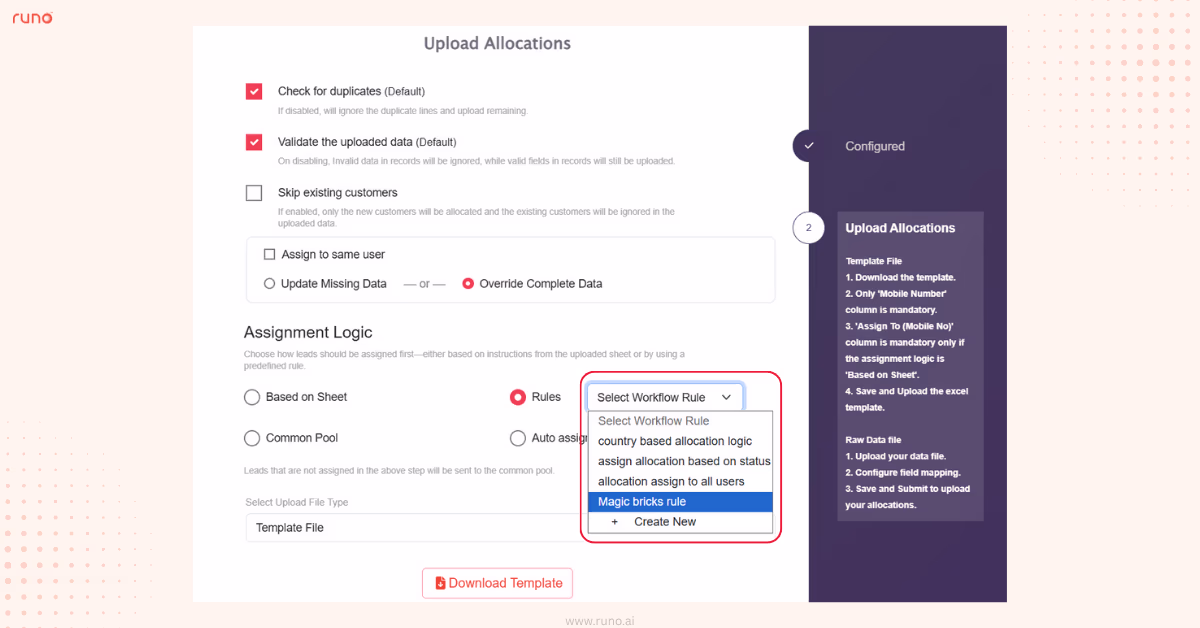
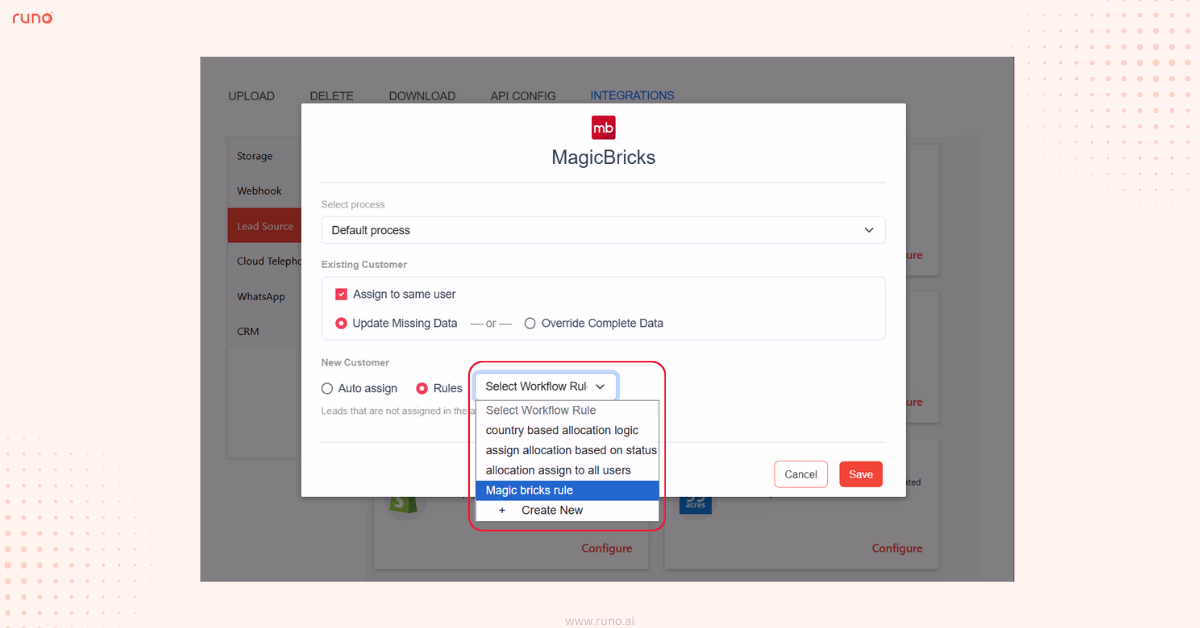
Gain greater control over workflow automation by defining business rules that determine when webhooks should be triggered. Conditional Webhook Triggers help reduce unnecessary webhook traffic, eliminate noisy integrations, and ensure downstream systems act only on relevant events.
What's New
How to Use
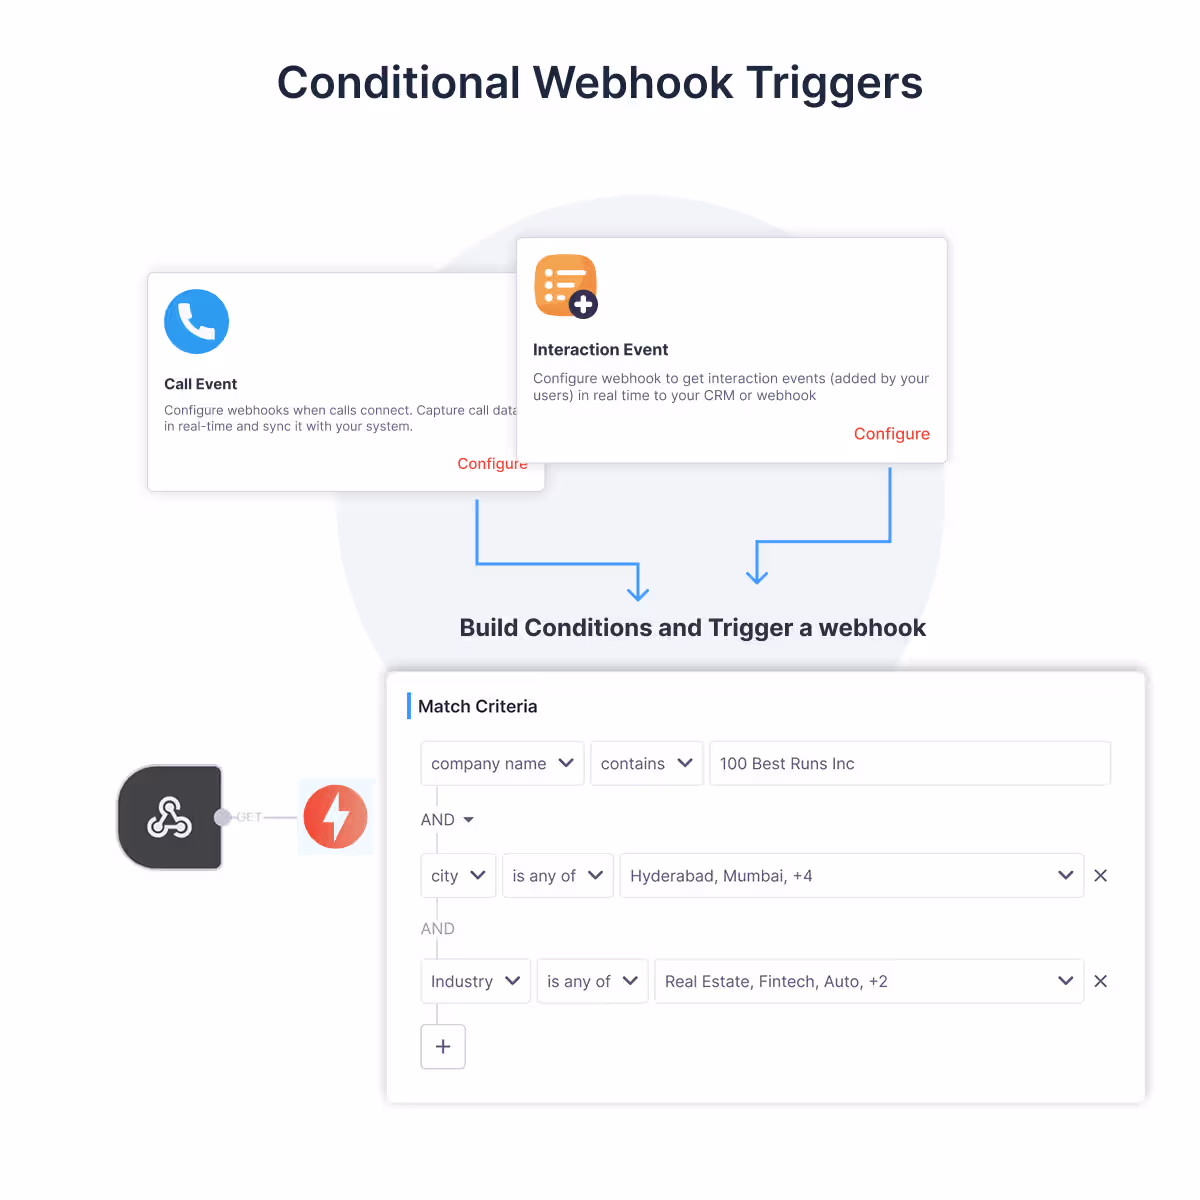
Reduce noise in integrations by triggering webhooks only for events that match your business rules.
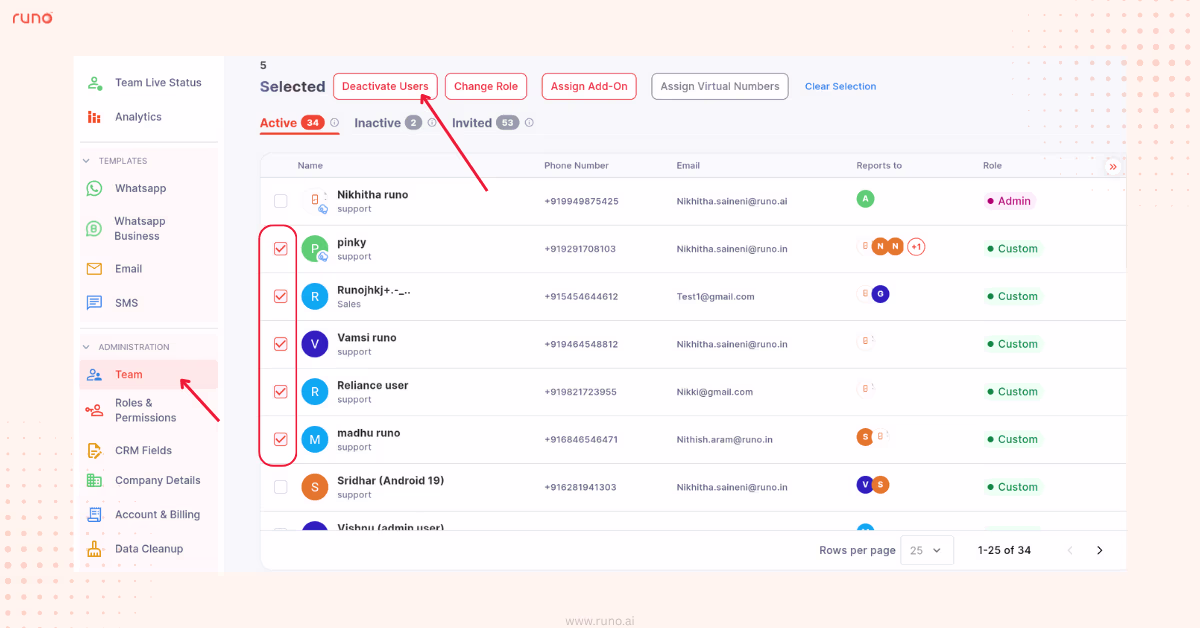
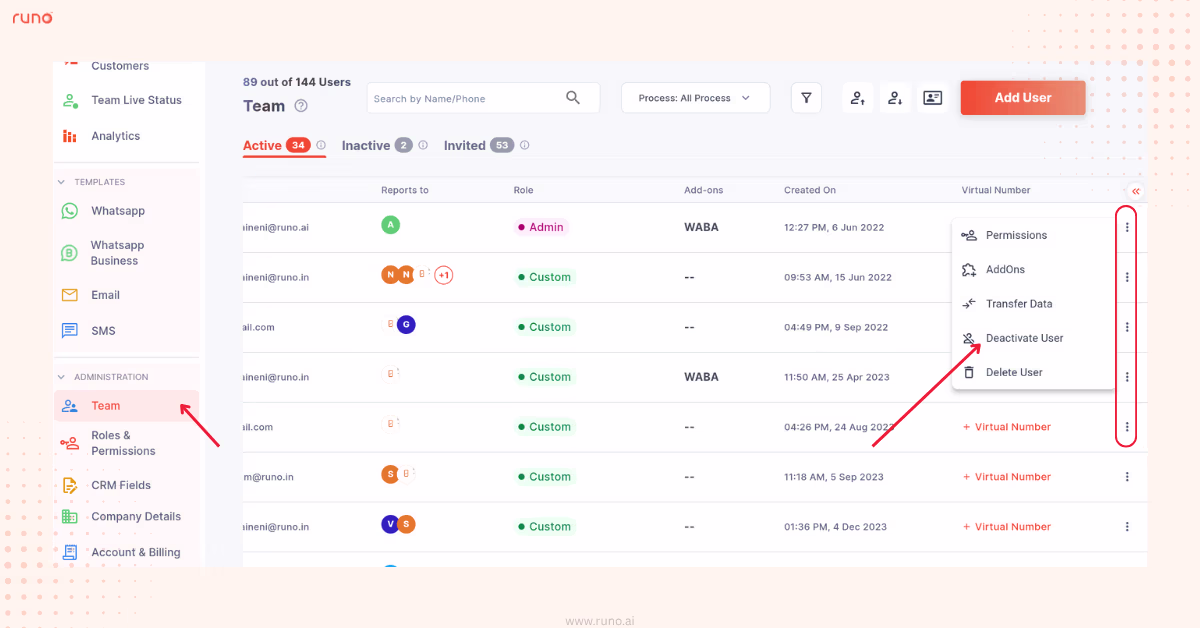
Export and share real-time team activity data with a single click. Managers can now download login status, call tracking, call recording, and app usage information directly from Team Live Status, making operational reporting and compliance tracking significantly easier ..
What's New
How to Use
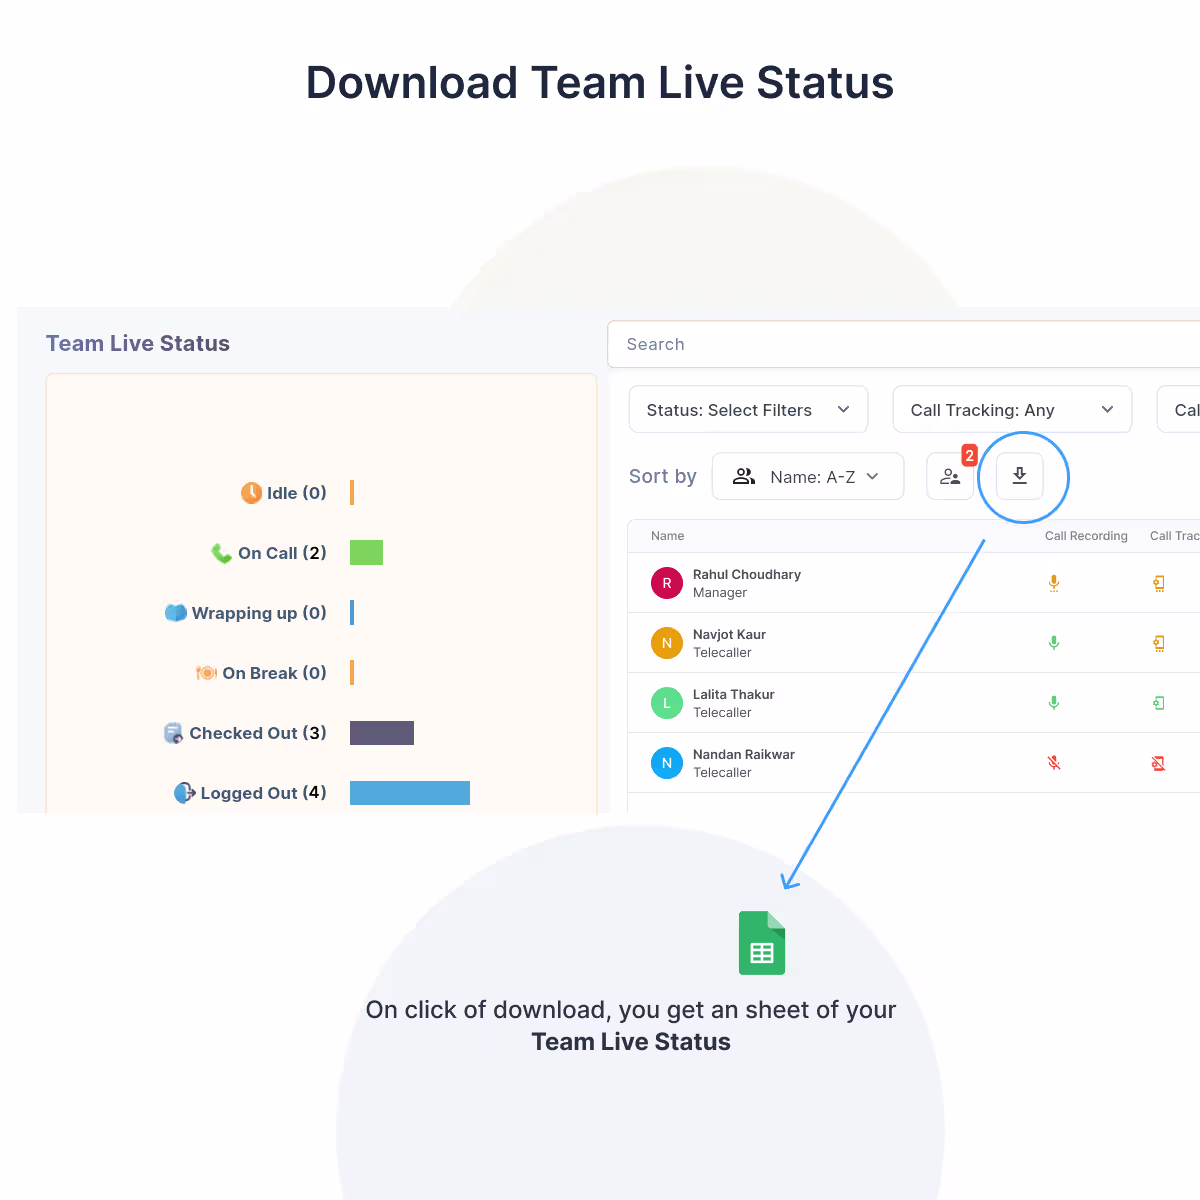
Track team activity more efficiently without relying on screenshots or manual reporting.
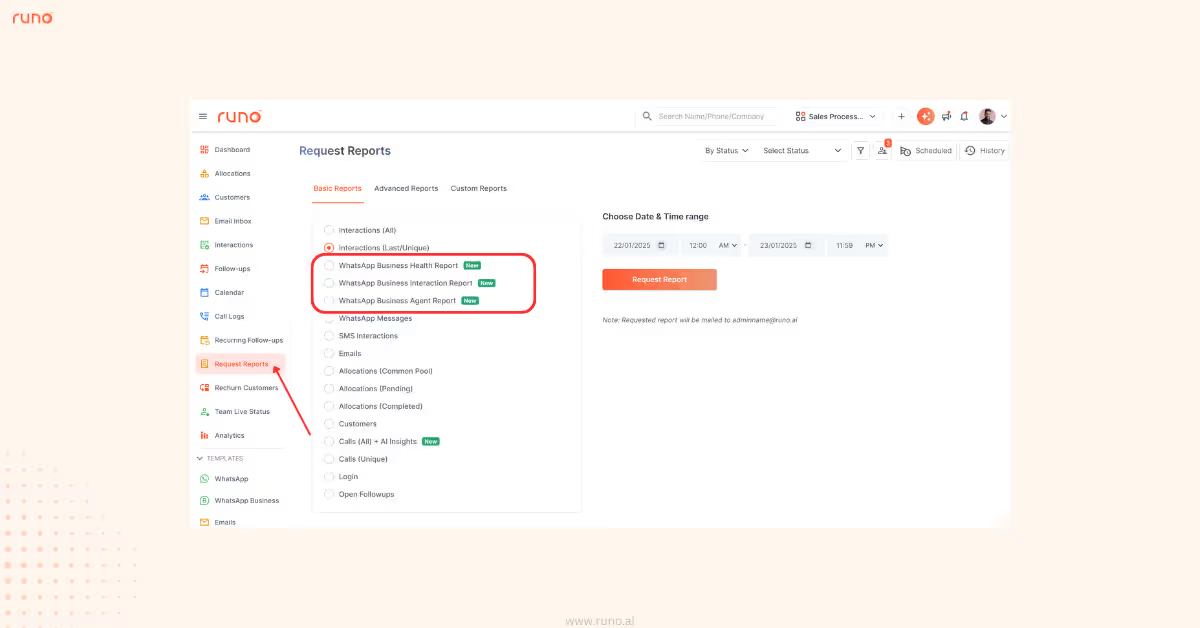
Gain deeper visibility into AI performance and customer interactions with downloadable reports and the ability to drill down into the calls behind your analytics .
What's New
How to Use
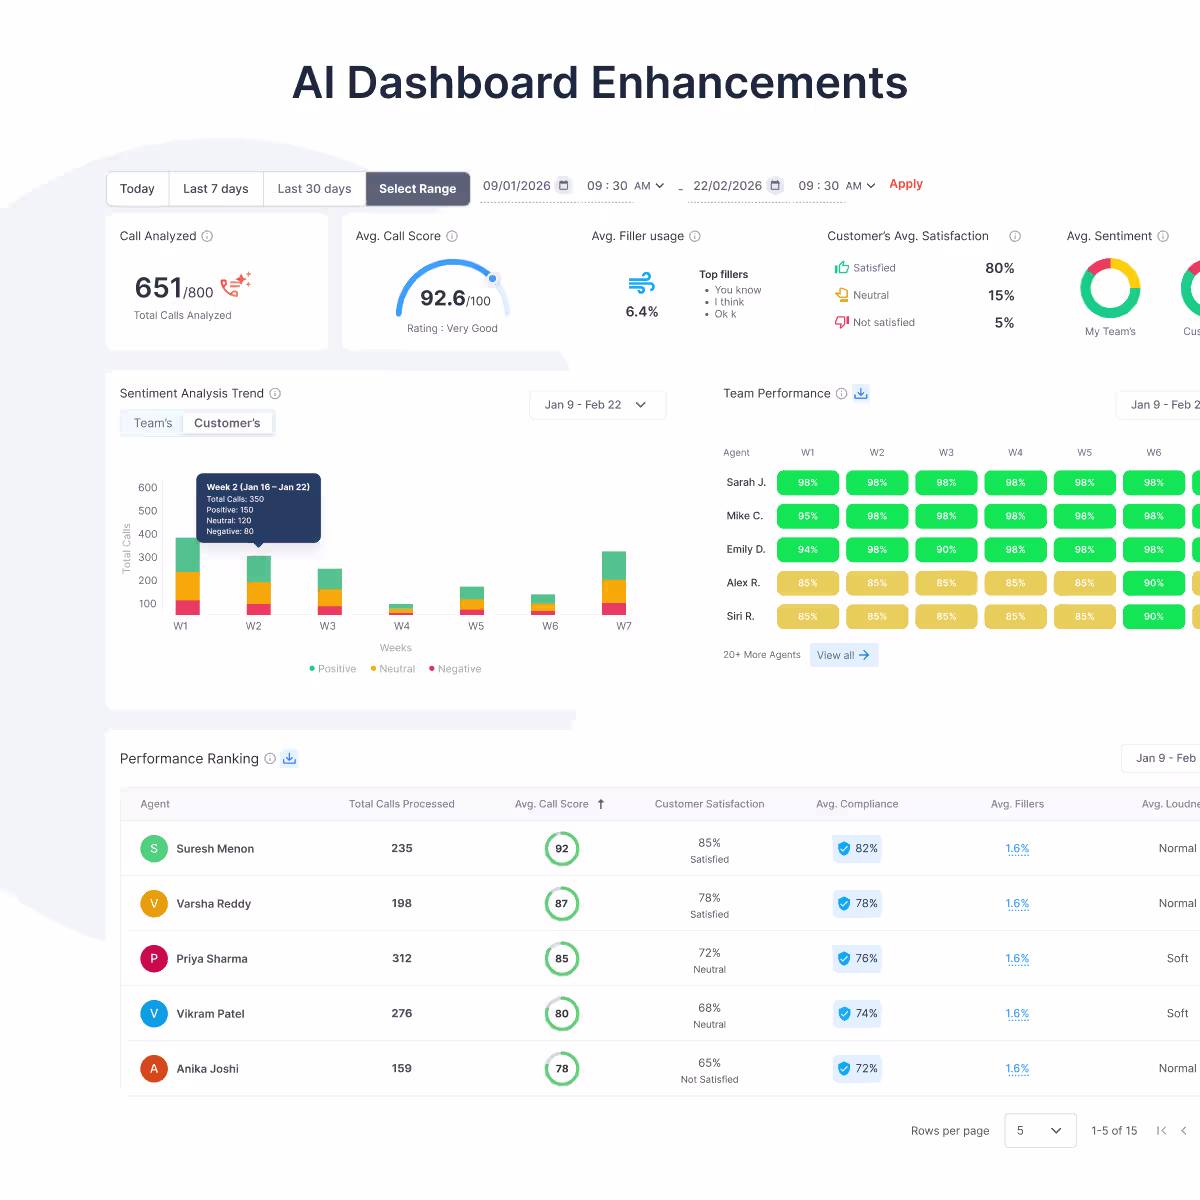
Go beyond summary metrics by exploring the conversations behind your analytics.
Manage large CRM option lists faster and more accurately with enhanced bulk upload capabilities. Admins can now paste data directly from Excel or Google Sheets while automatically detecting duplicates, validating records, and reviewing potential conflicts before saving .
What's New
How to Use
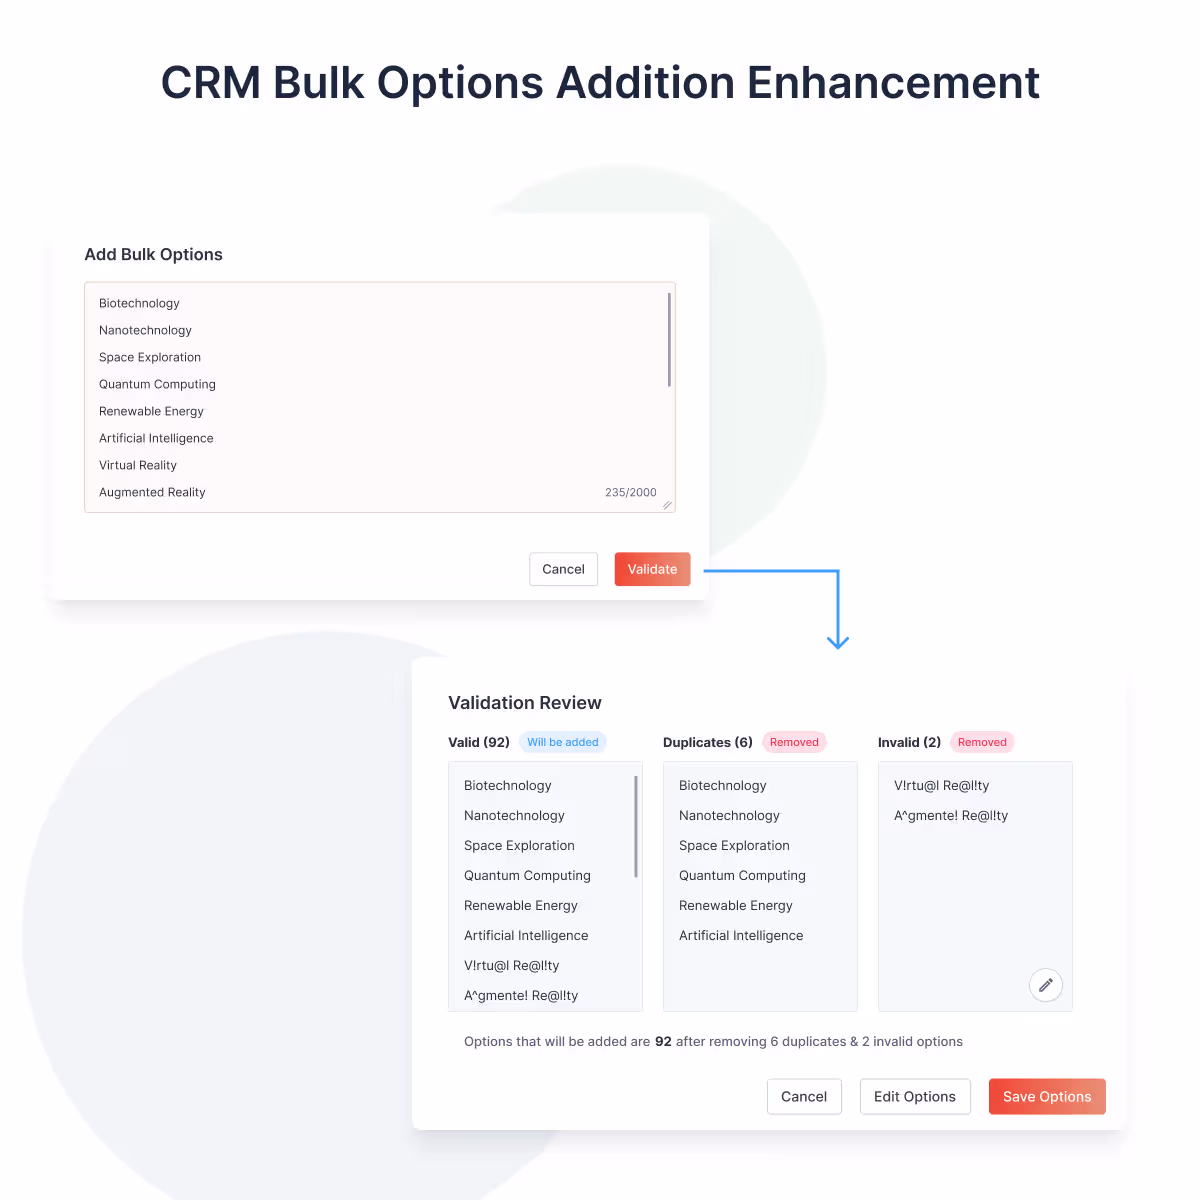
Add large CRM option lists in minutes while catching duplicates and errors before they impact your data.
Adjust column widths across tables and reports for a more comfortable viewing experience.
What's New
How to Use
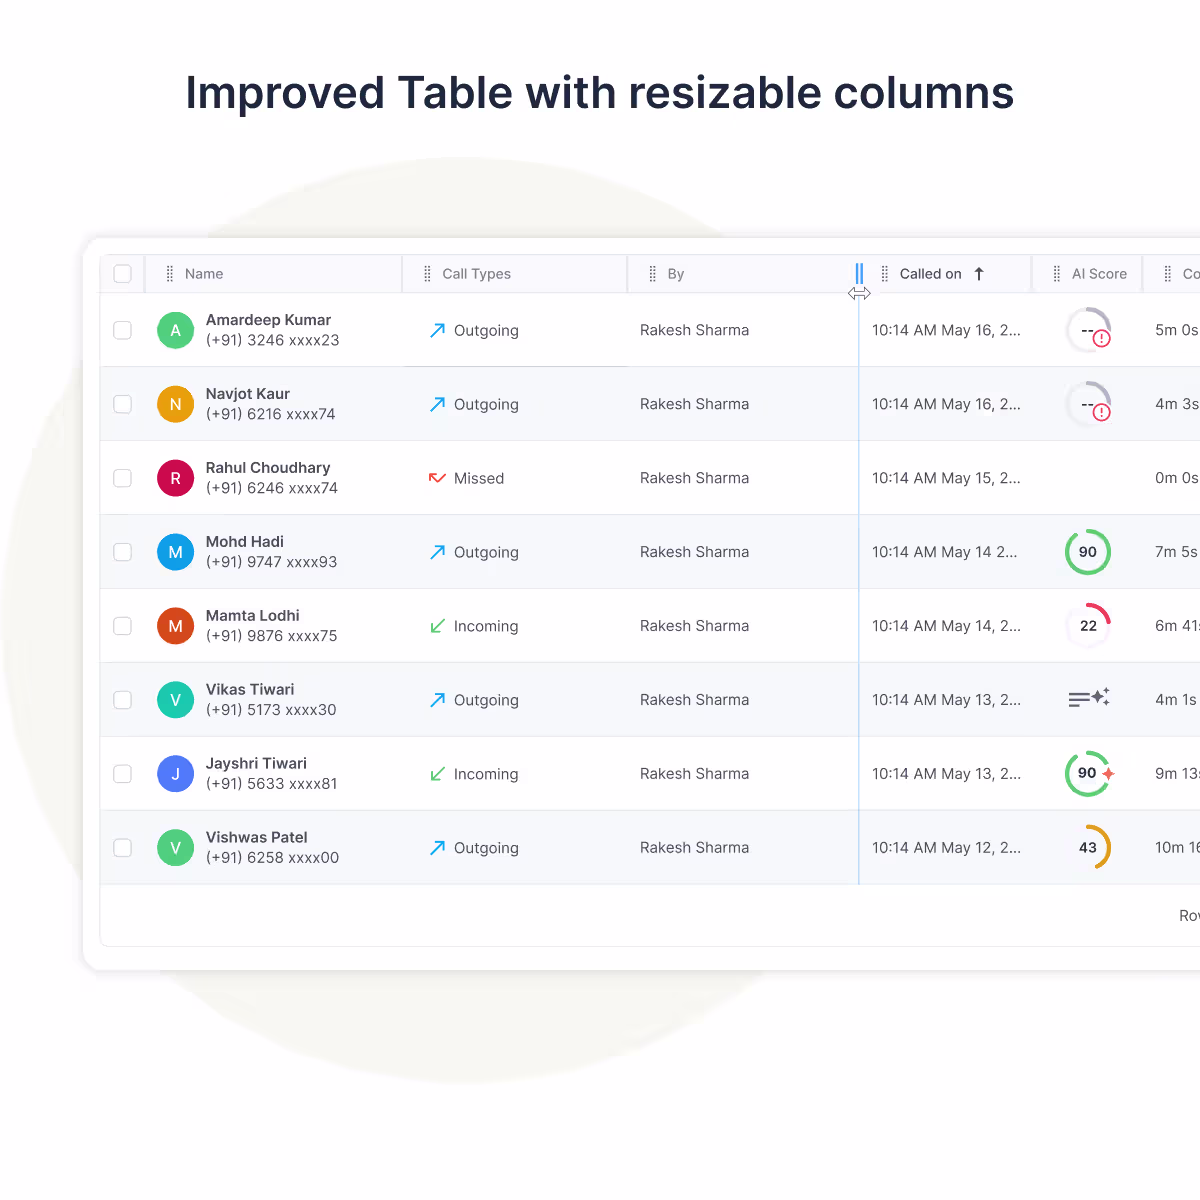
View more of the information that matters by adjusting columns to fit your workflow.
Move beyond call-level analysis with AI-powered customer intelligence. Runo now analyzes recent customer conversations to provide a consolidated view of conversion likelihood, customer health, sentiment, scores, and recommended next actions.
What's New
How to Use
Use these insights to identify high-priority customers, anticipate conversion opportunities, and take the right next action.
*Enjoy this feature at no cost until September 30, 2026
Improve the relevance of AI-generated insights by analyzing only the conversations that meet specific CRM criteria.
What's New
How to Use
Standardize AI transcript outputs across your organization by setting a default transcript script at the account level. Admins can also choose to automatically convert all transcripts to English for greater consistency and easier analysis.
What's New
How to Use
Use consistent transcript formats and language across teams for easier review, analysis, and collaboration.
Gain greater control over workflow automation by defining business rules that determine when webhooks should be triggered. Conditional Webhook Triggers help reduce unnecessary webhook traffic, eliminate noisy integrations, and ensure downstream systems act only on relevant events.
What's New
How to Use
Reduce noise in integrations by triggering webhooks only for events that match your business rules.
Export and share real-time team activity data with a single click. Managers can now download login status, call tracking, call recording, and app usage information directly from Team Live Status, making operational reporting and compliance tracking significantly easier ..
What's New
How to Use
Track team activity more efficiently without relying on screenshots or manual reporting.
Gain deeper visibility into AI performance and customer interactions with downloadable reports and the ability to drill down into the calls behind your analytics .
What's New
How to Use
Go beyond summary metrics by exploring the conversations behind your analytics.
Manage large CRM option lists faster and more accurately with enhanced bulk upload capabilities. Admins can now paste data directly from Excel or Google Sheets while automatically detecting duplicates, validating records, and reviewing potential conflicts before saving ..
What's New
How to Use
Add large CRM option lists in minutes while catching duplicates and errors before they impact your data.
Adjust column widths across tables and reports for a more comfortable viewing experience.
What's New
How to Use
View more of the information that matters by adjusting columns to fit your workflow.
Introducing Runo v8.1 - bringing seamless cross-process lead transfers, powerful new APIs for faster data access and automation, customizable AI insights, centralized admin controls, enhanced usage visibility, and a host of improvements to streamline your workflows end-to-end.
Managing leads across multiple processes often meant relying on manual workarounds.
With v8.1, you can now seamlessly transfer leads between processes without losing any critical context or history.
What’s new:
How to use:
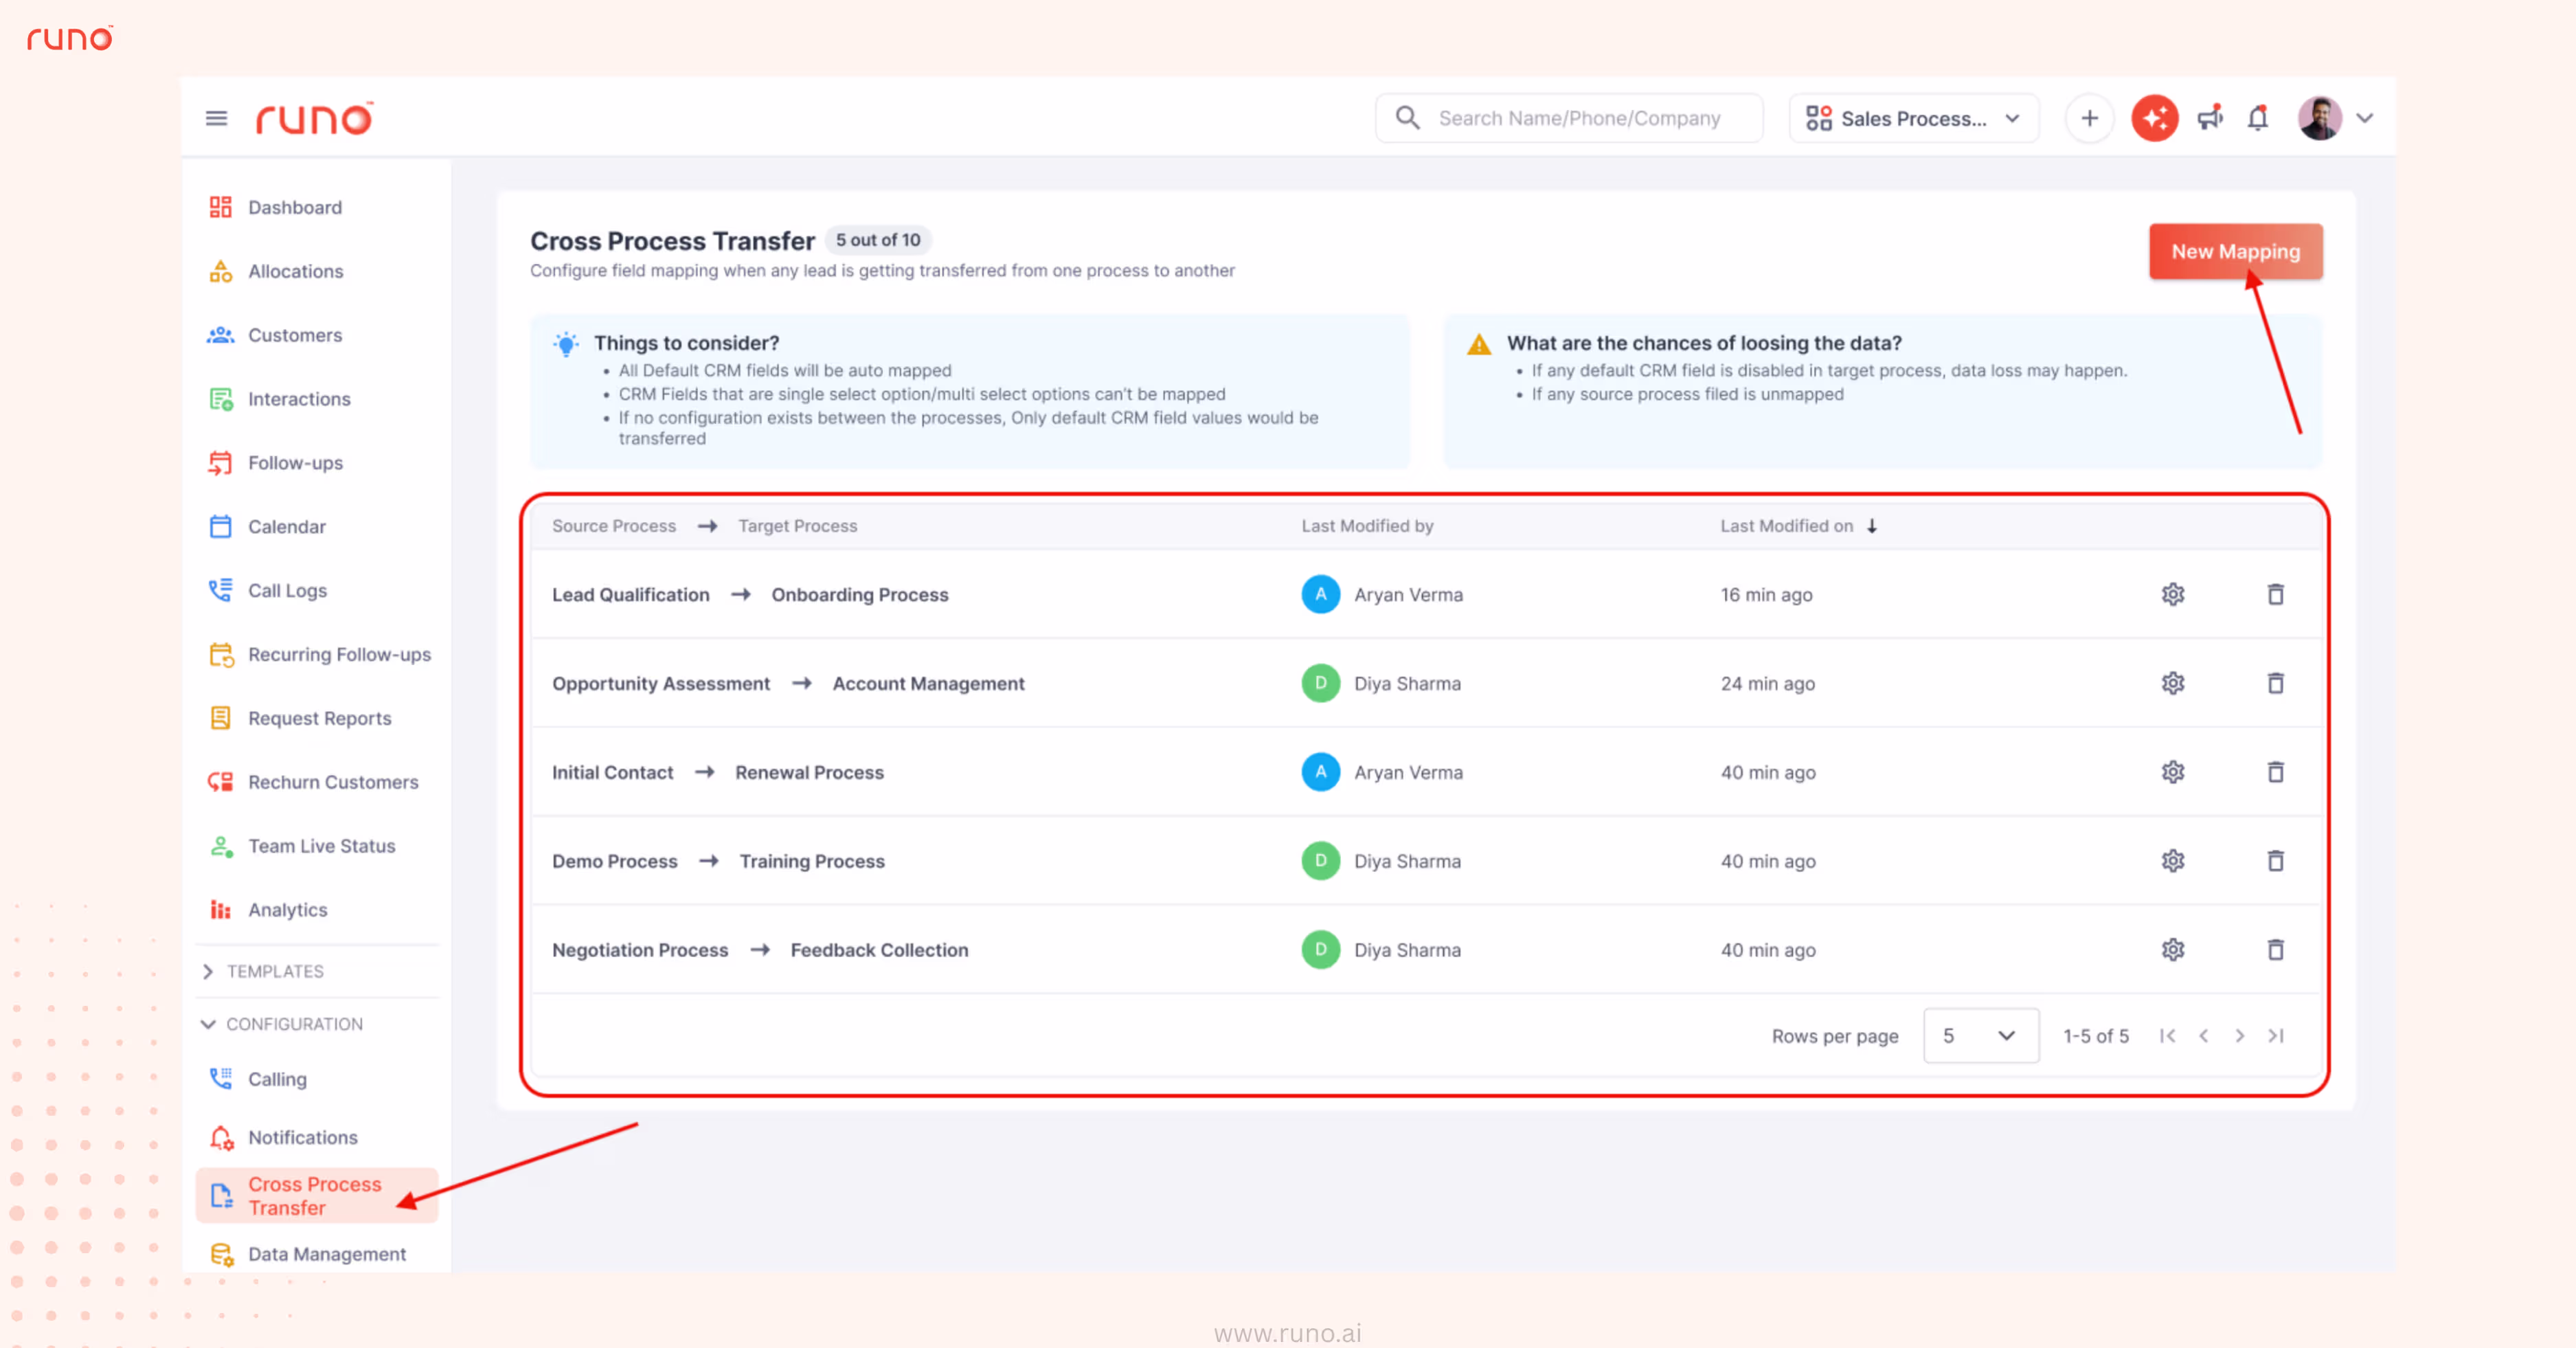
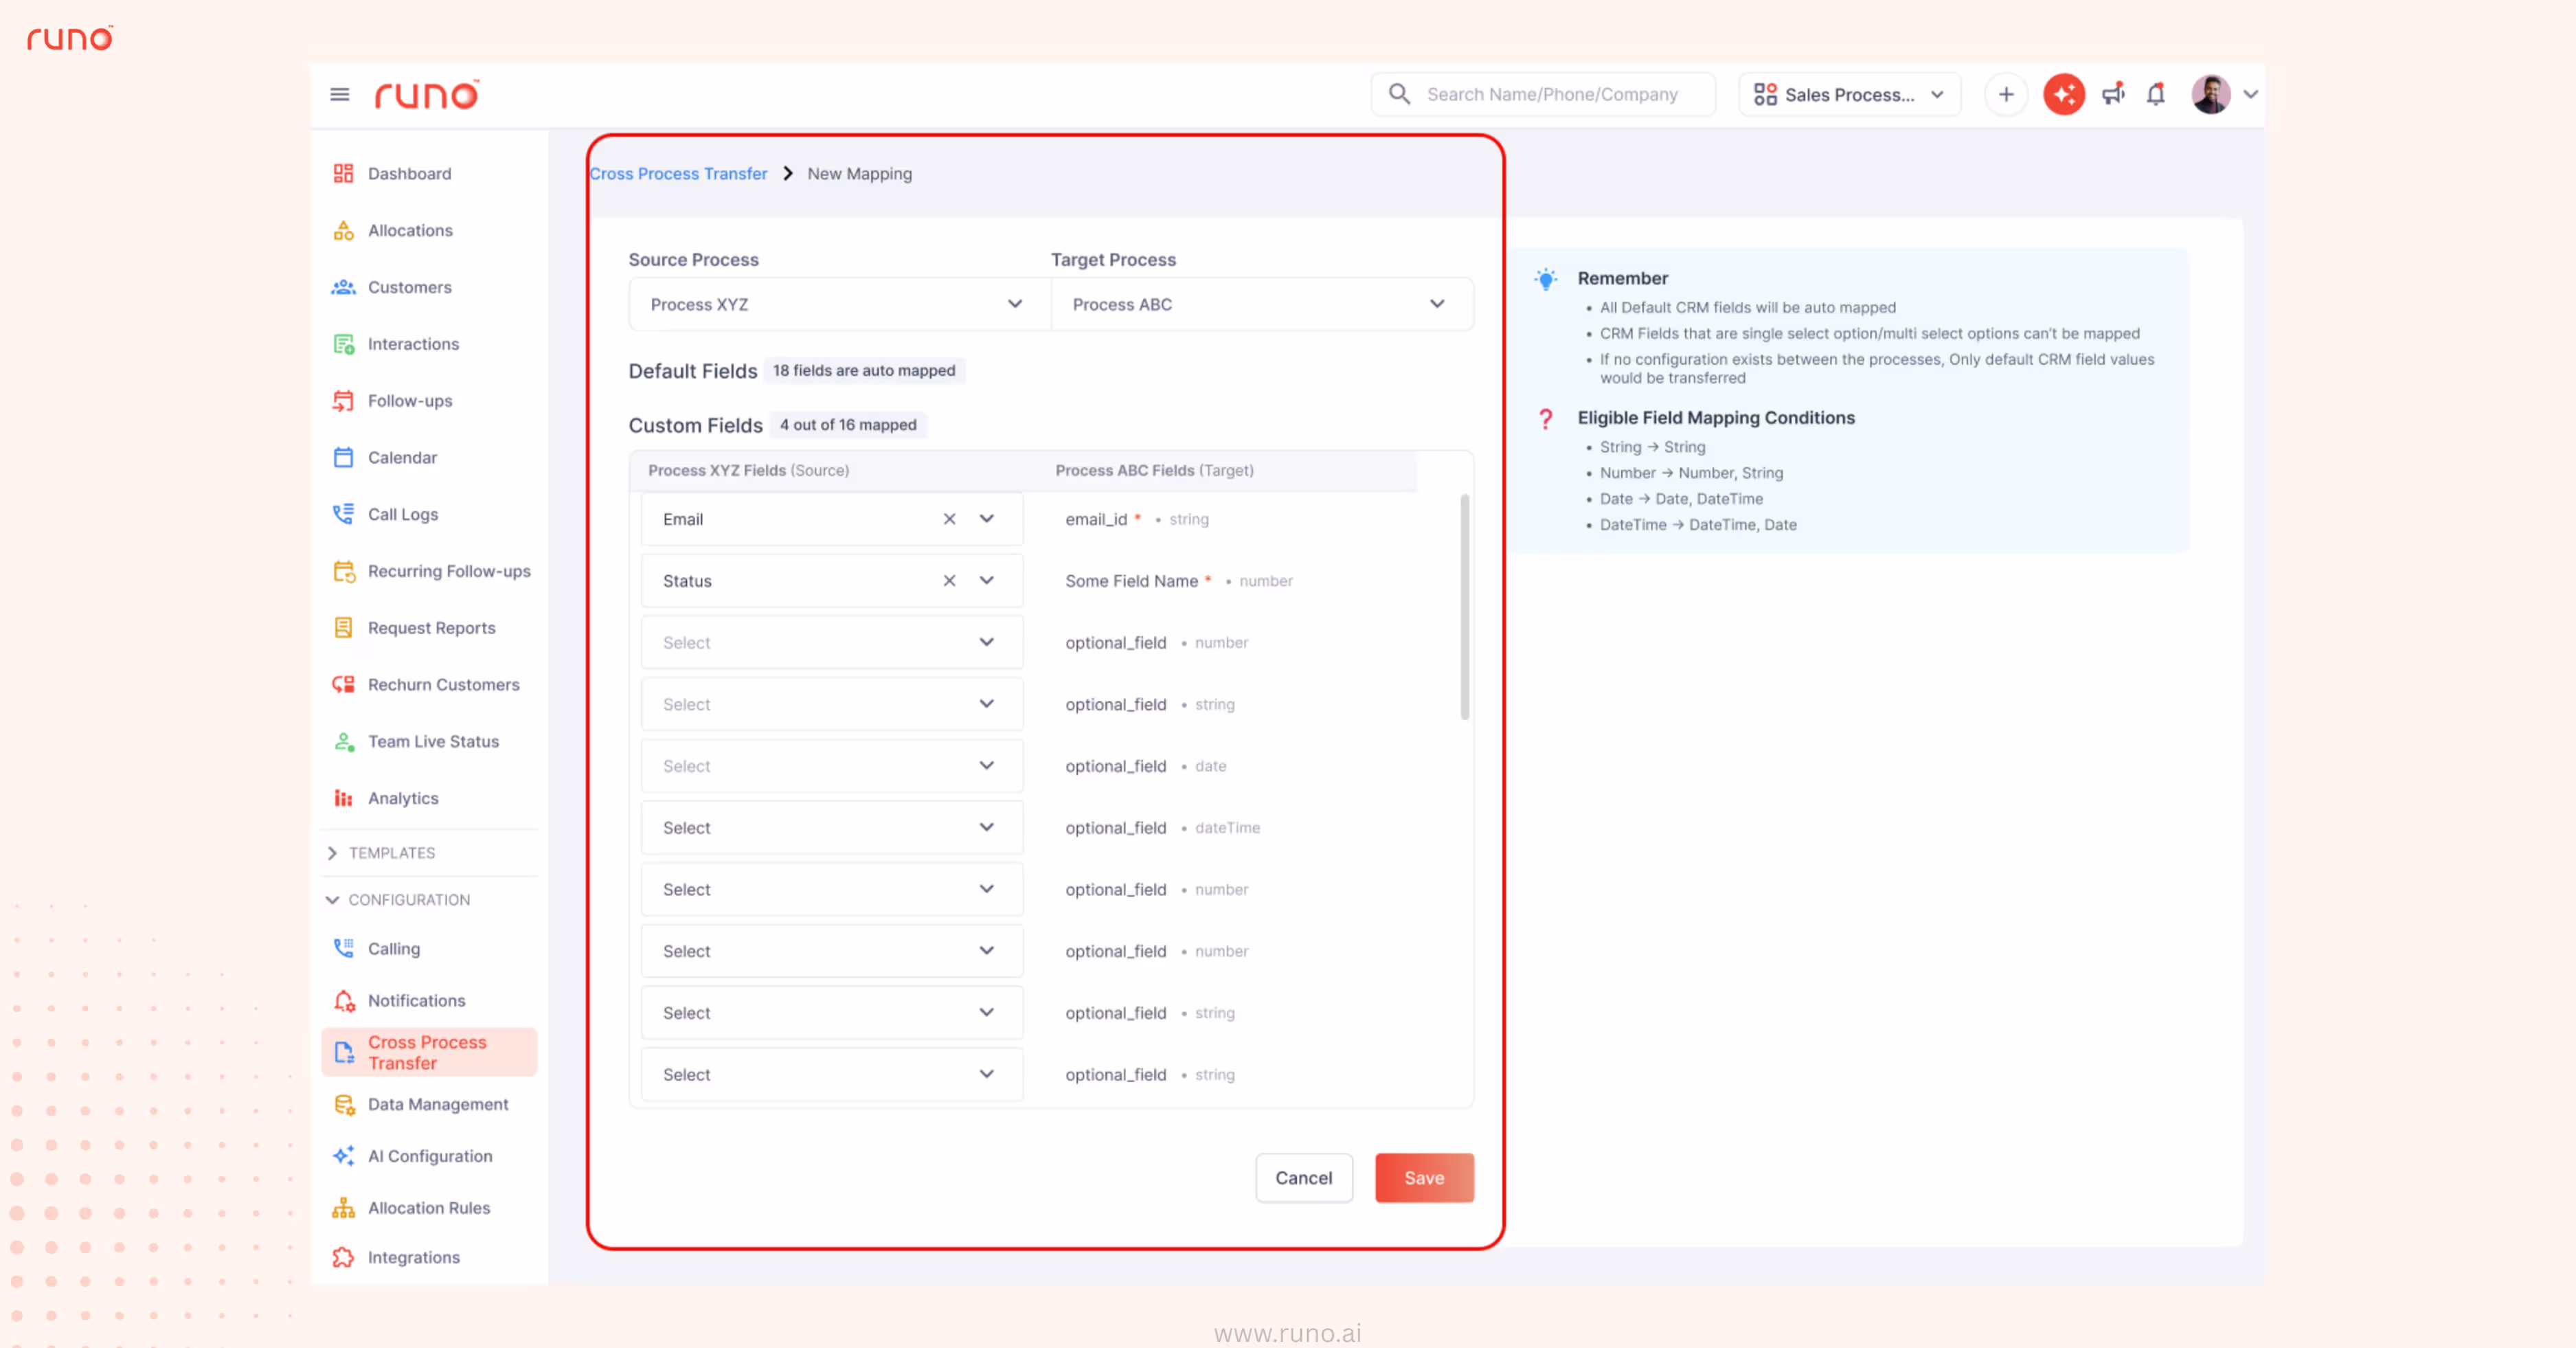
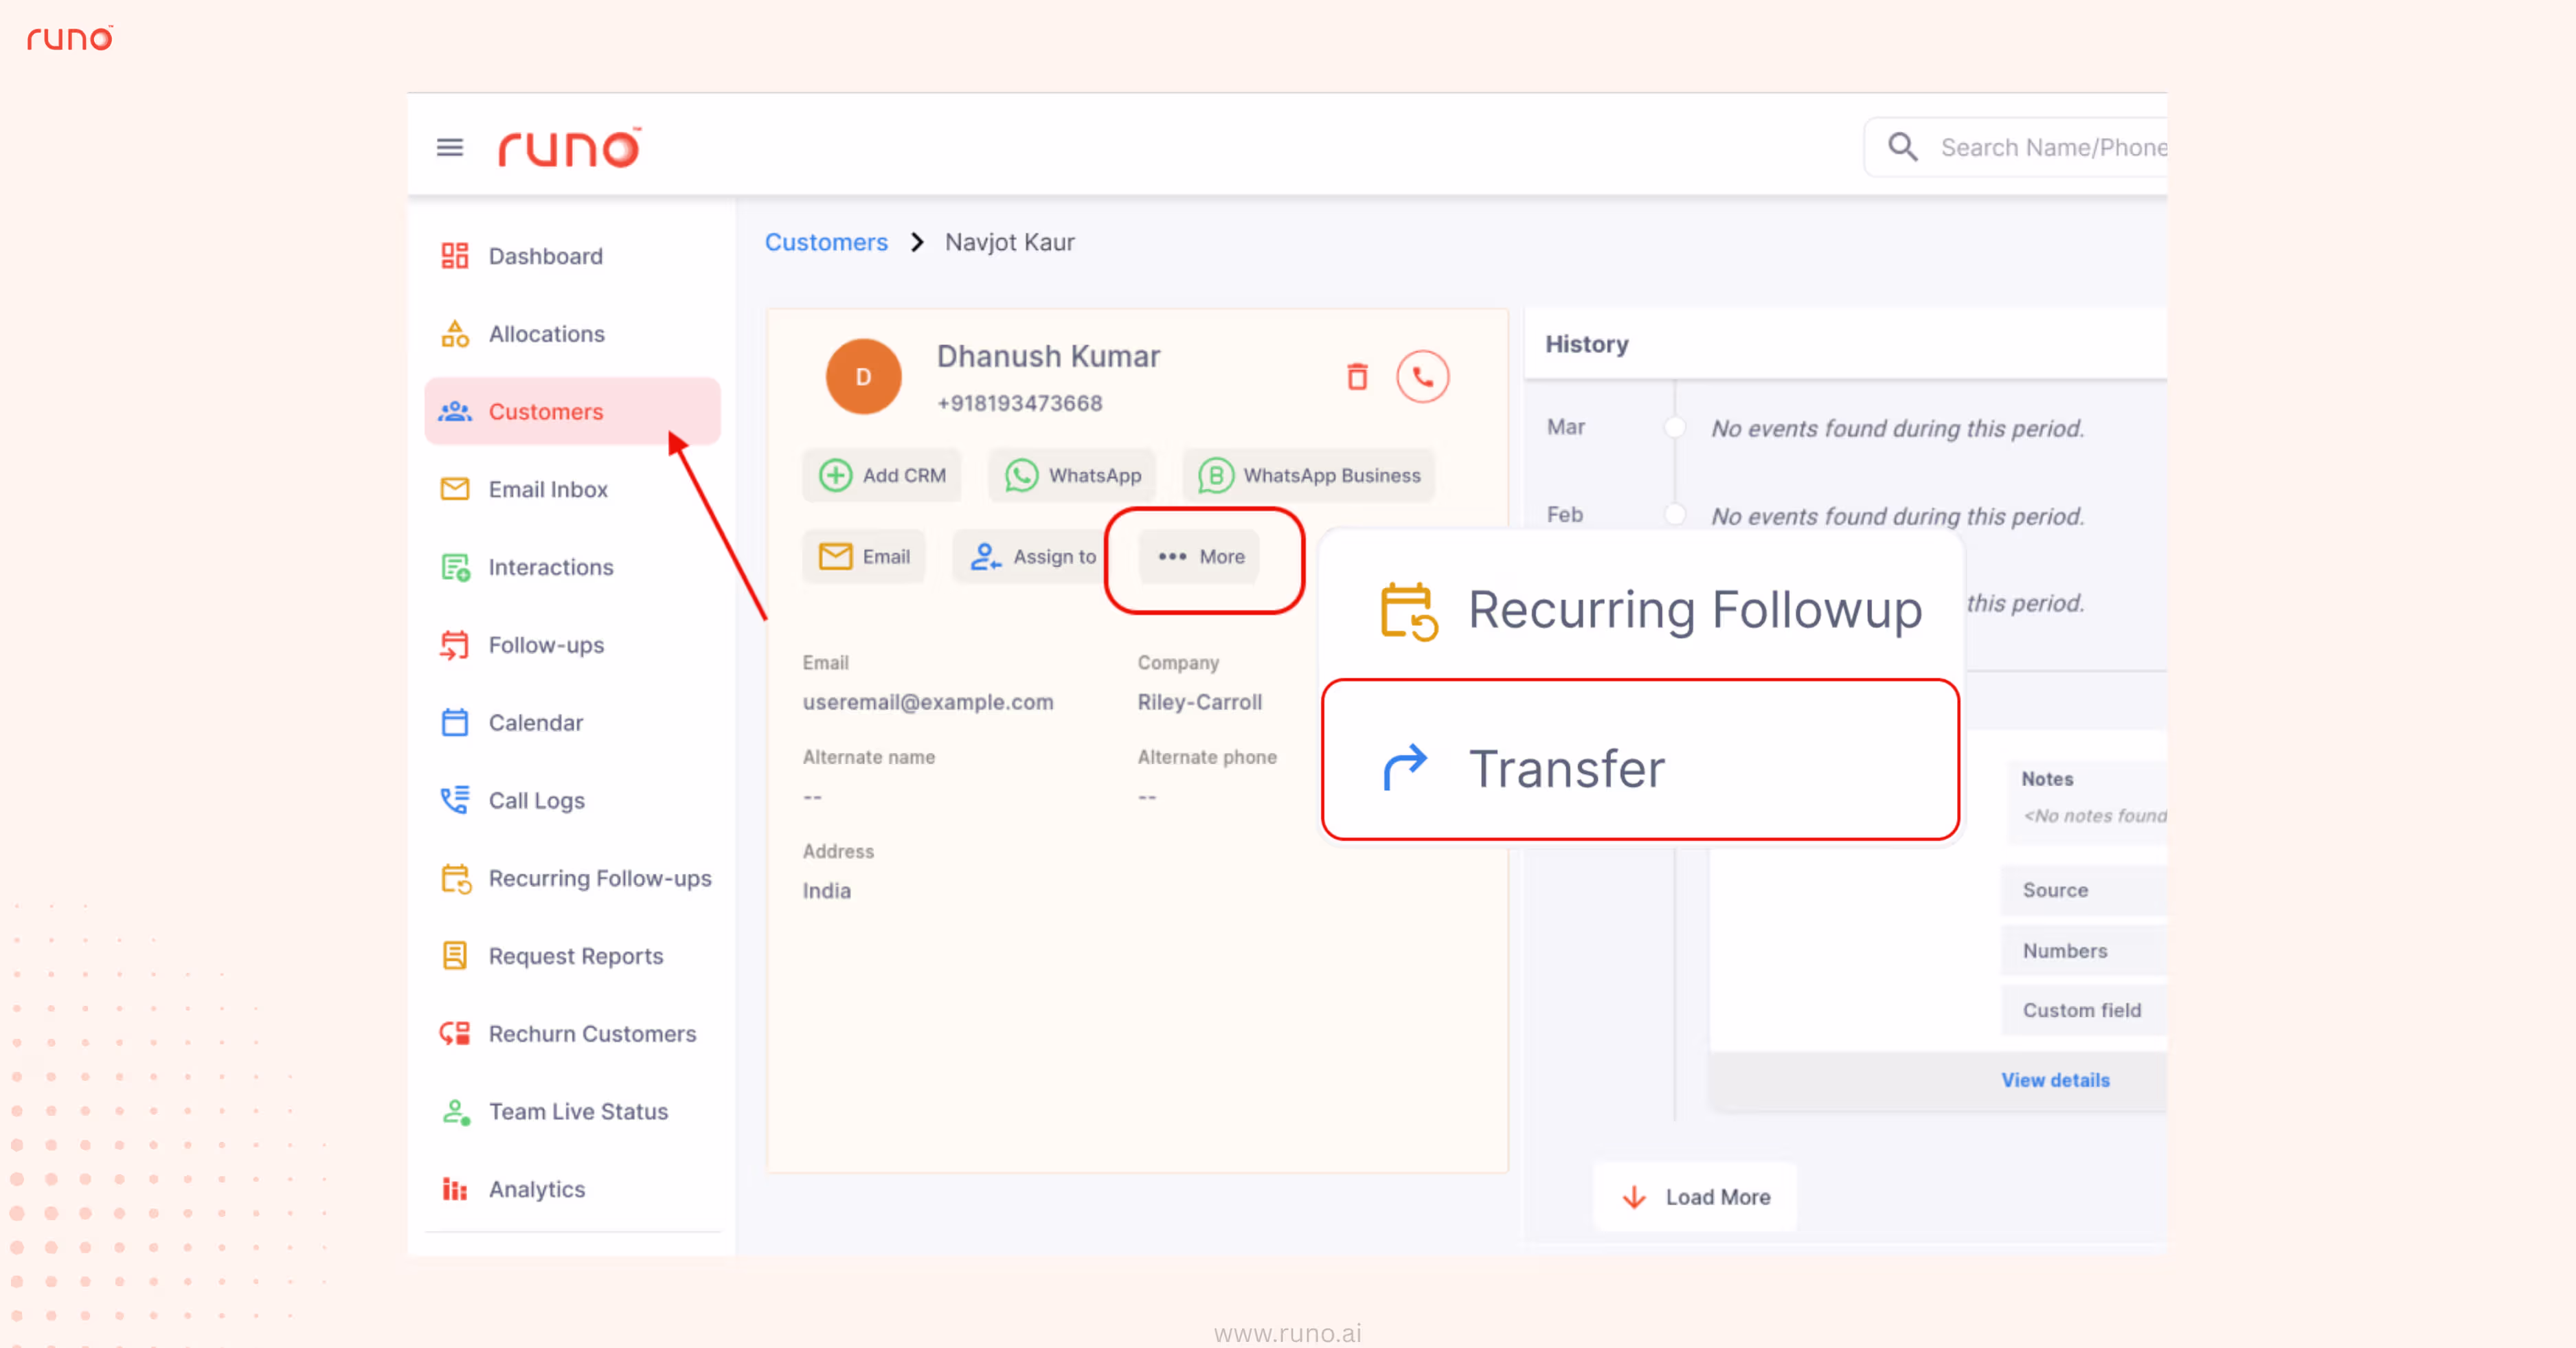
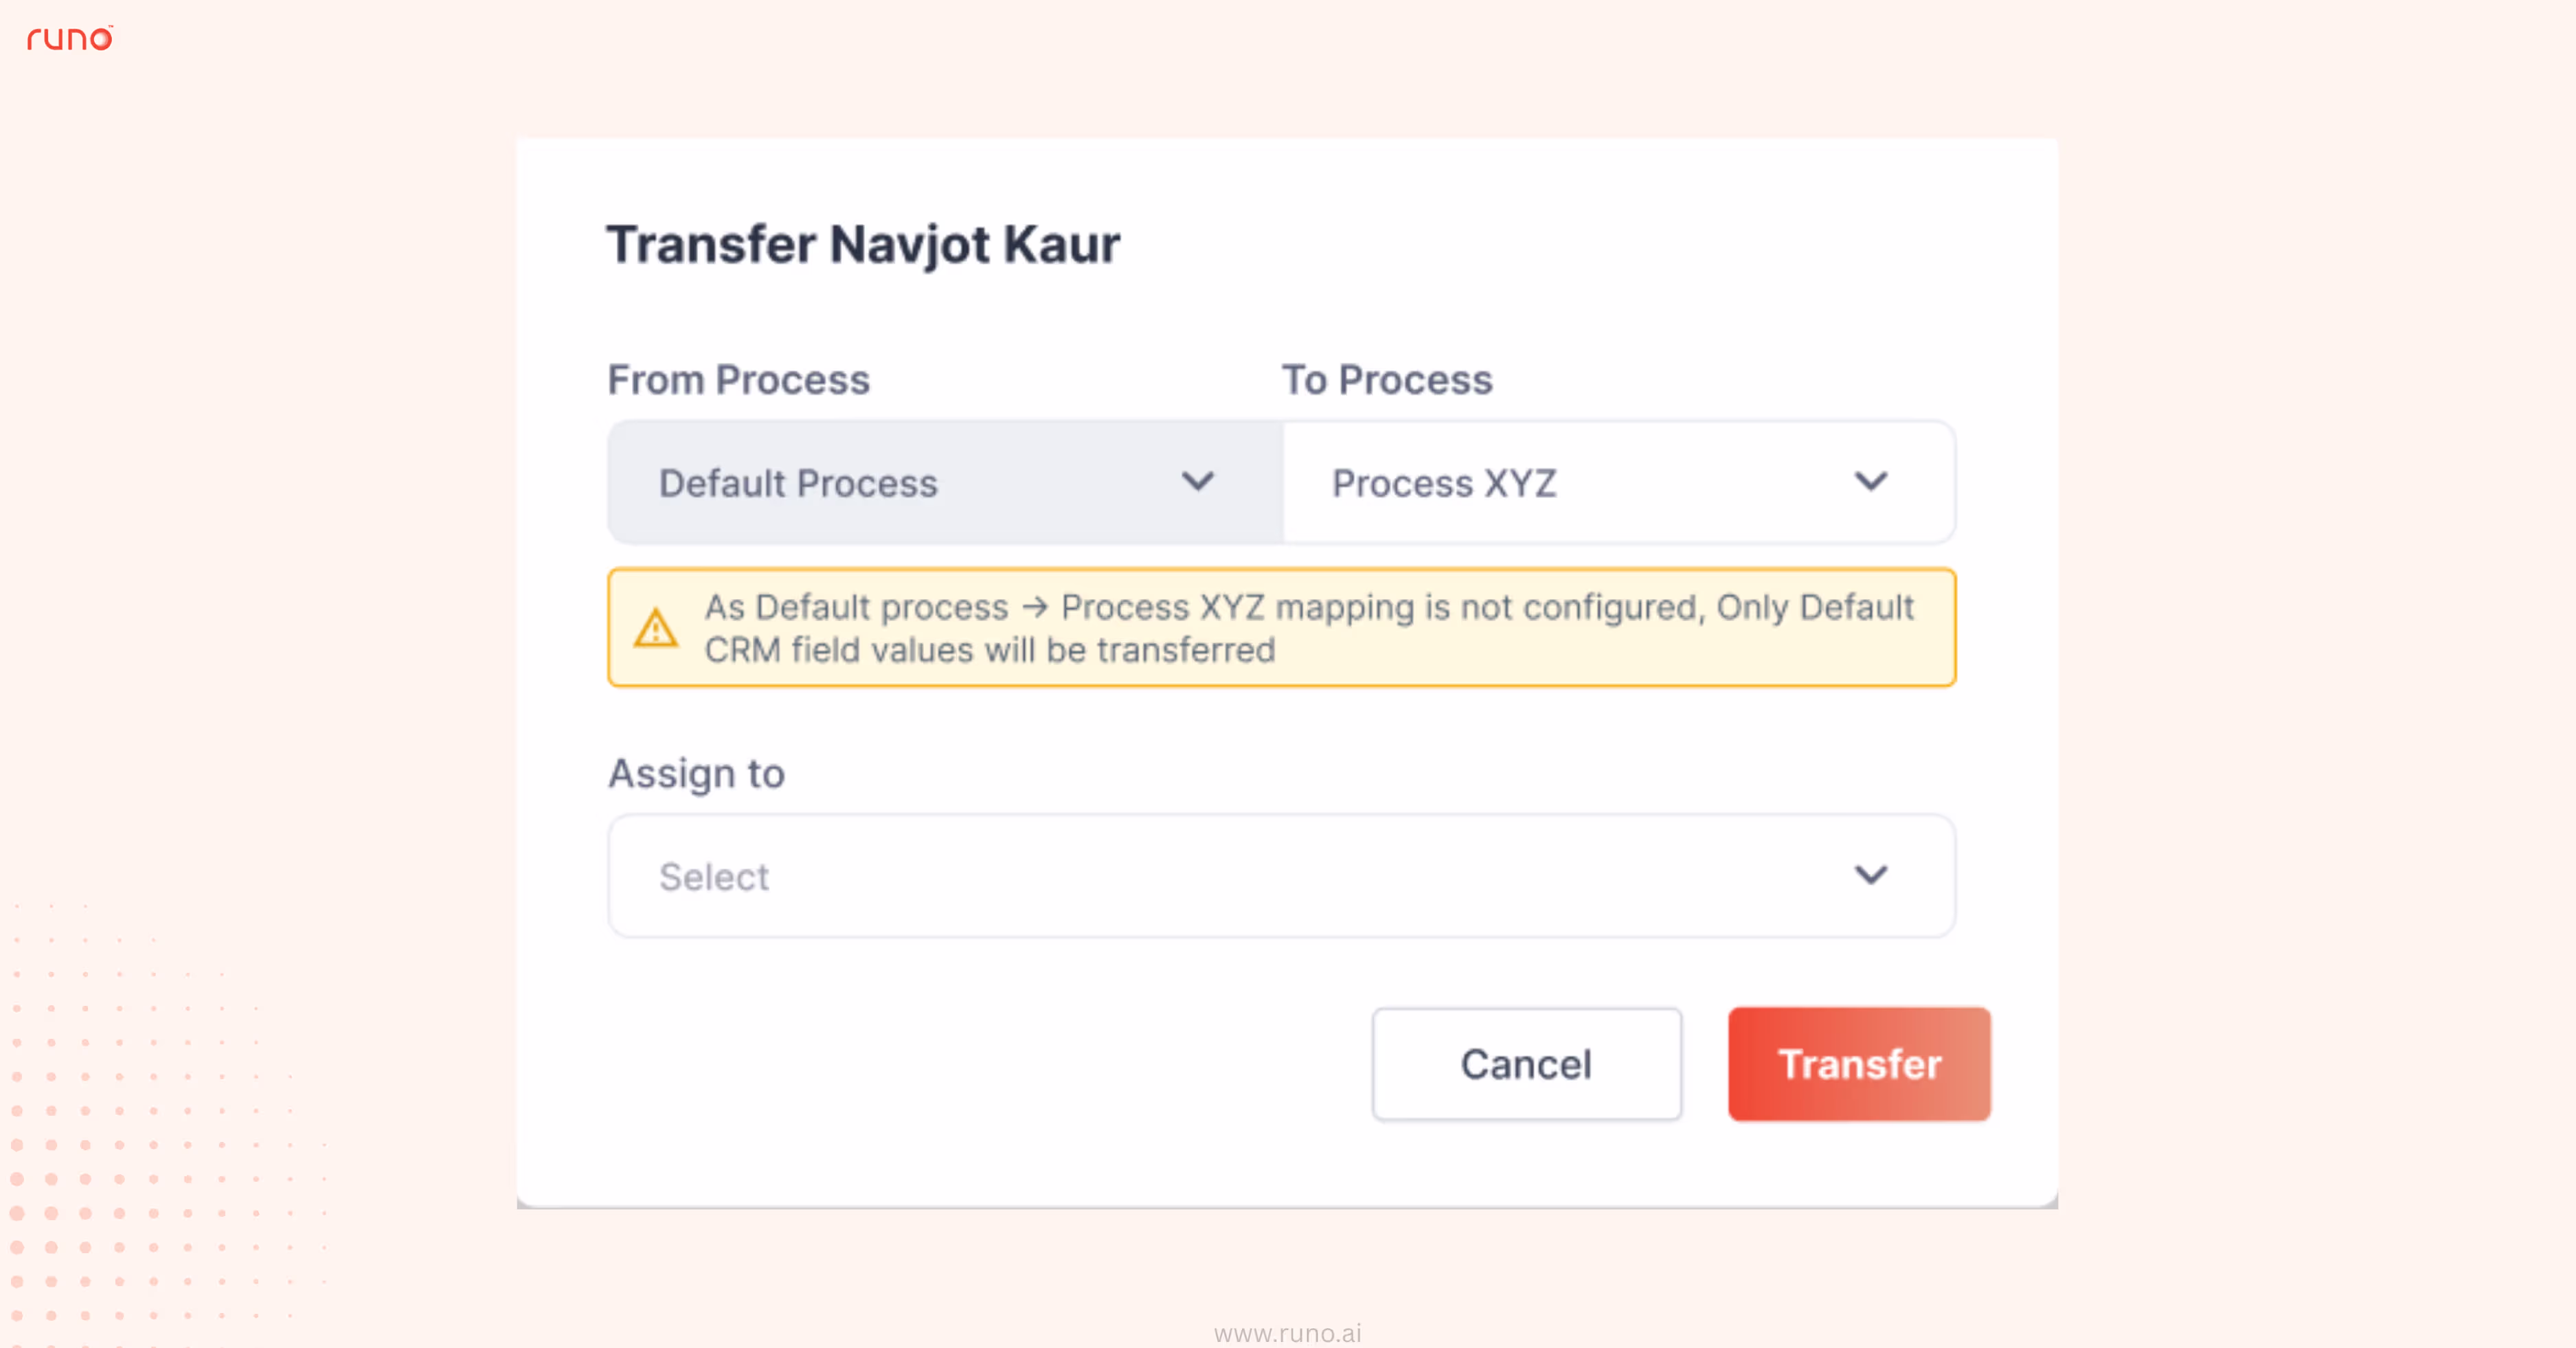
This ensures smooth lead movement across workflows while maintaining complete data integrity and context.
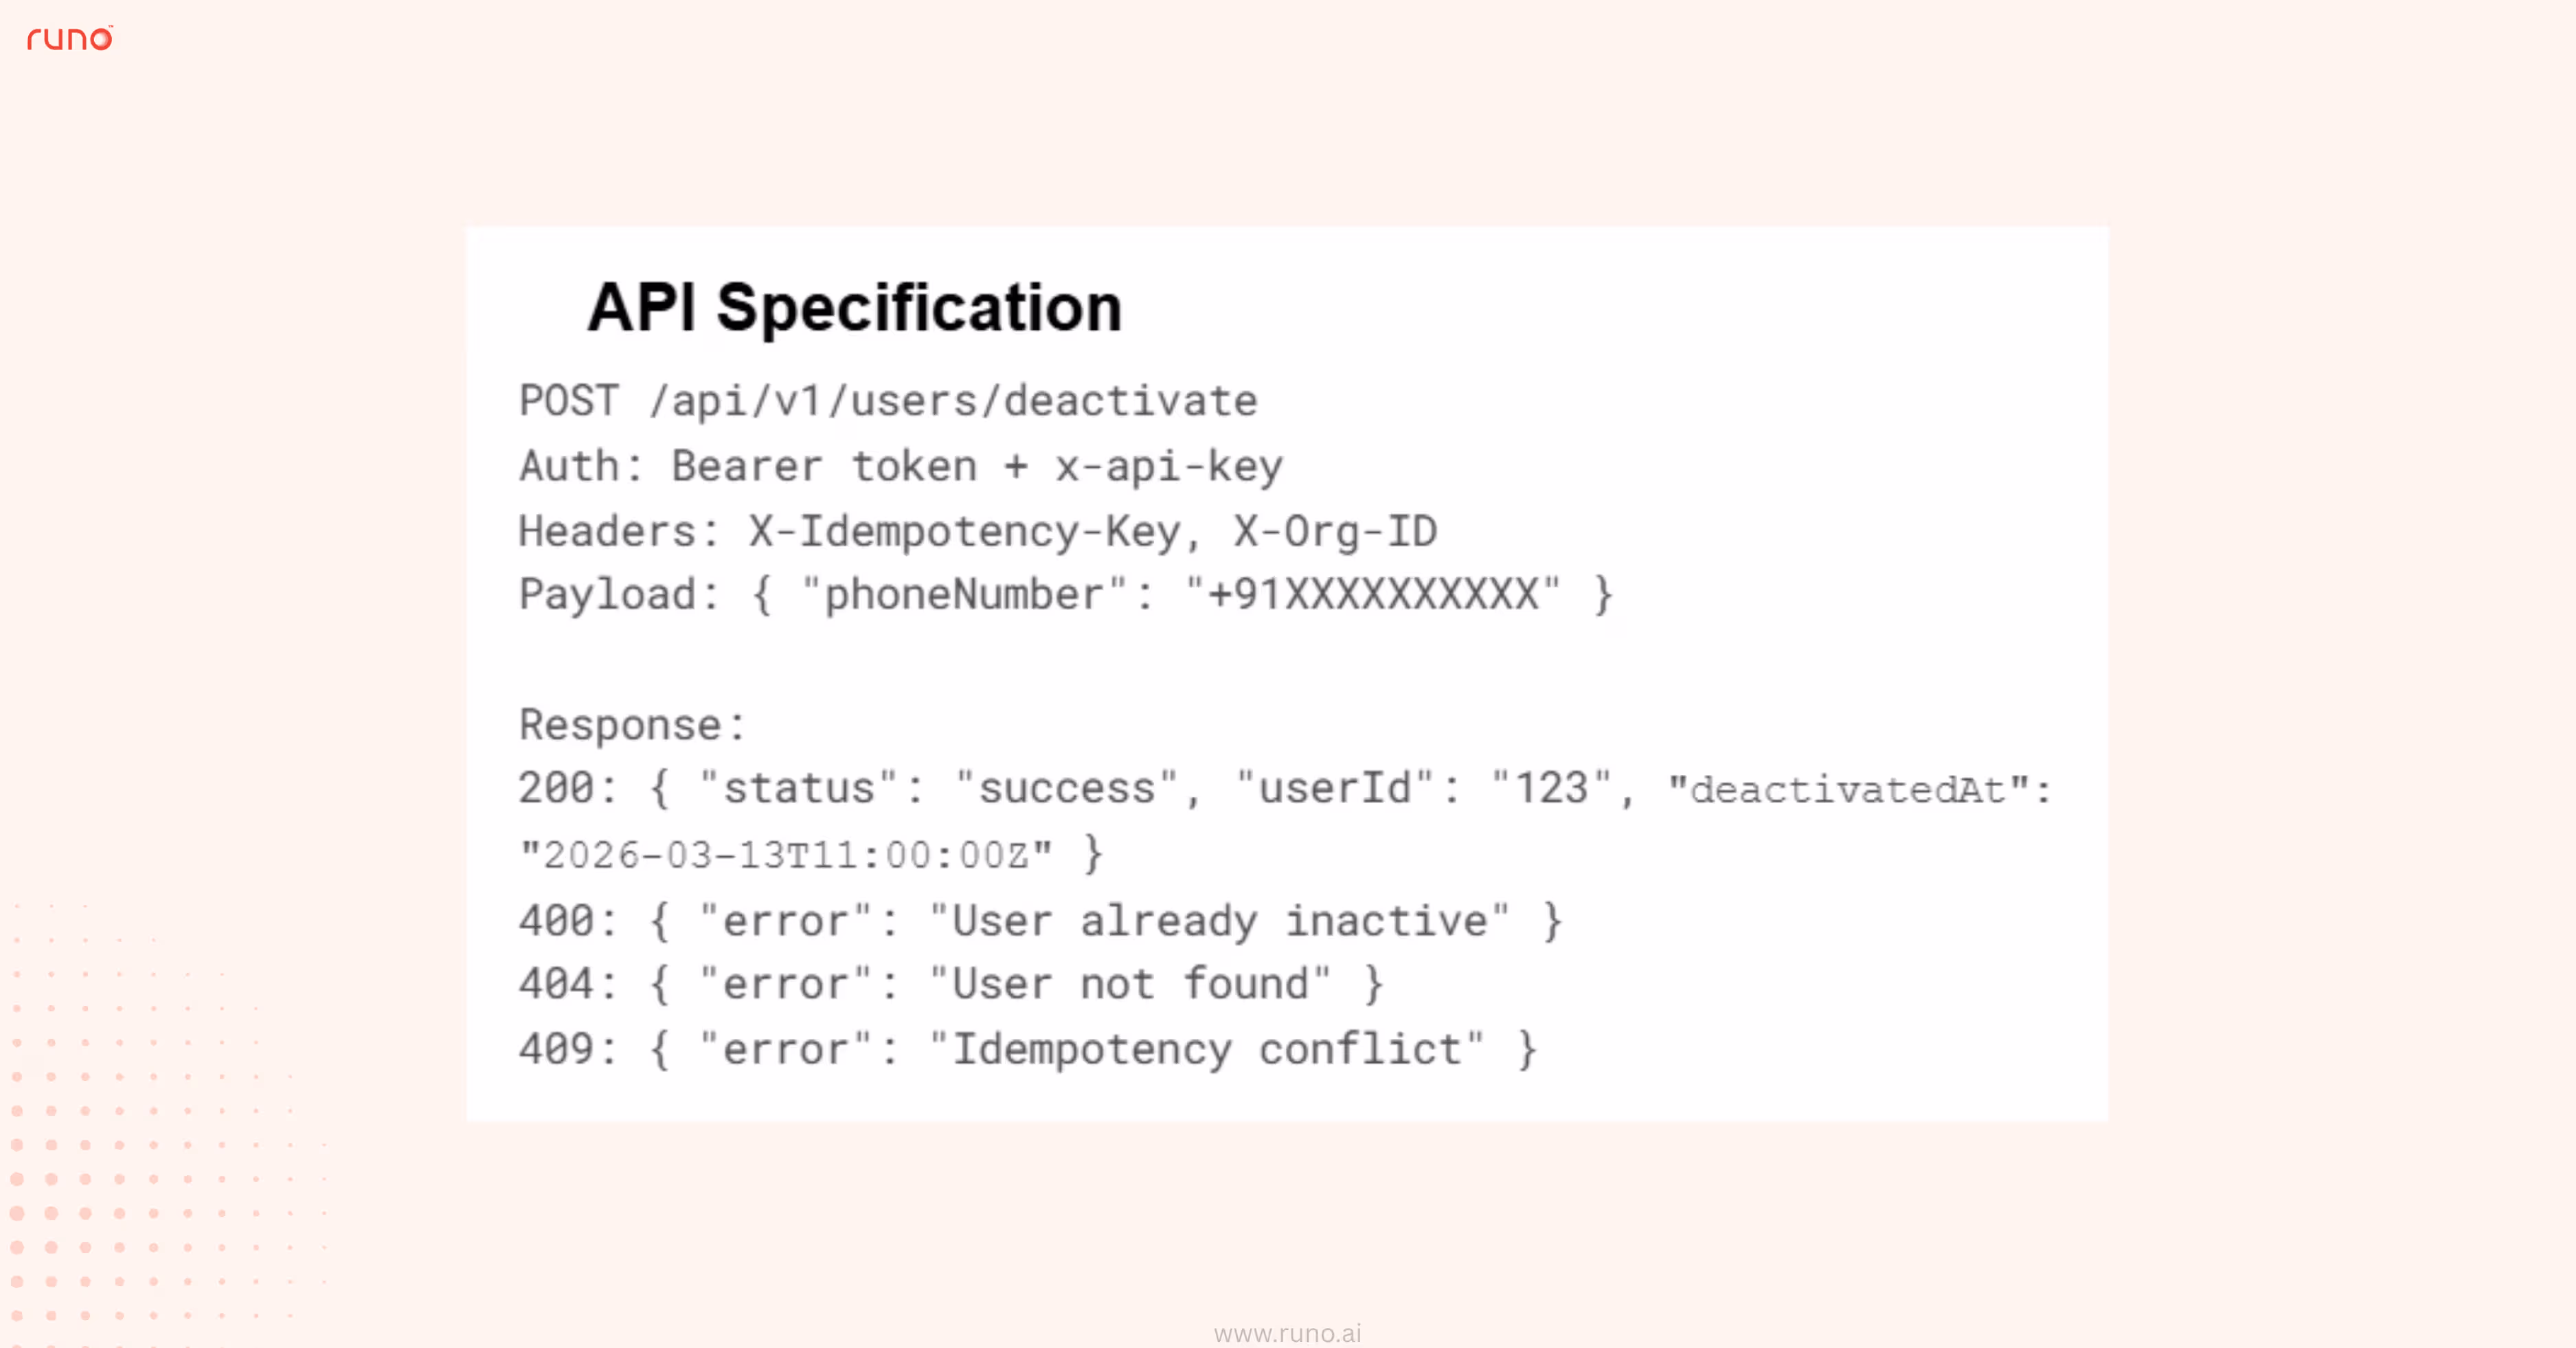
Managing user access across systems can be time-consuming and error-prone when done manually.
With v8.1, you can now programmatically deactivate users in Runo through a secure API, ensuring smoother user lifecycle management and better control.
What’s new:
Refer to the API documentation to integrate and start deactivating users programmatically.
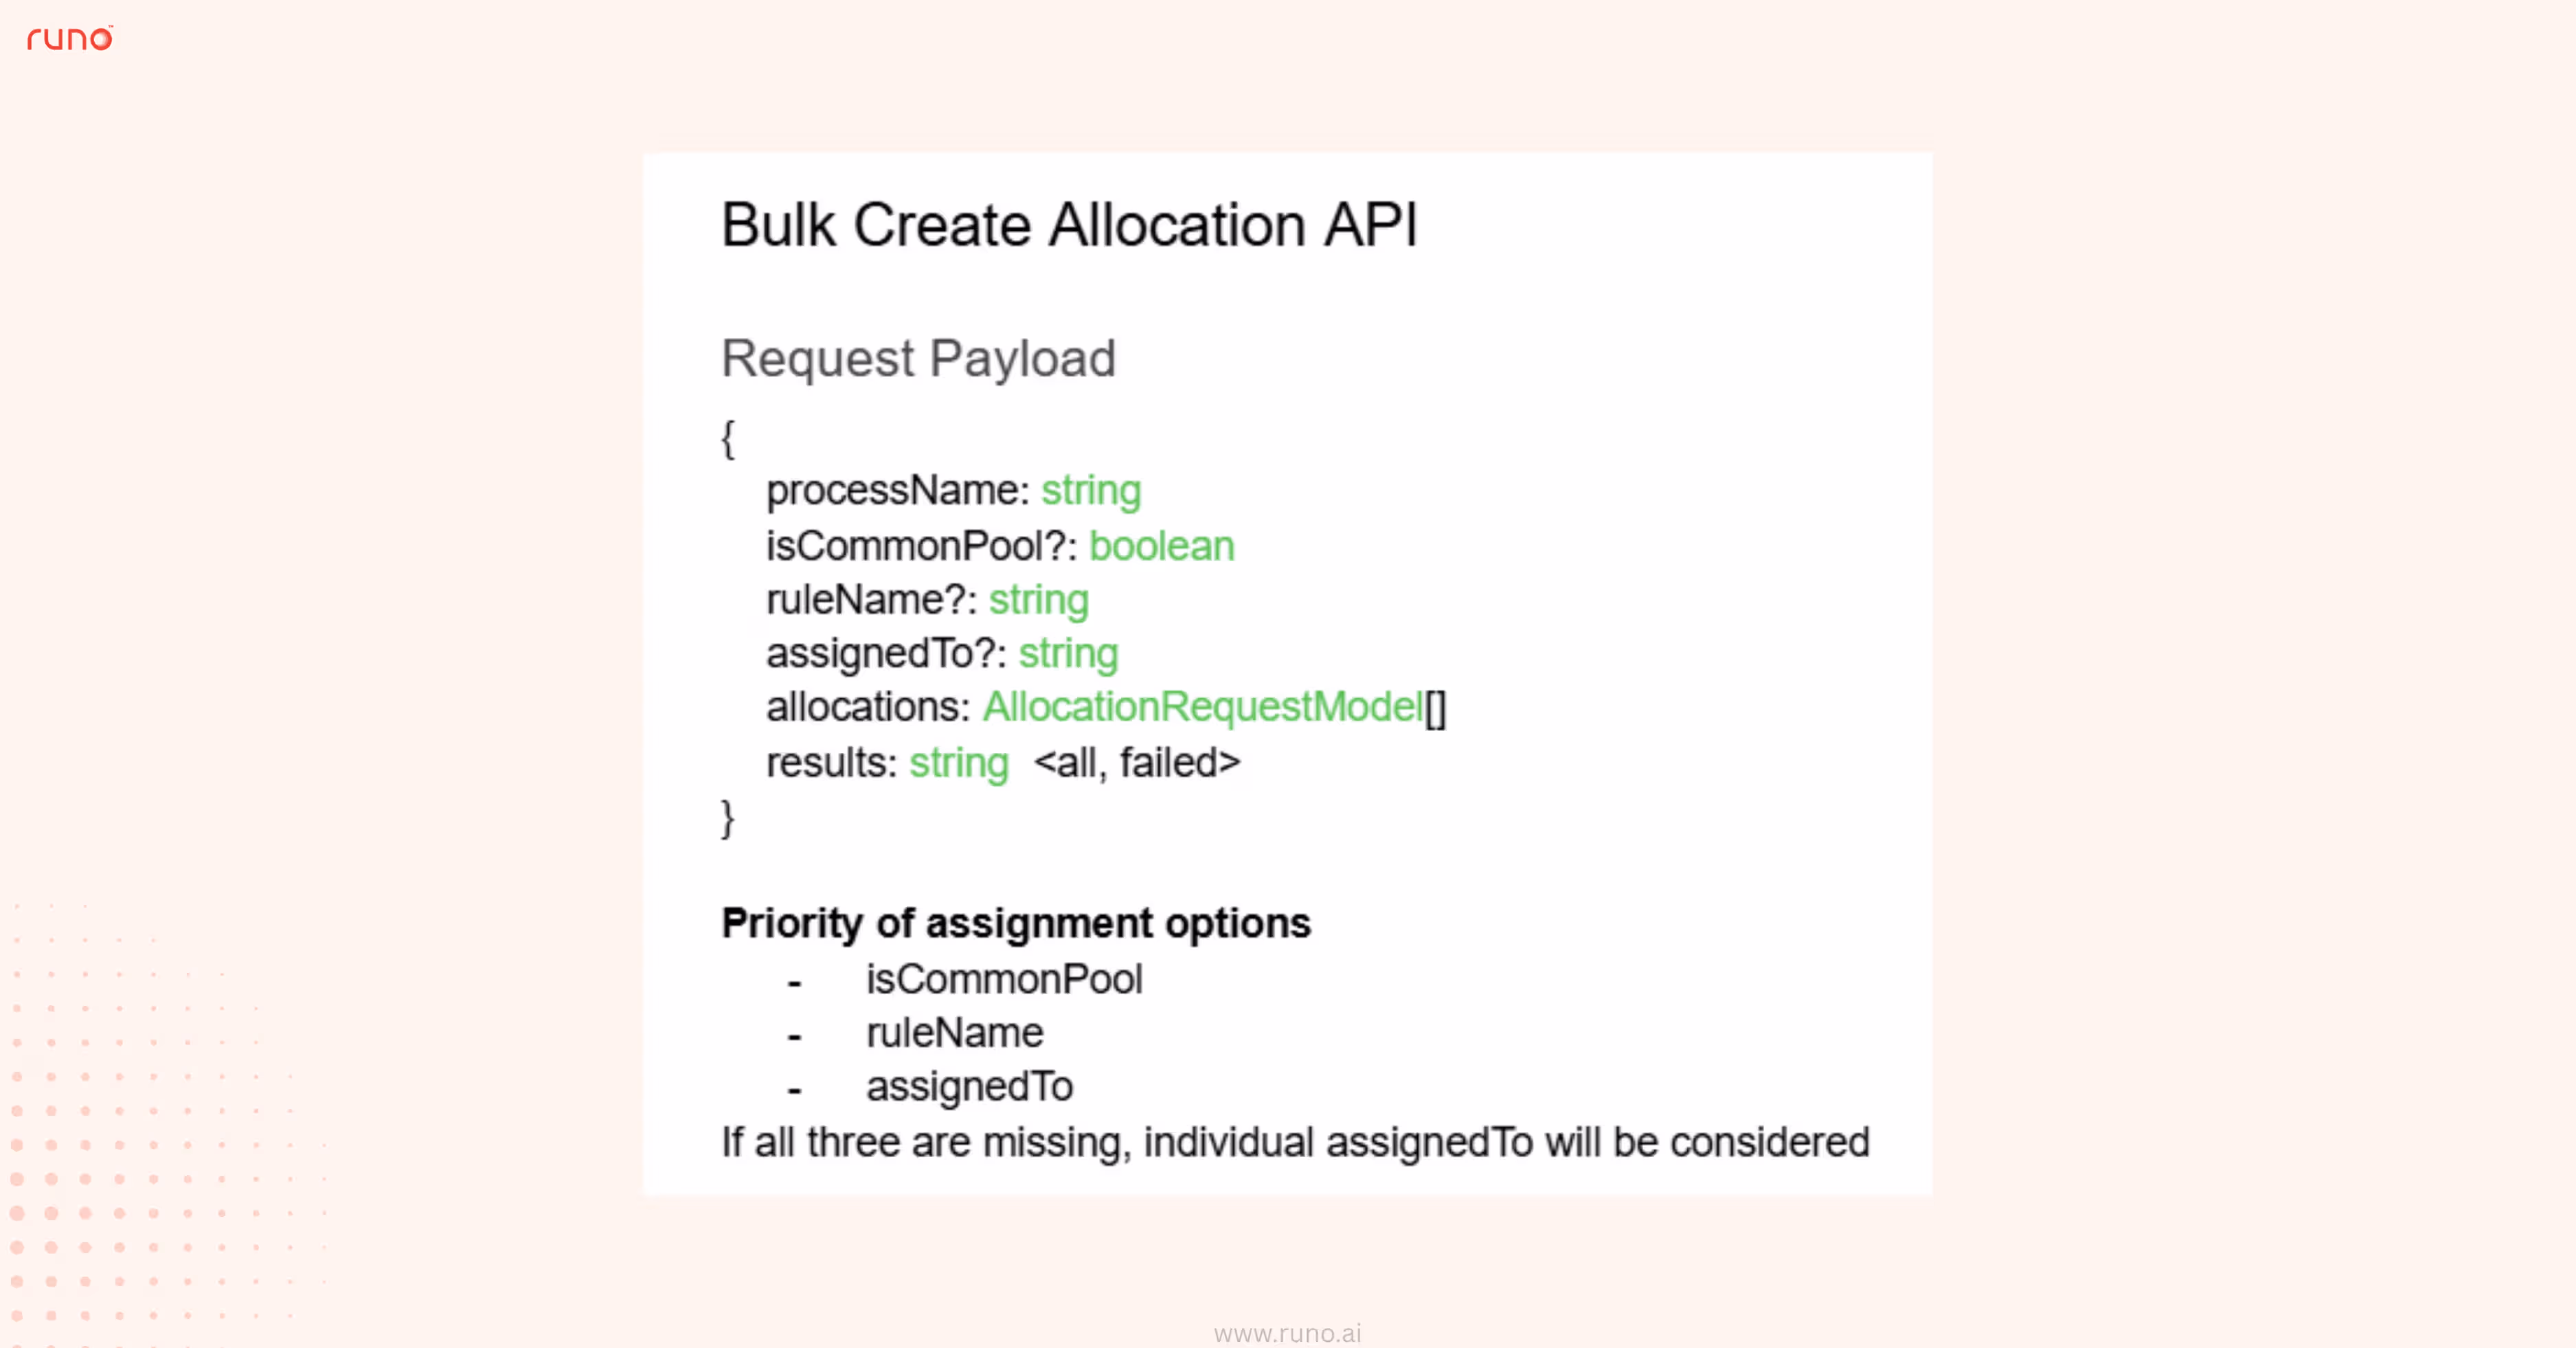
Handling high volumes of lead assignments often requires multiple steps and constant coordination.
With v8.1, you can now streamline this process by creating and assigning leads/customers in bulk through a single API request.
What’s new:
Below is a sample payload.
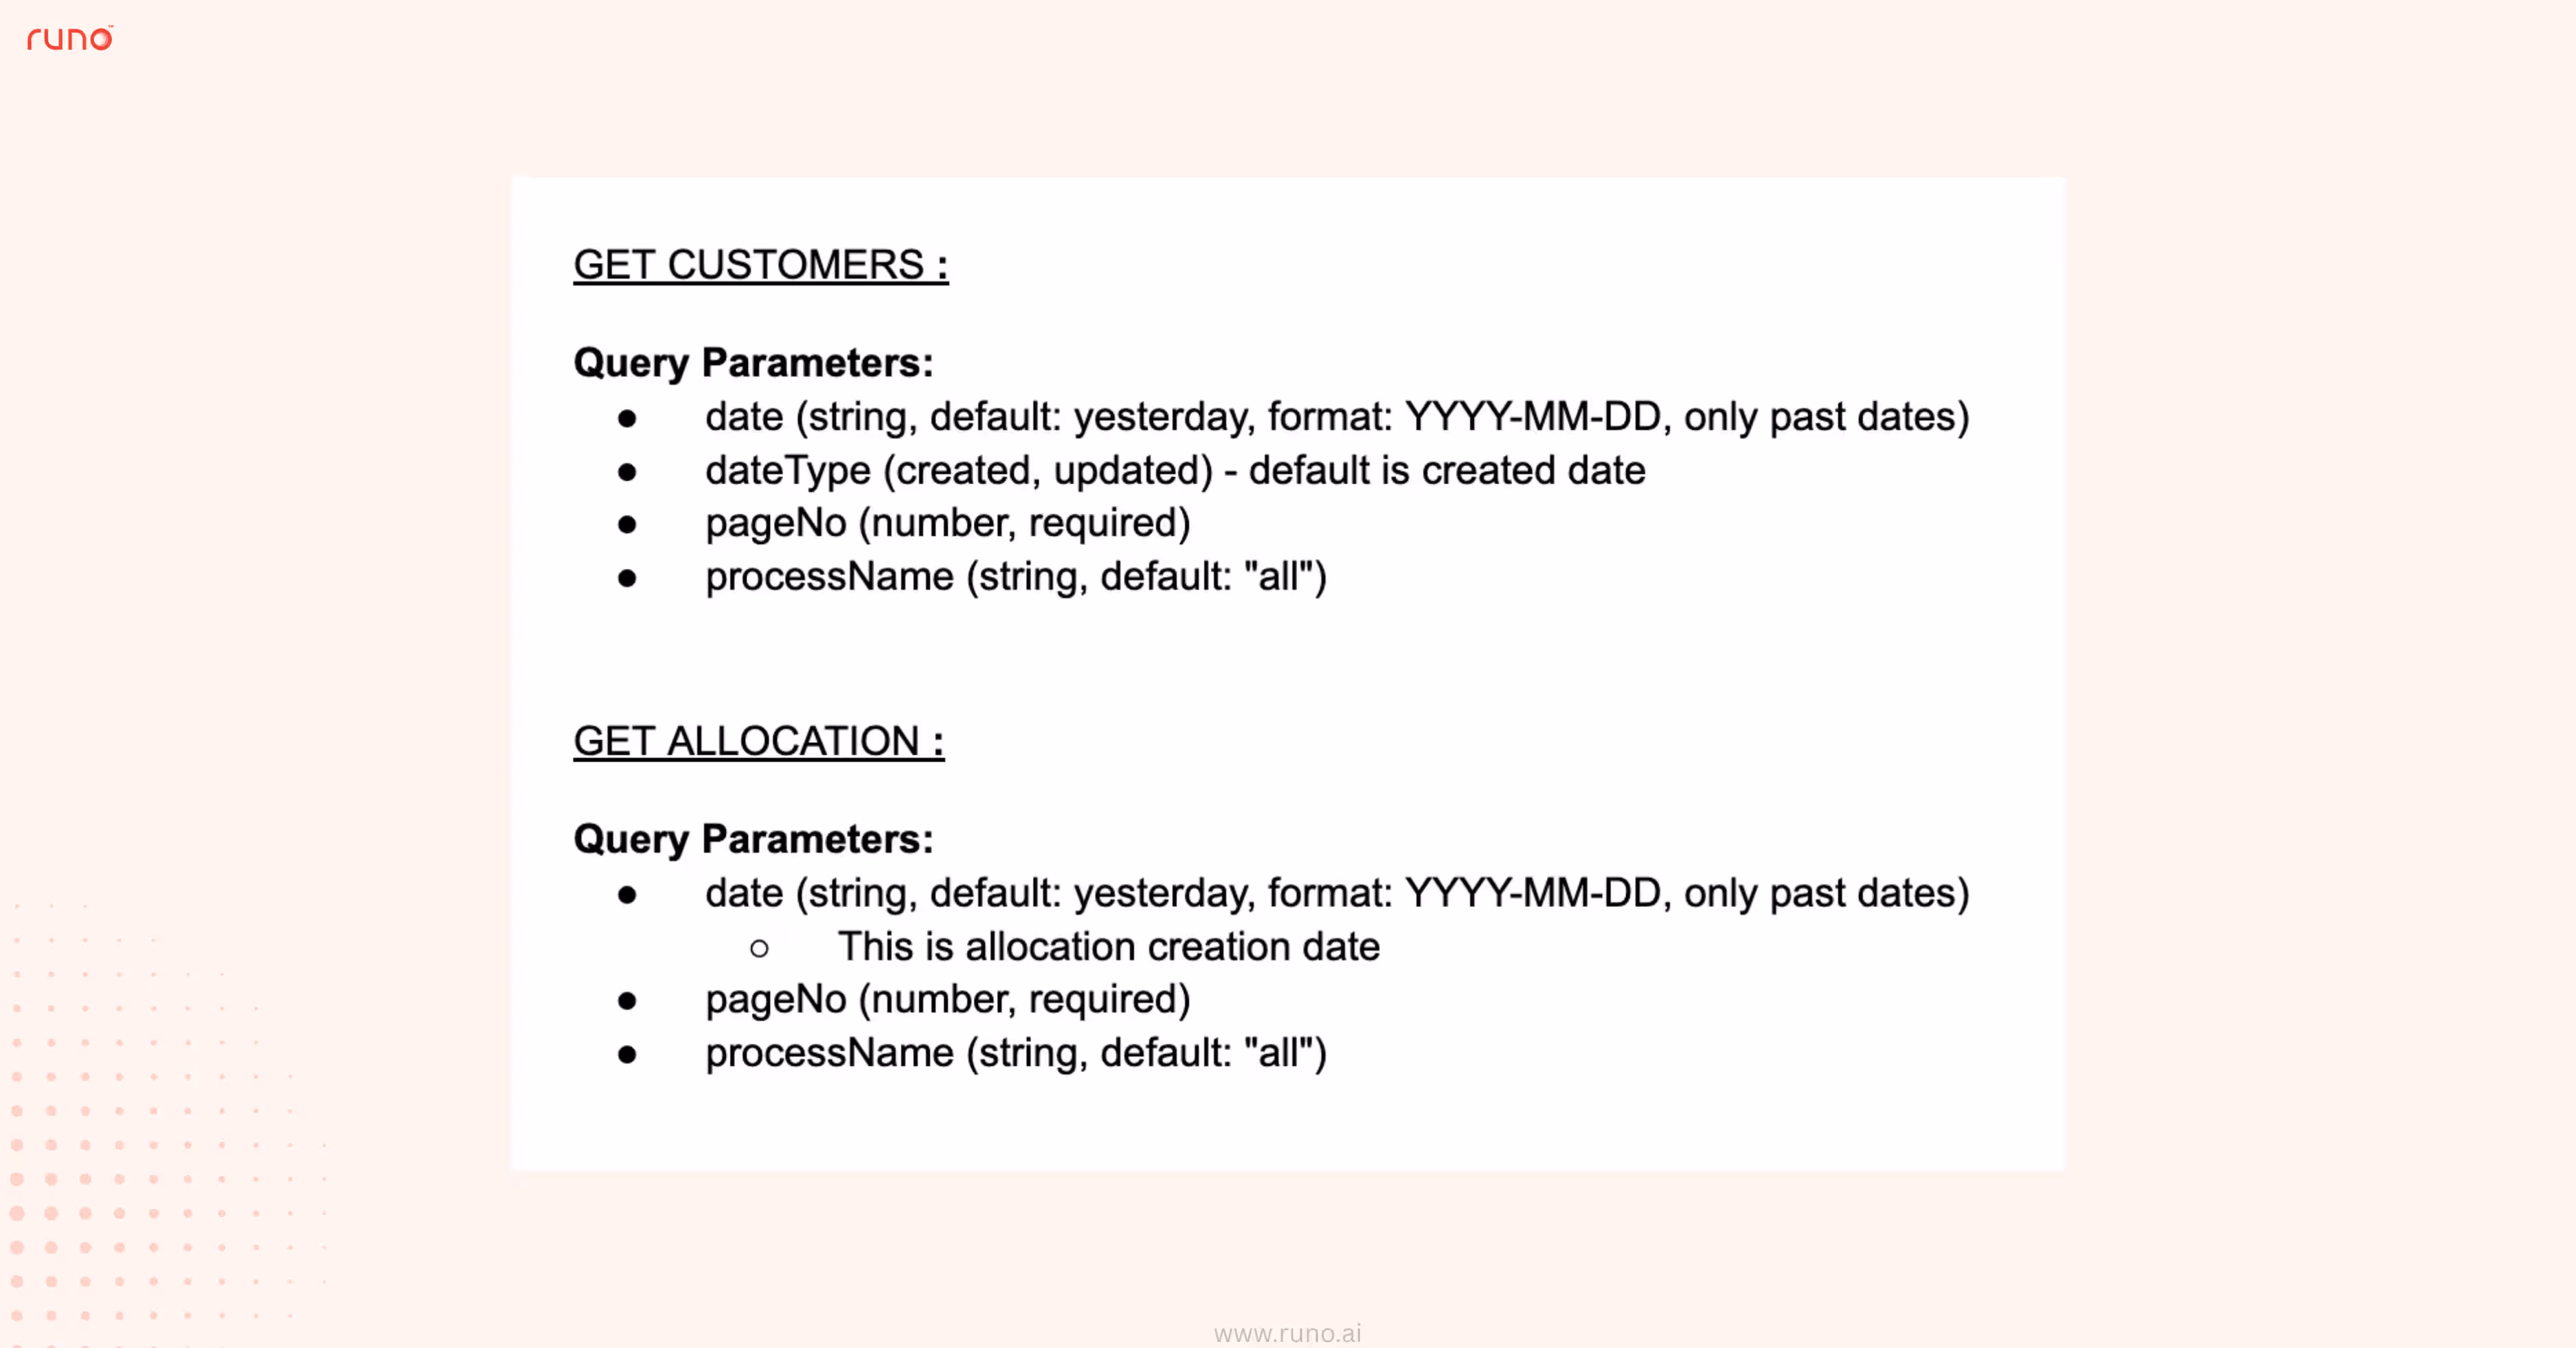
Accessing customer and allocation data shouldn’t depend on manual exports and delays.
With v8.1, you can now fetch this data programmatically through secure APIs, making real-time syncing with your systems faster and more reliable.
What’s new:
While default AI Intents provide a strong foundation for conversation analysis, every business has unique nuances.
With v8.1, you can now extend these capabilities by adding custom intents, ensuring AI insights are even more aligned with your specific goals.
What’s new:
How to use:
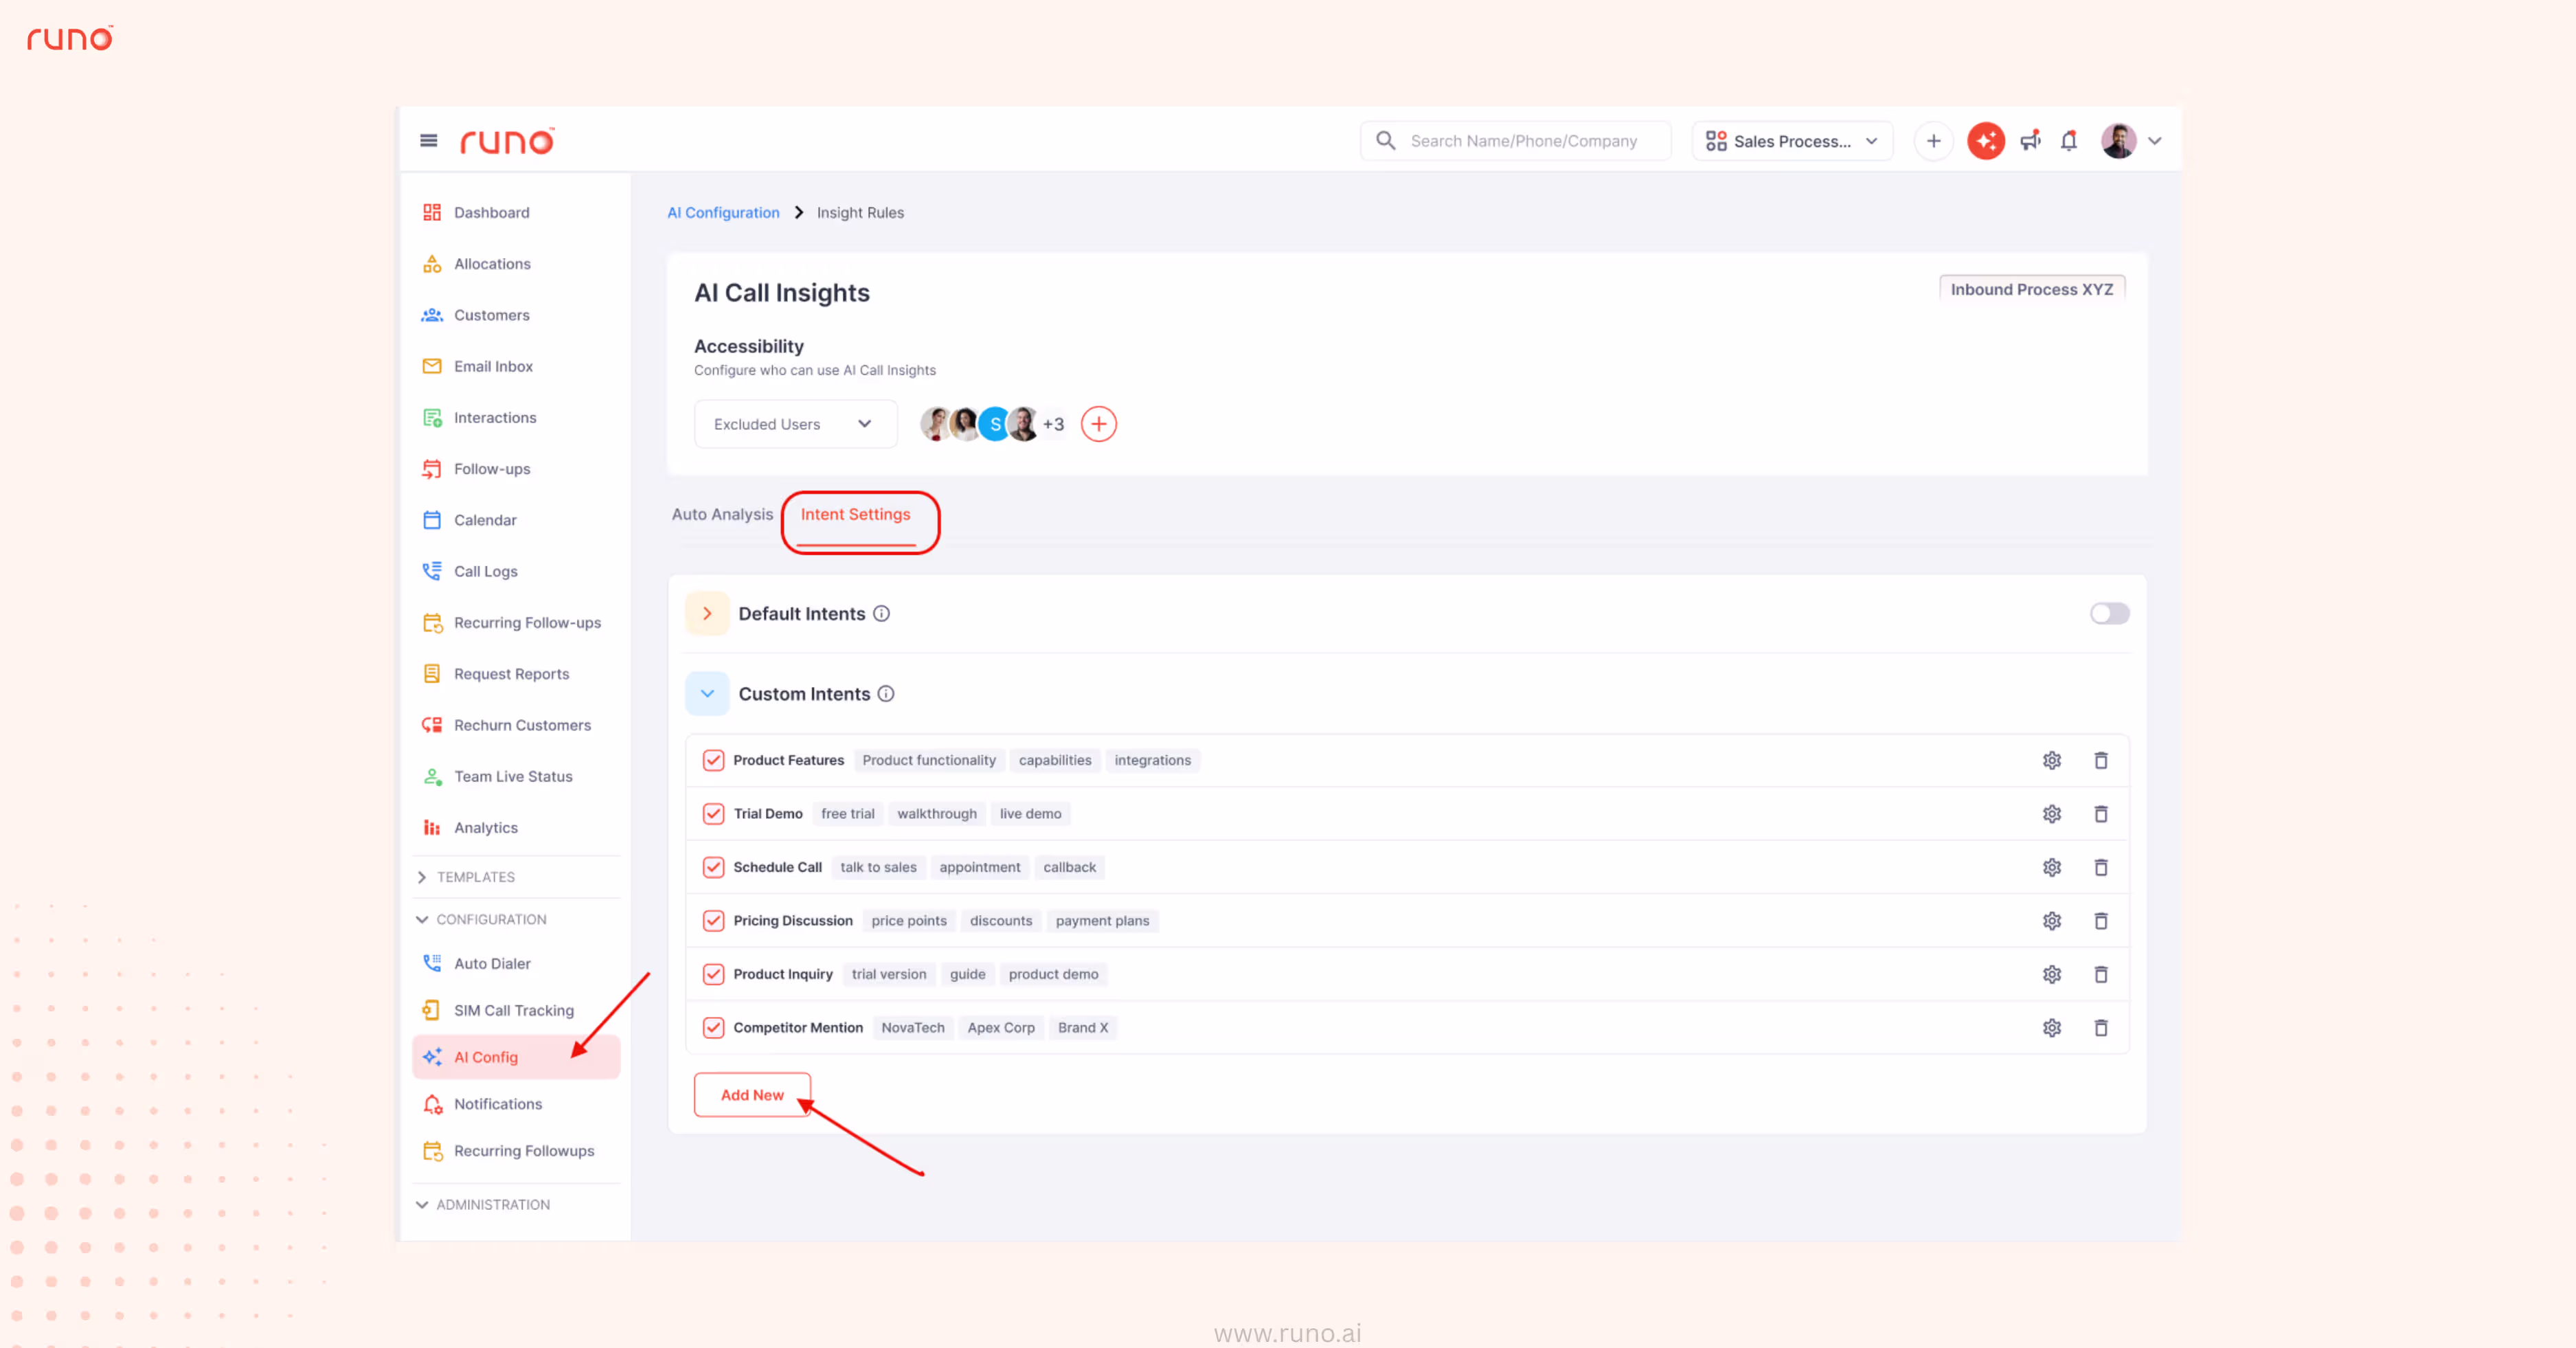
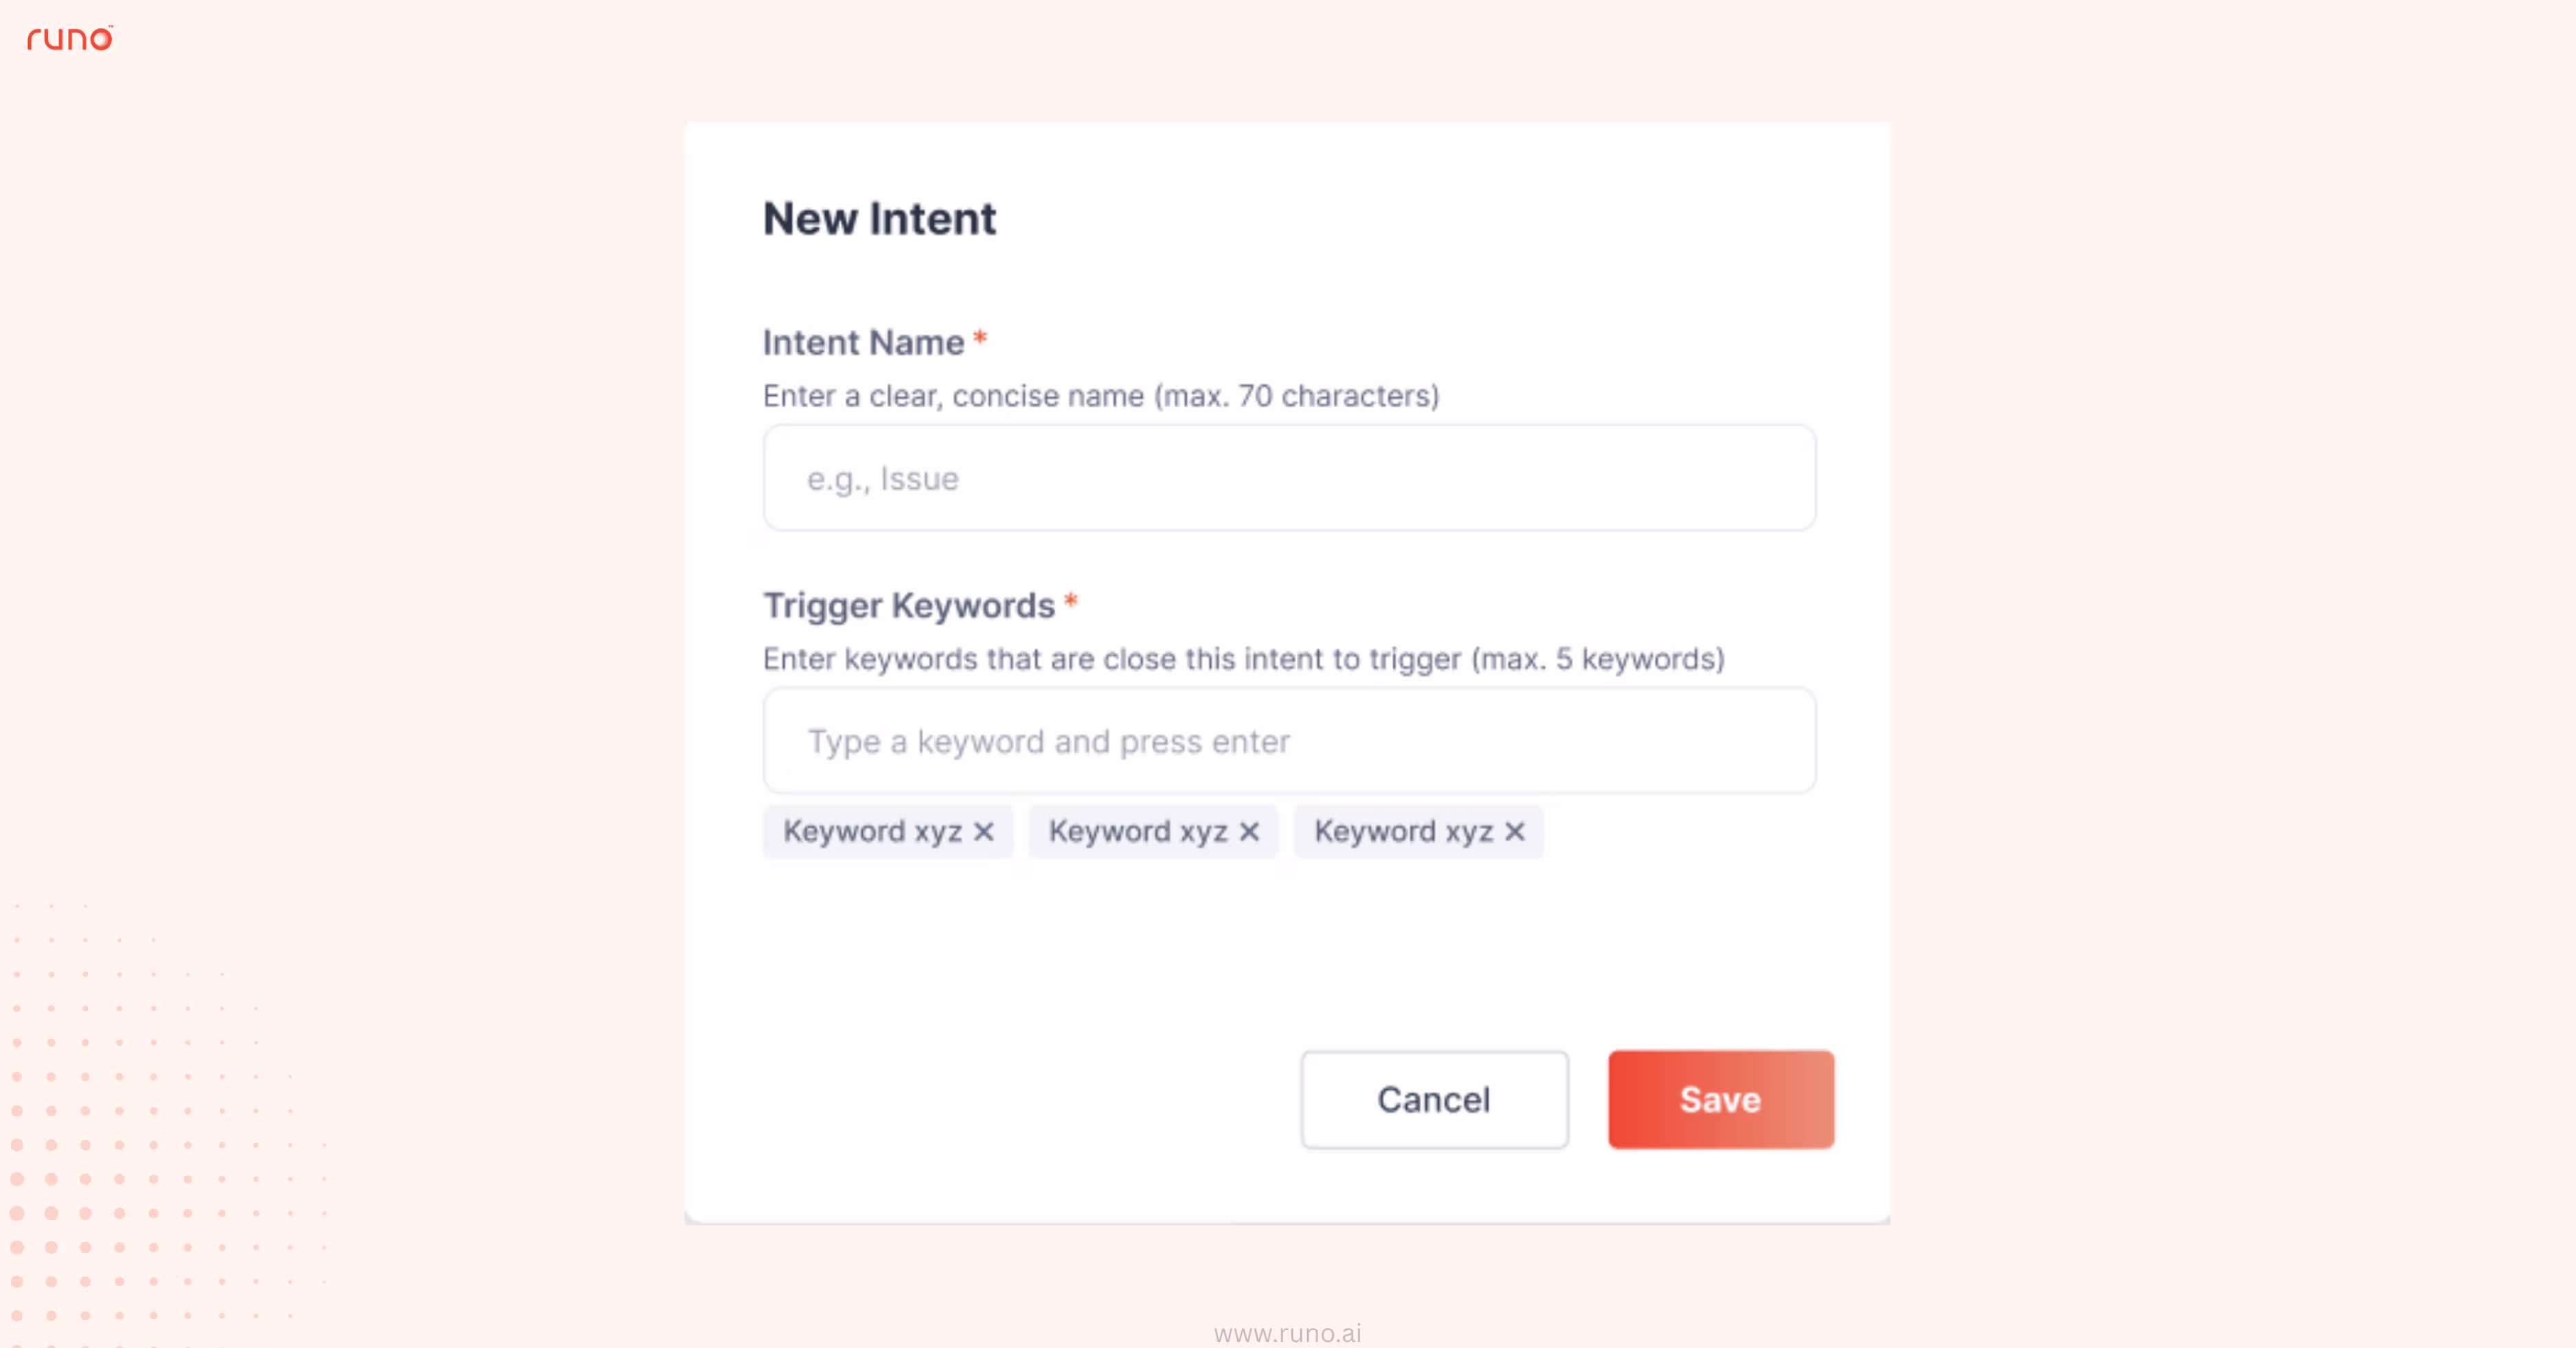
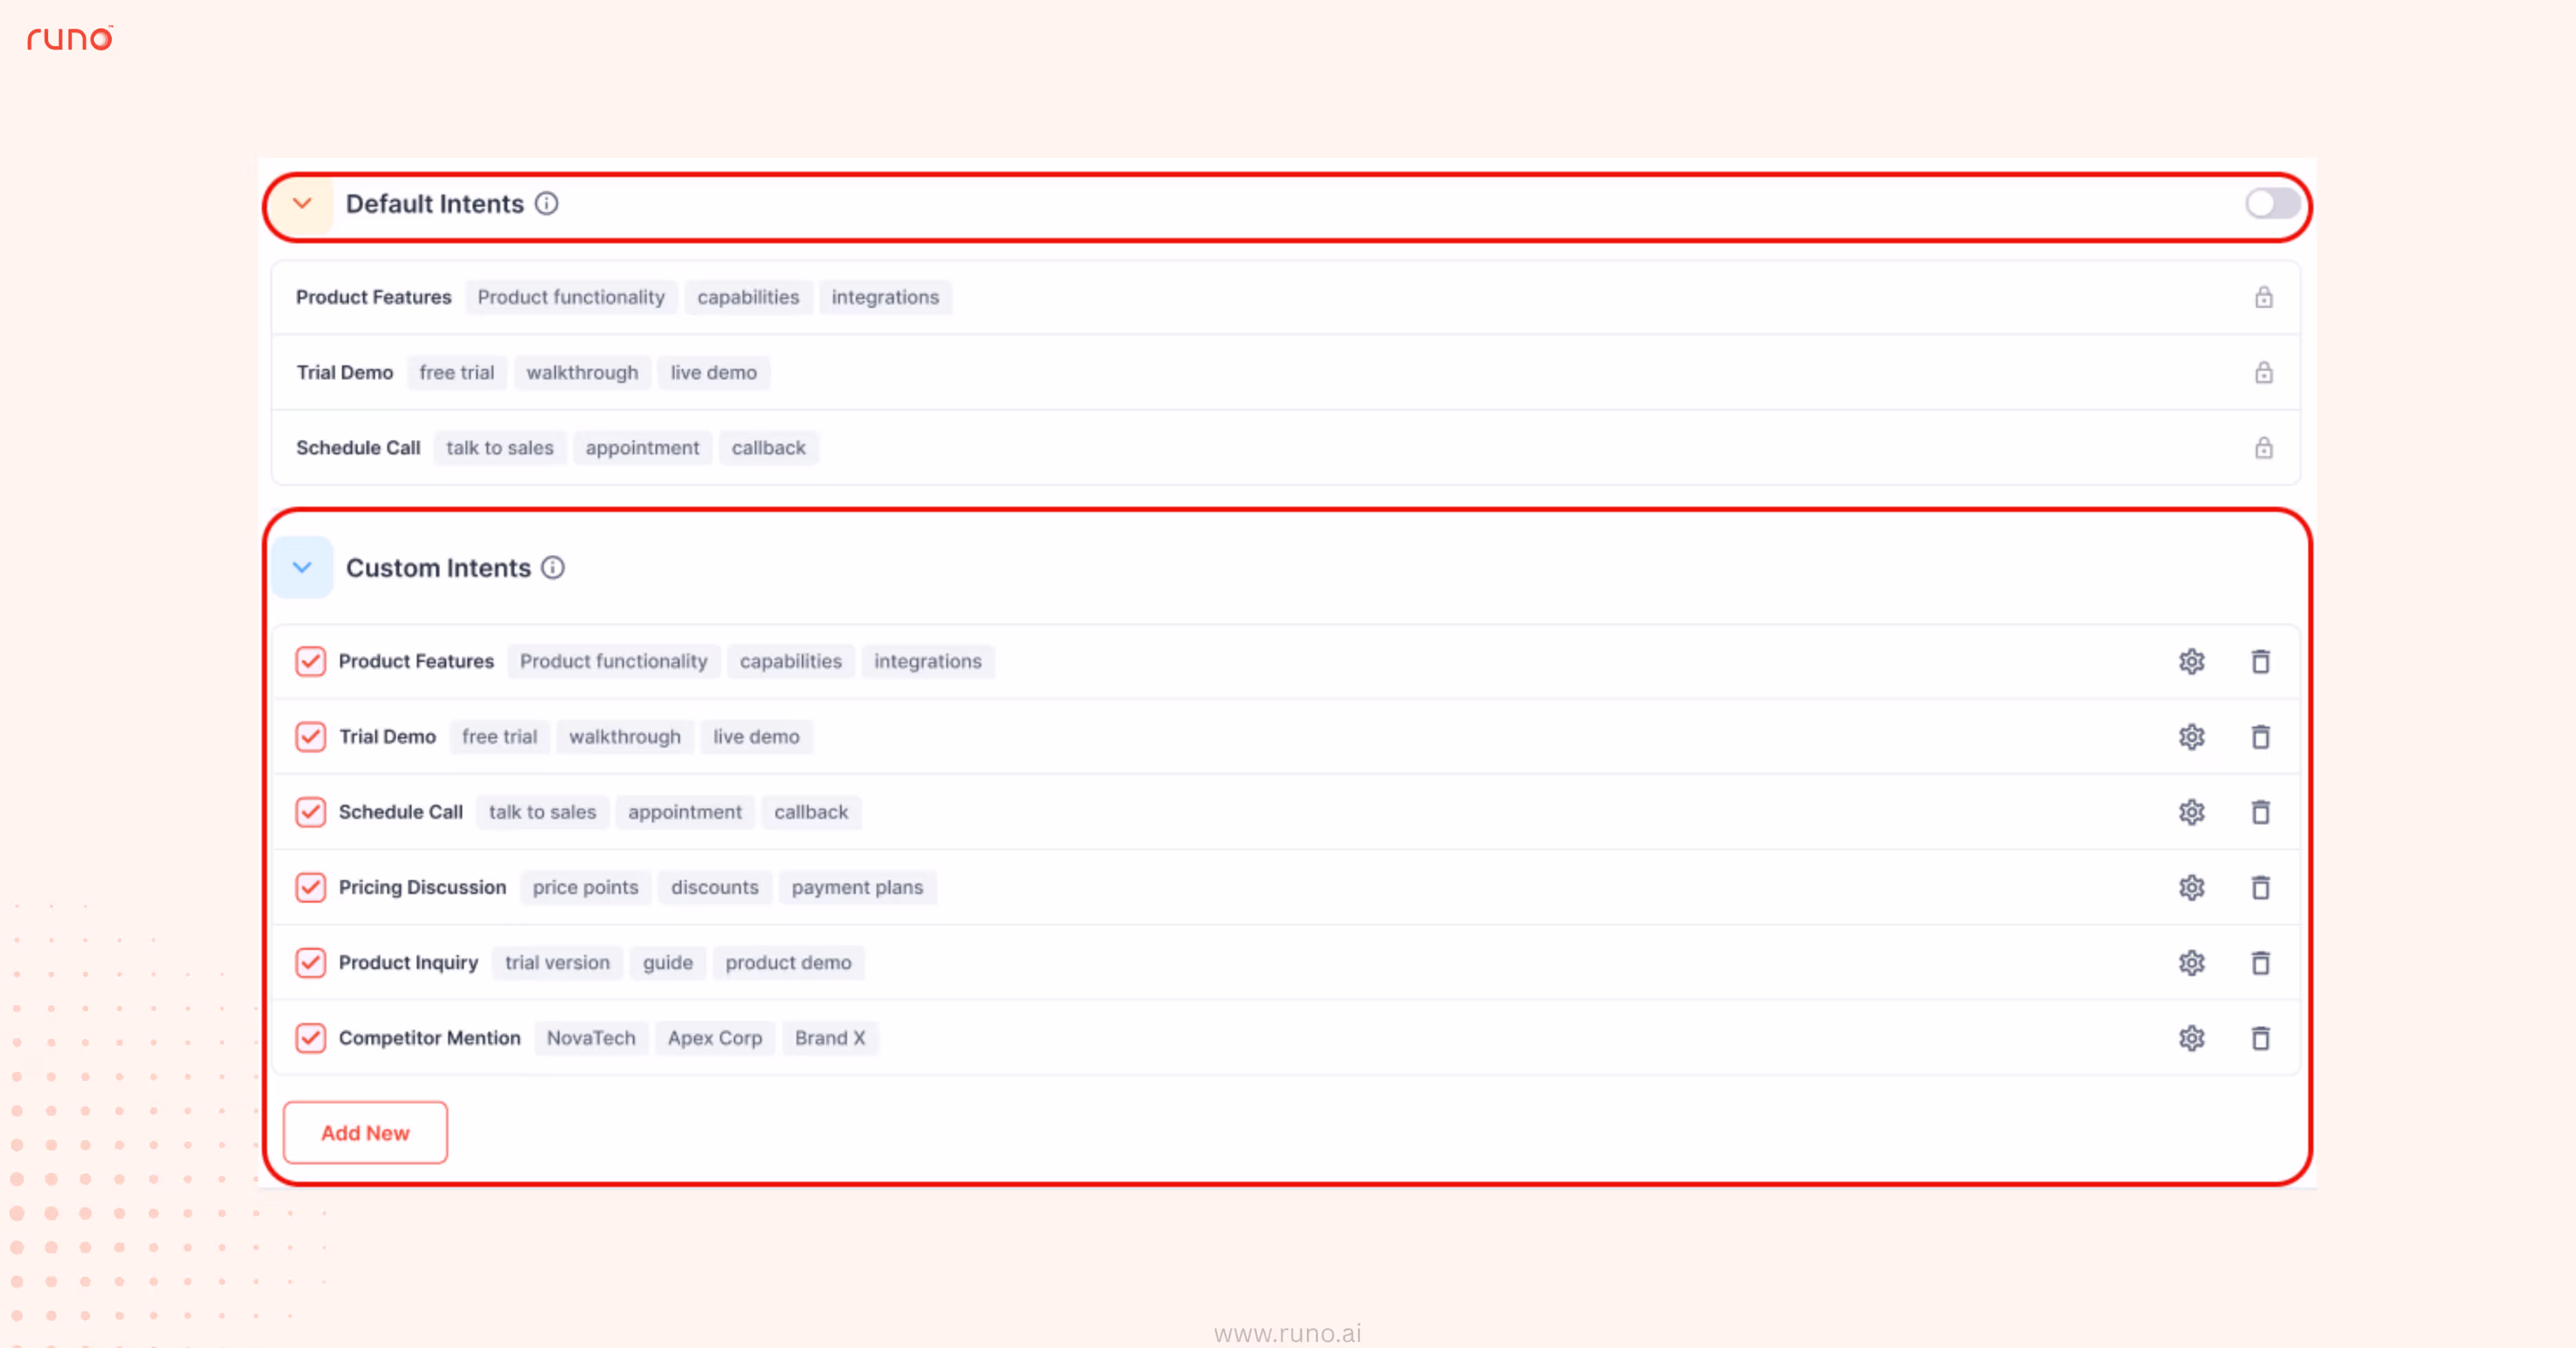
This update gives you more control over how AI interprets conversations, making insights more relevant, contextual, and business-specific.
Managing admin settings and access controls may become complex as teams grow.
With v8.1, the Admin experience has been restructured to bring better organization, clearer navigation, and more granular control over user permissions.
What’s new:
How to use:

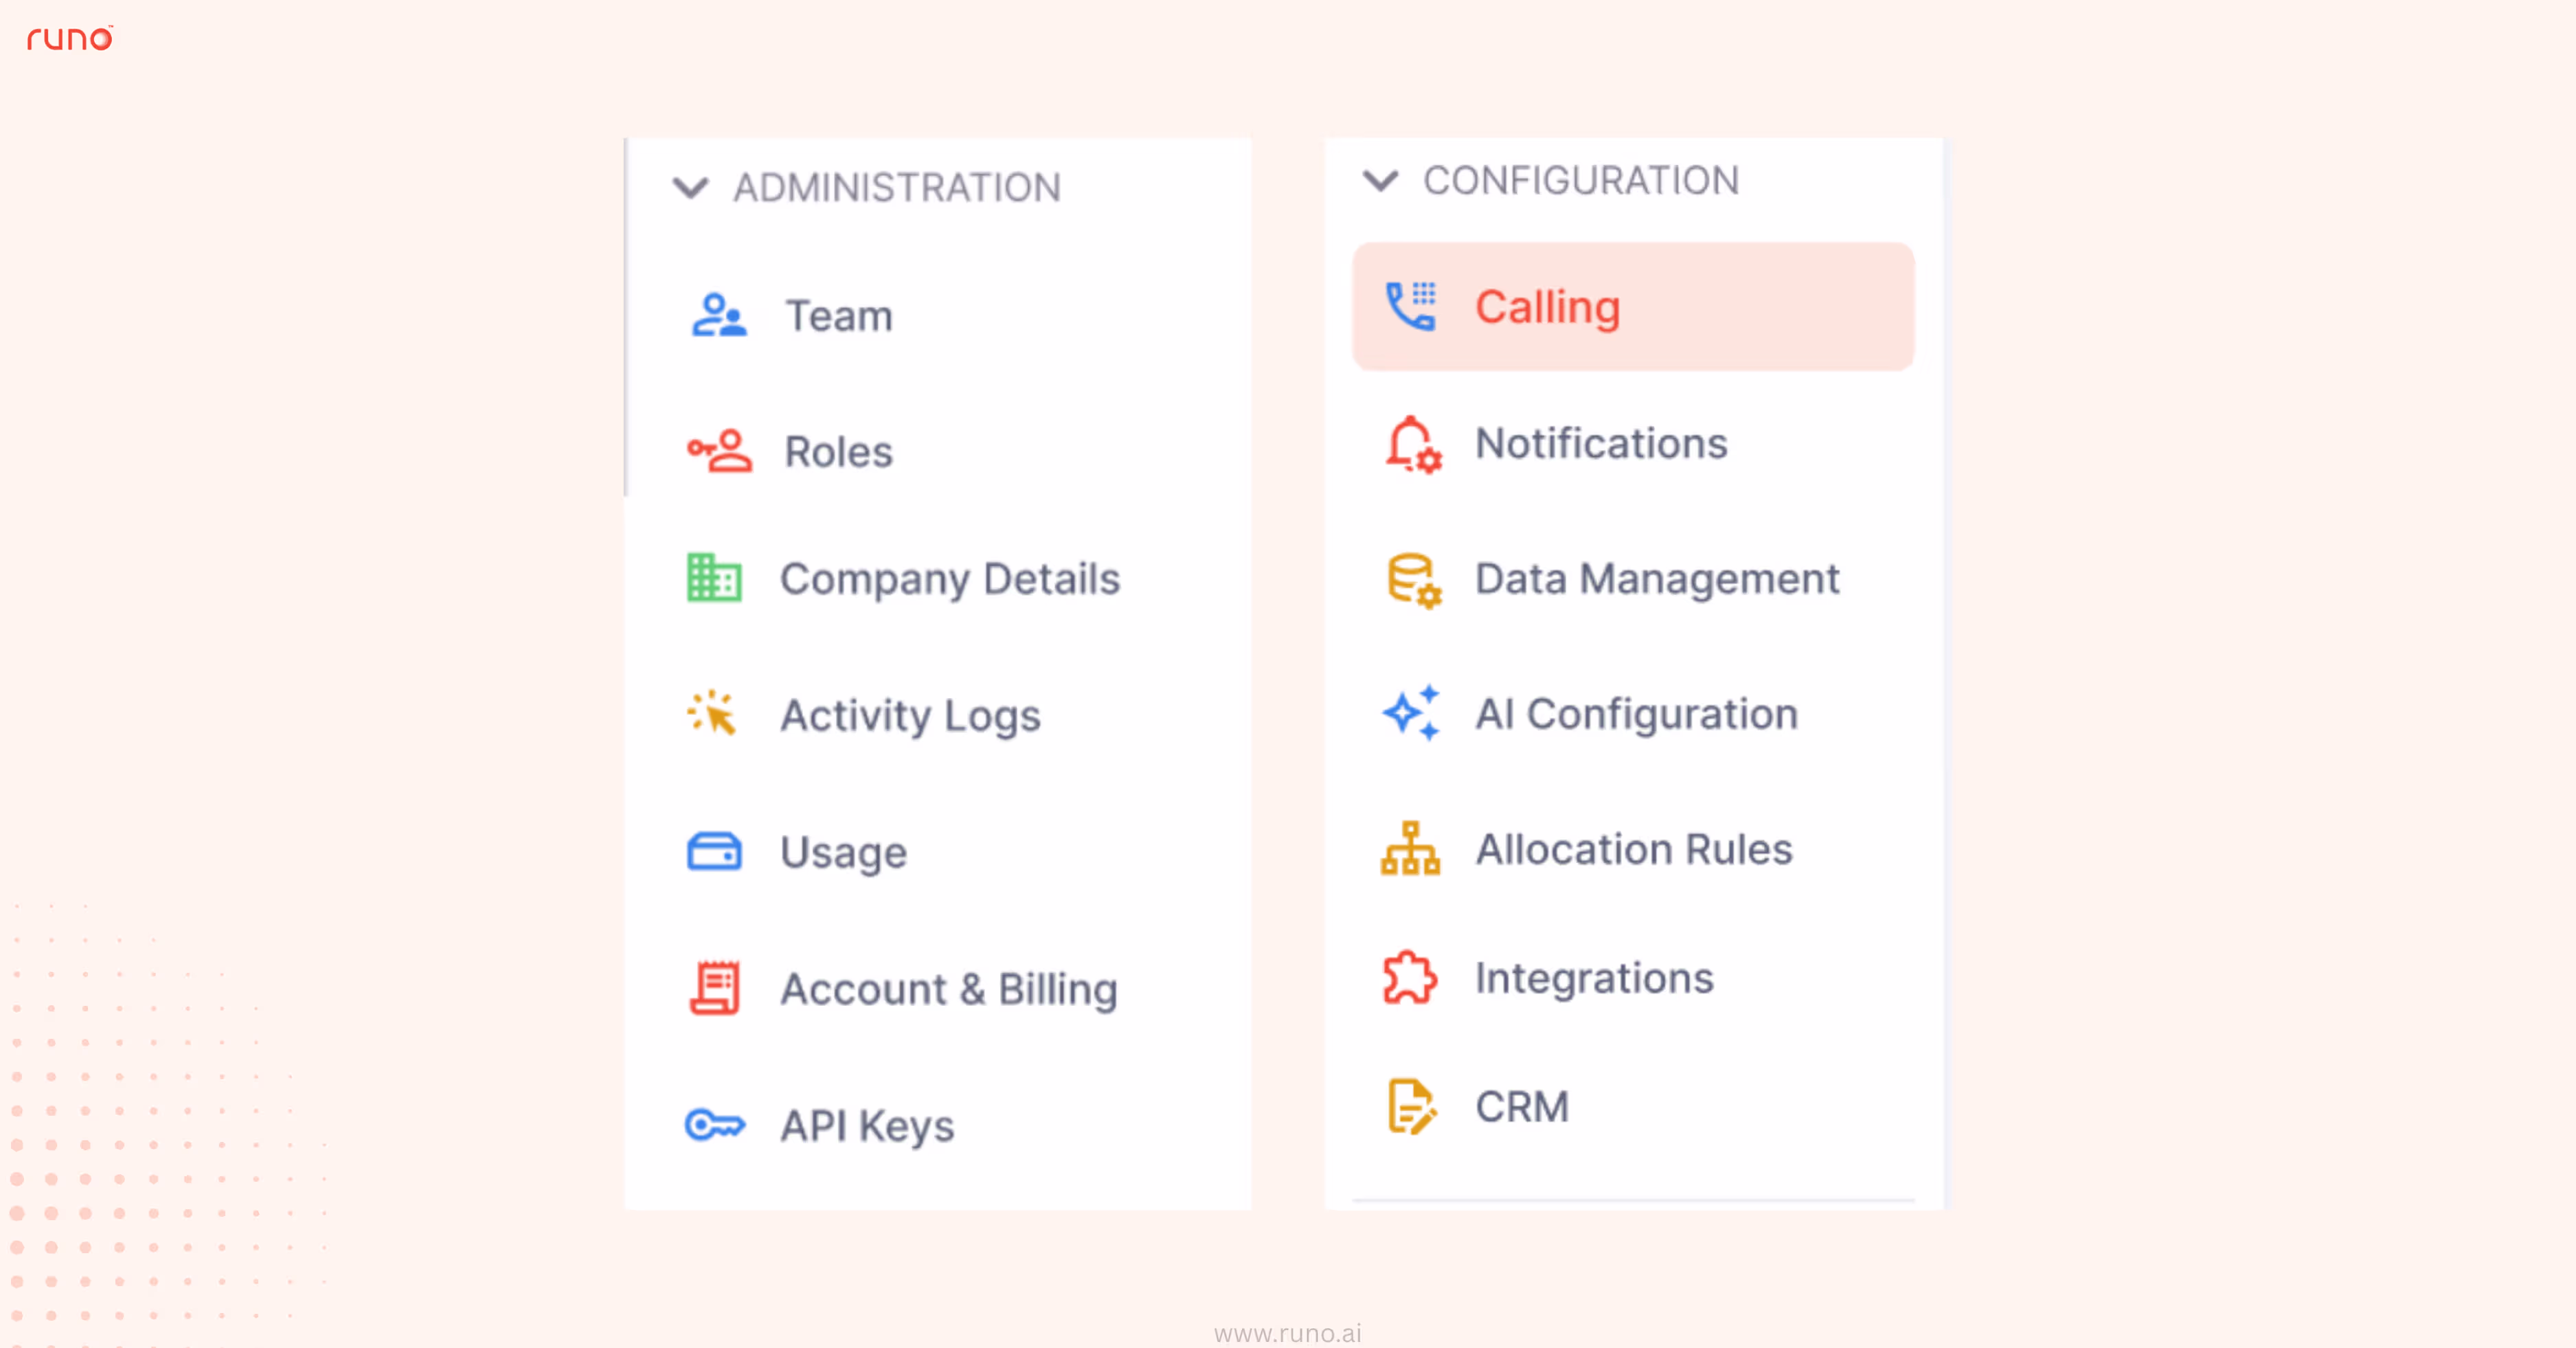
This makes admin management more intuitive, secure, and scalable as your team grows.
With v8.1, solo admins can now securely delete their accounts on their own, making account management faster and more flexible.
What’s new:
How to use:
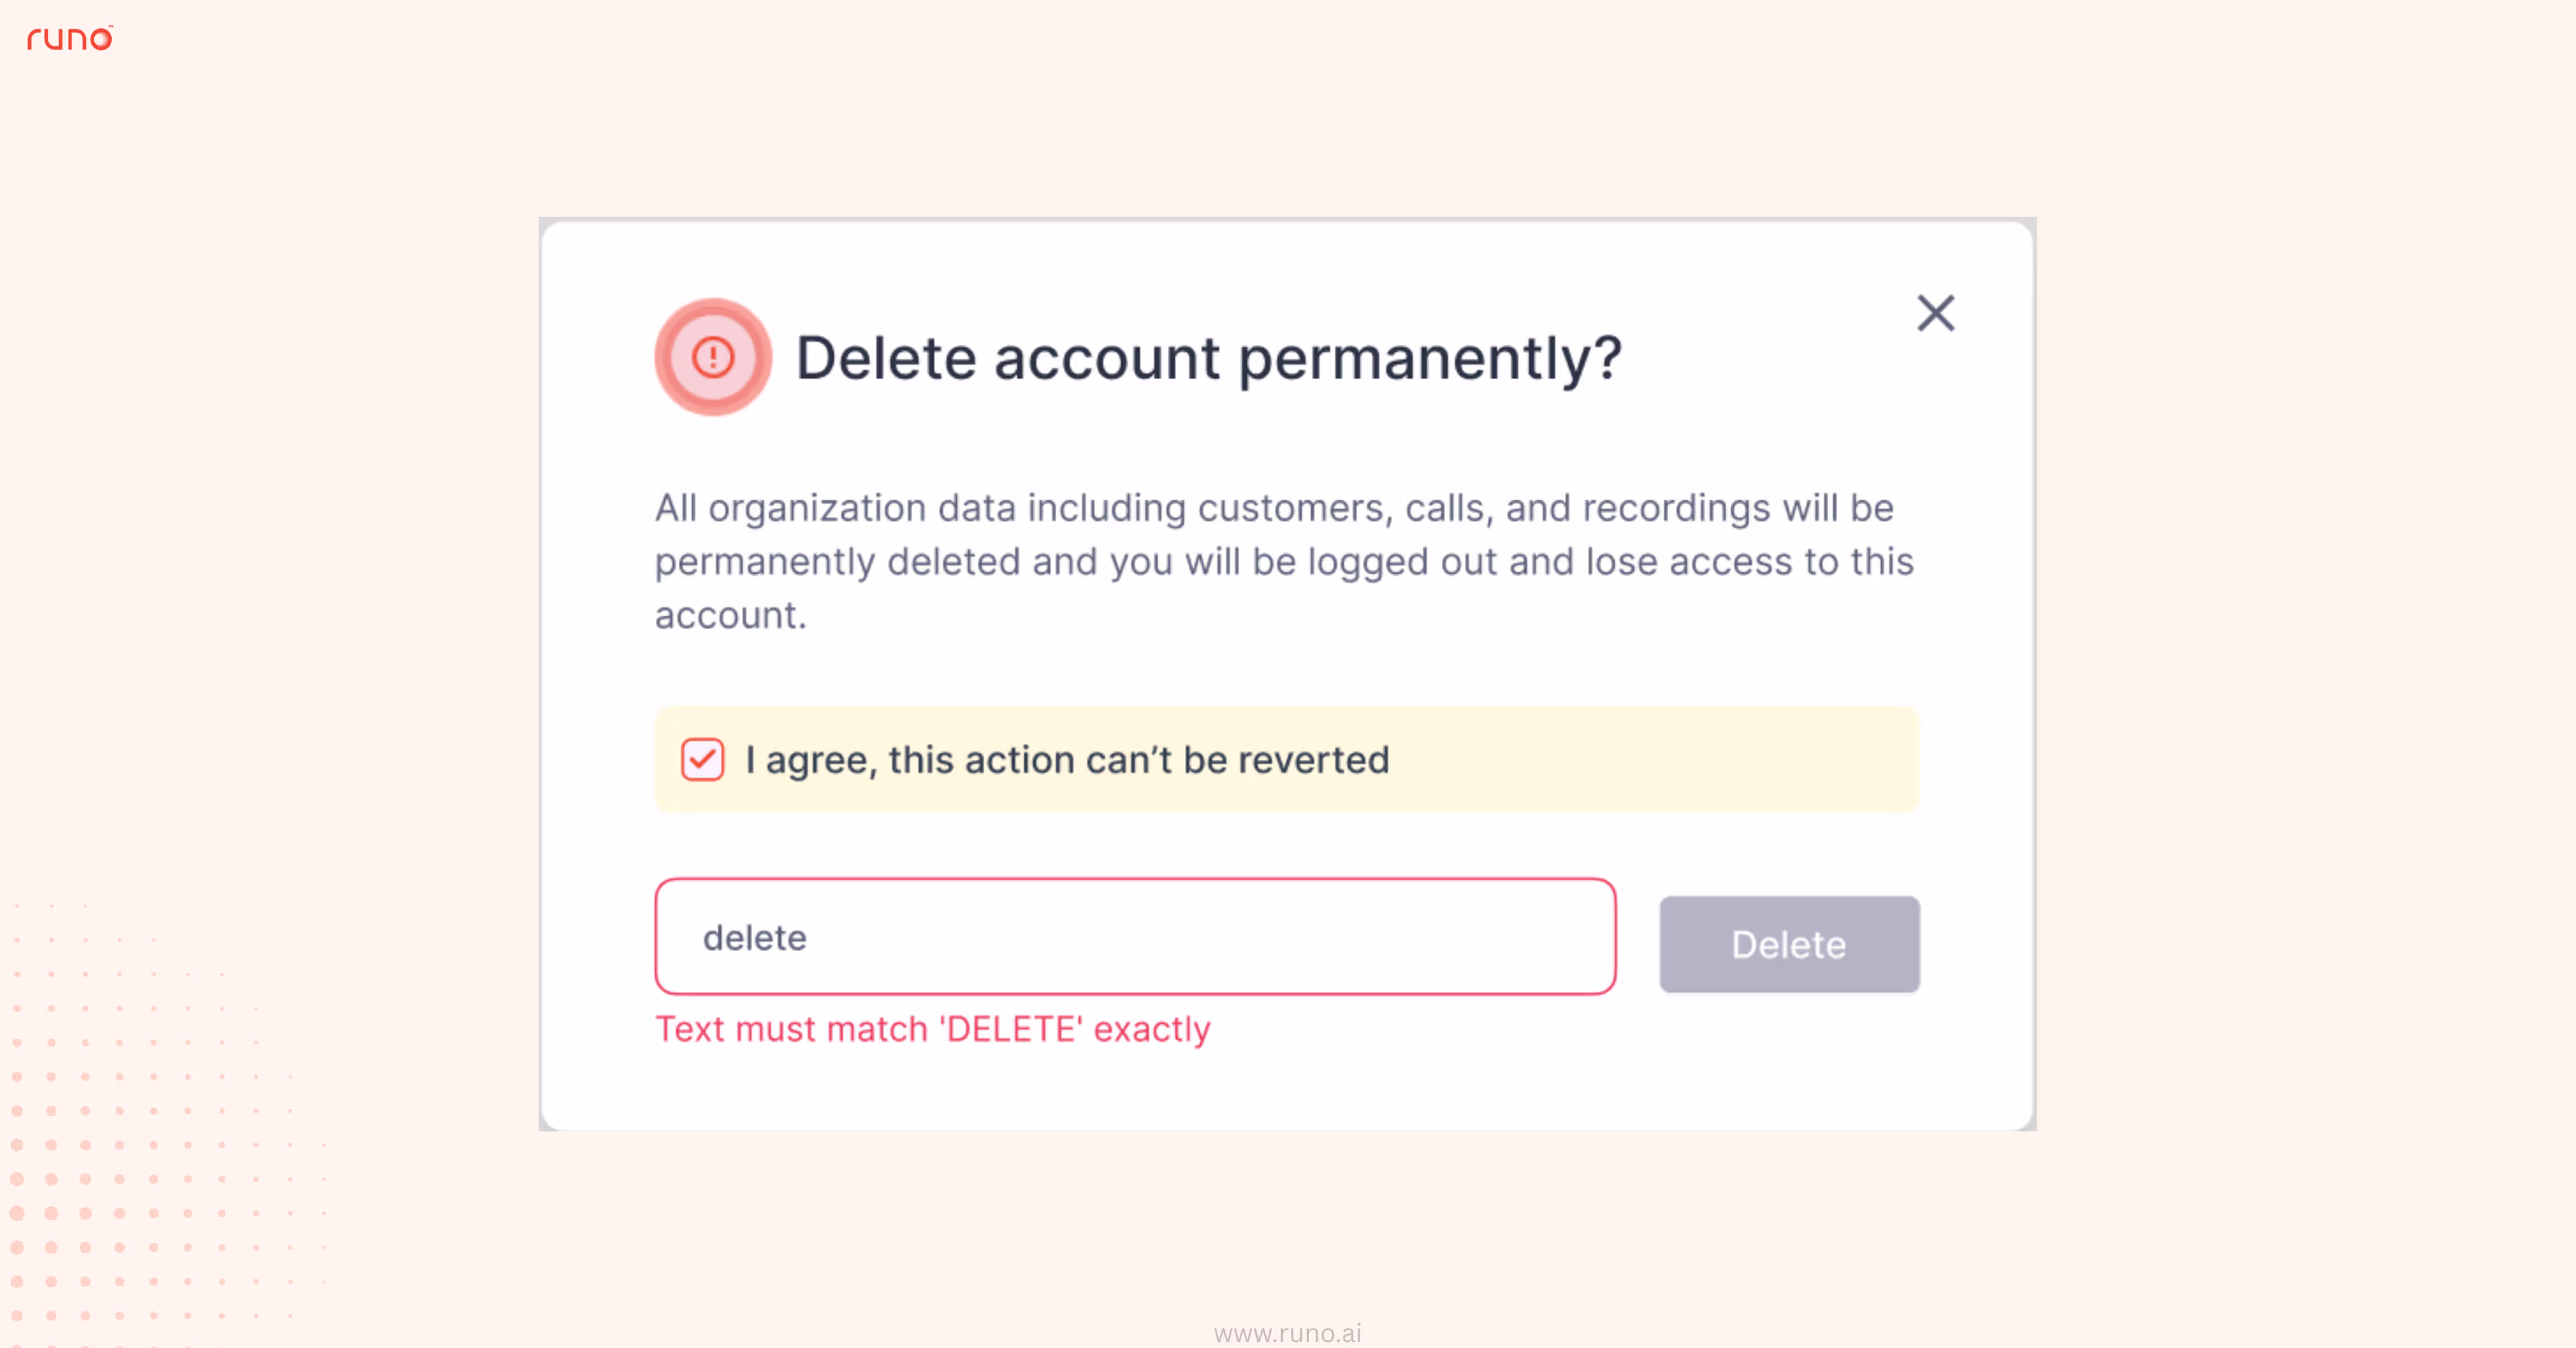
This reduces friction for users while maintaining safeguards to prevent misuse and protect business integrity.
Understanding system usage is key to avoiding unexpected limits and optimizing costs.
With v8.1, technical admins now get deeper visibility into usage patterns, helping them plan more effectively.
What’s new:
How to use:
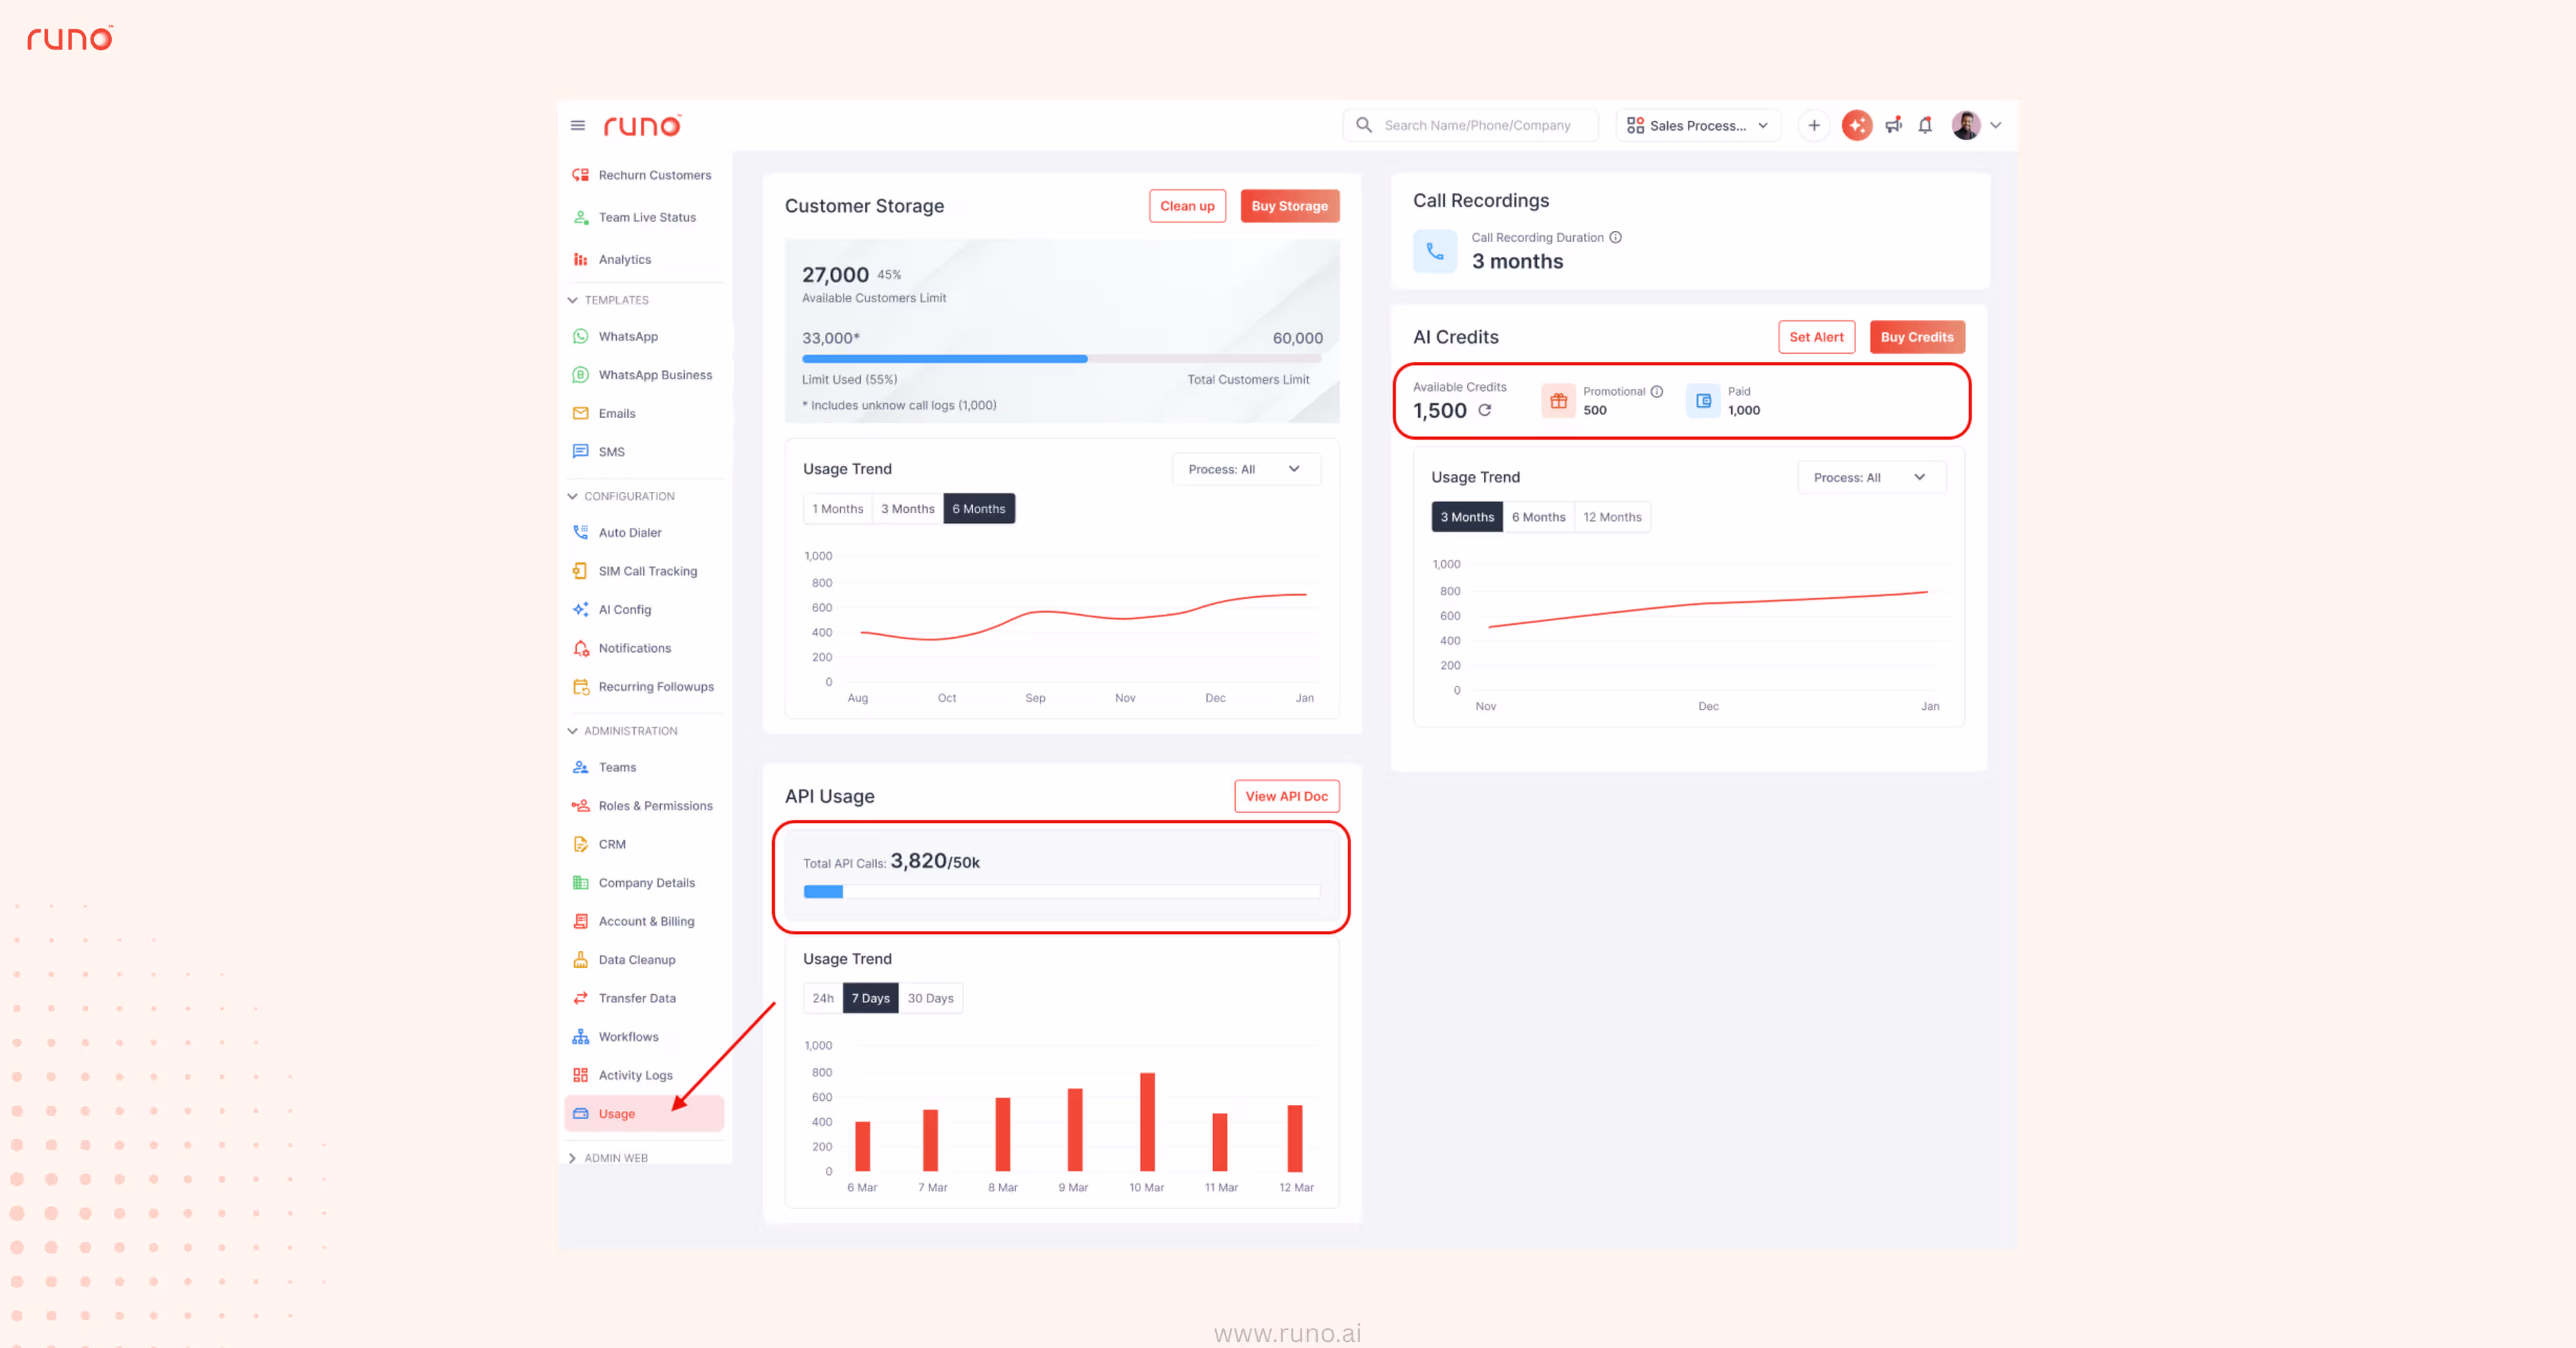
This helps teams proactively manage usage, avoid disruptions, and make more informed cost decisions.
Tracking past data transfers can be challenging without clear visibility into what moved, when, and by whom.
With v8.1, a dedicated history view brings complete transparency to all your data transfer activities, making audits and troubleshooting much simpler.
What’s new:
How to use:
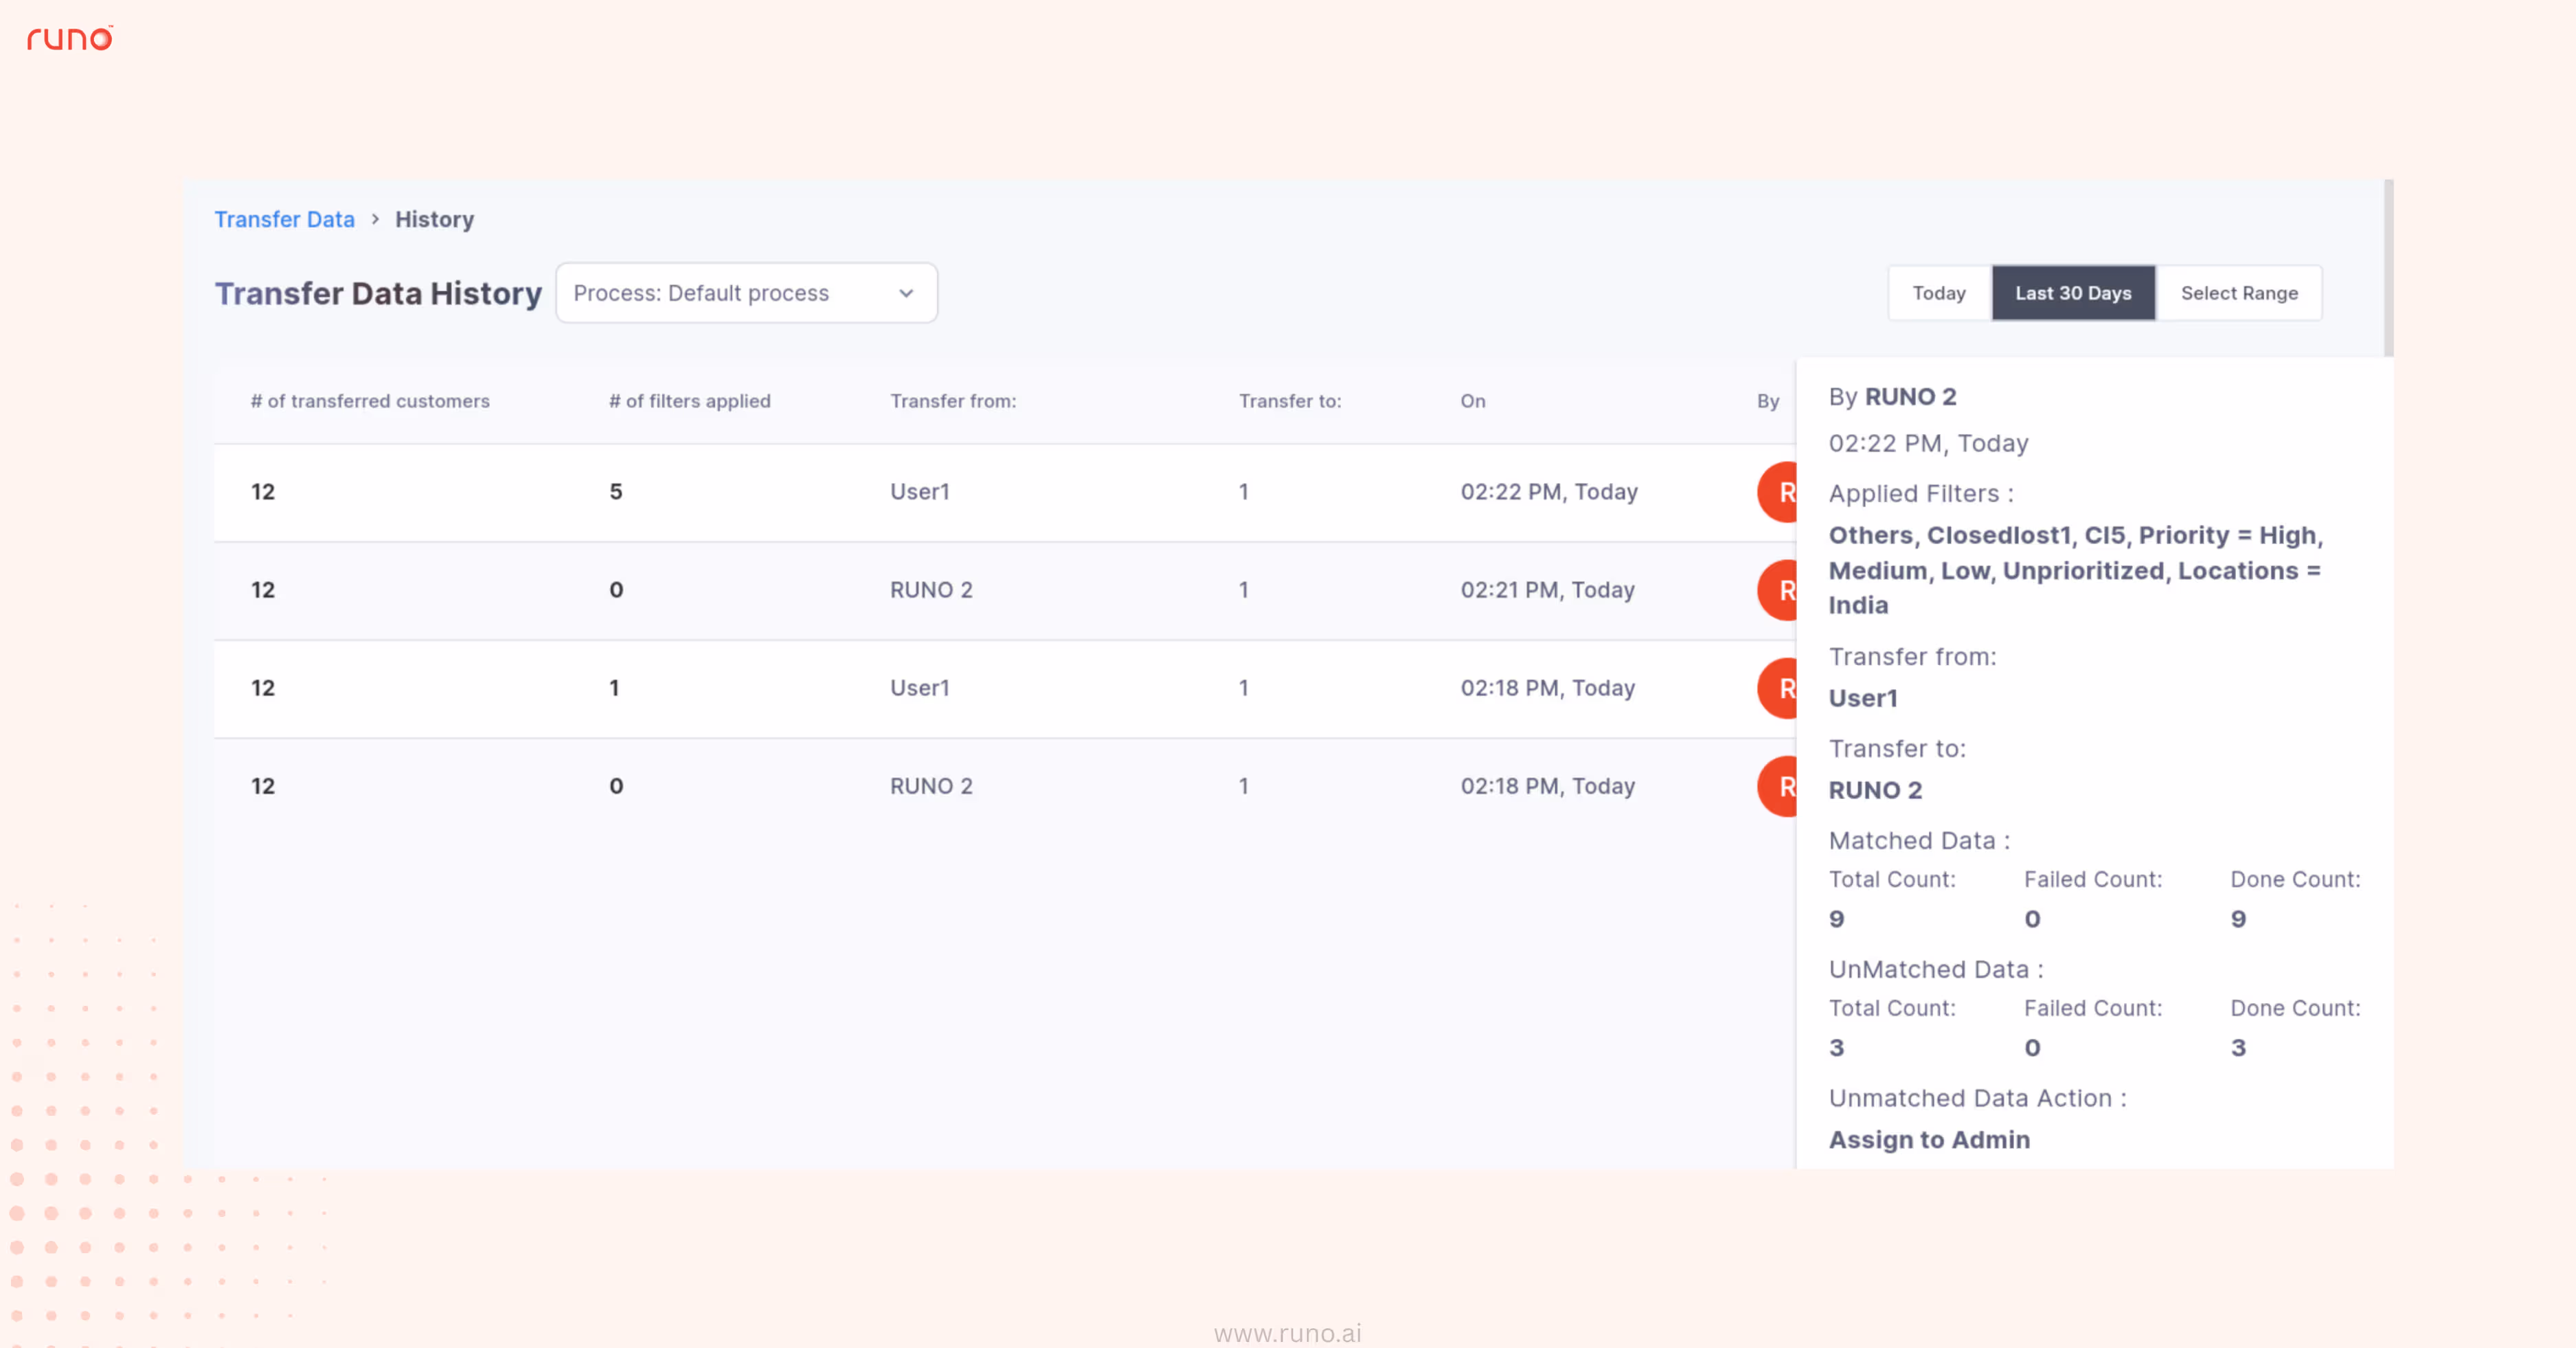
This gives you complete visibility and control over data movements, making audits and issue resolution faster and more reliable.
Controlling when and how leads flow into the system is critical for campaign management.
With v8.1, you can now directly manage your Facebook Lead Ads connection, ensuring smoother control over lead inflow without risking accidental disruptions.
What’s new:
How to use:
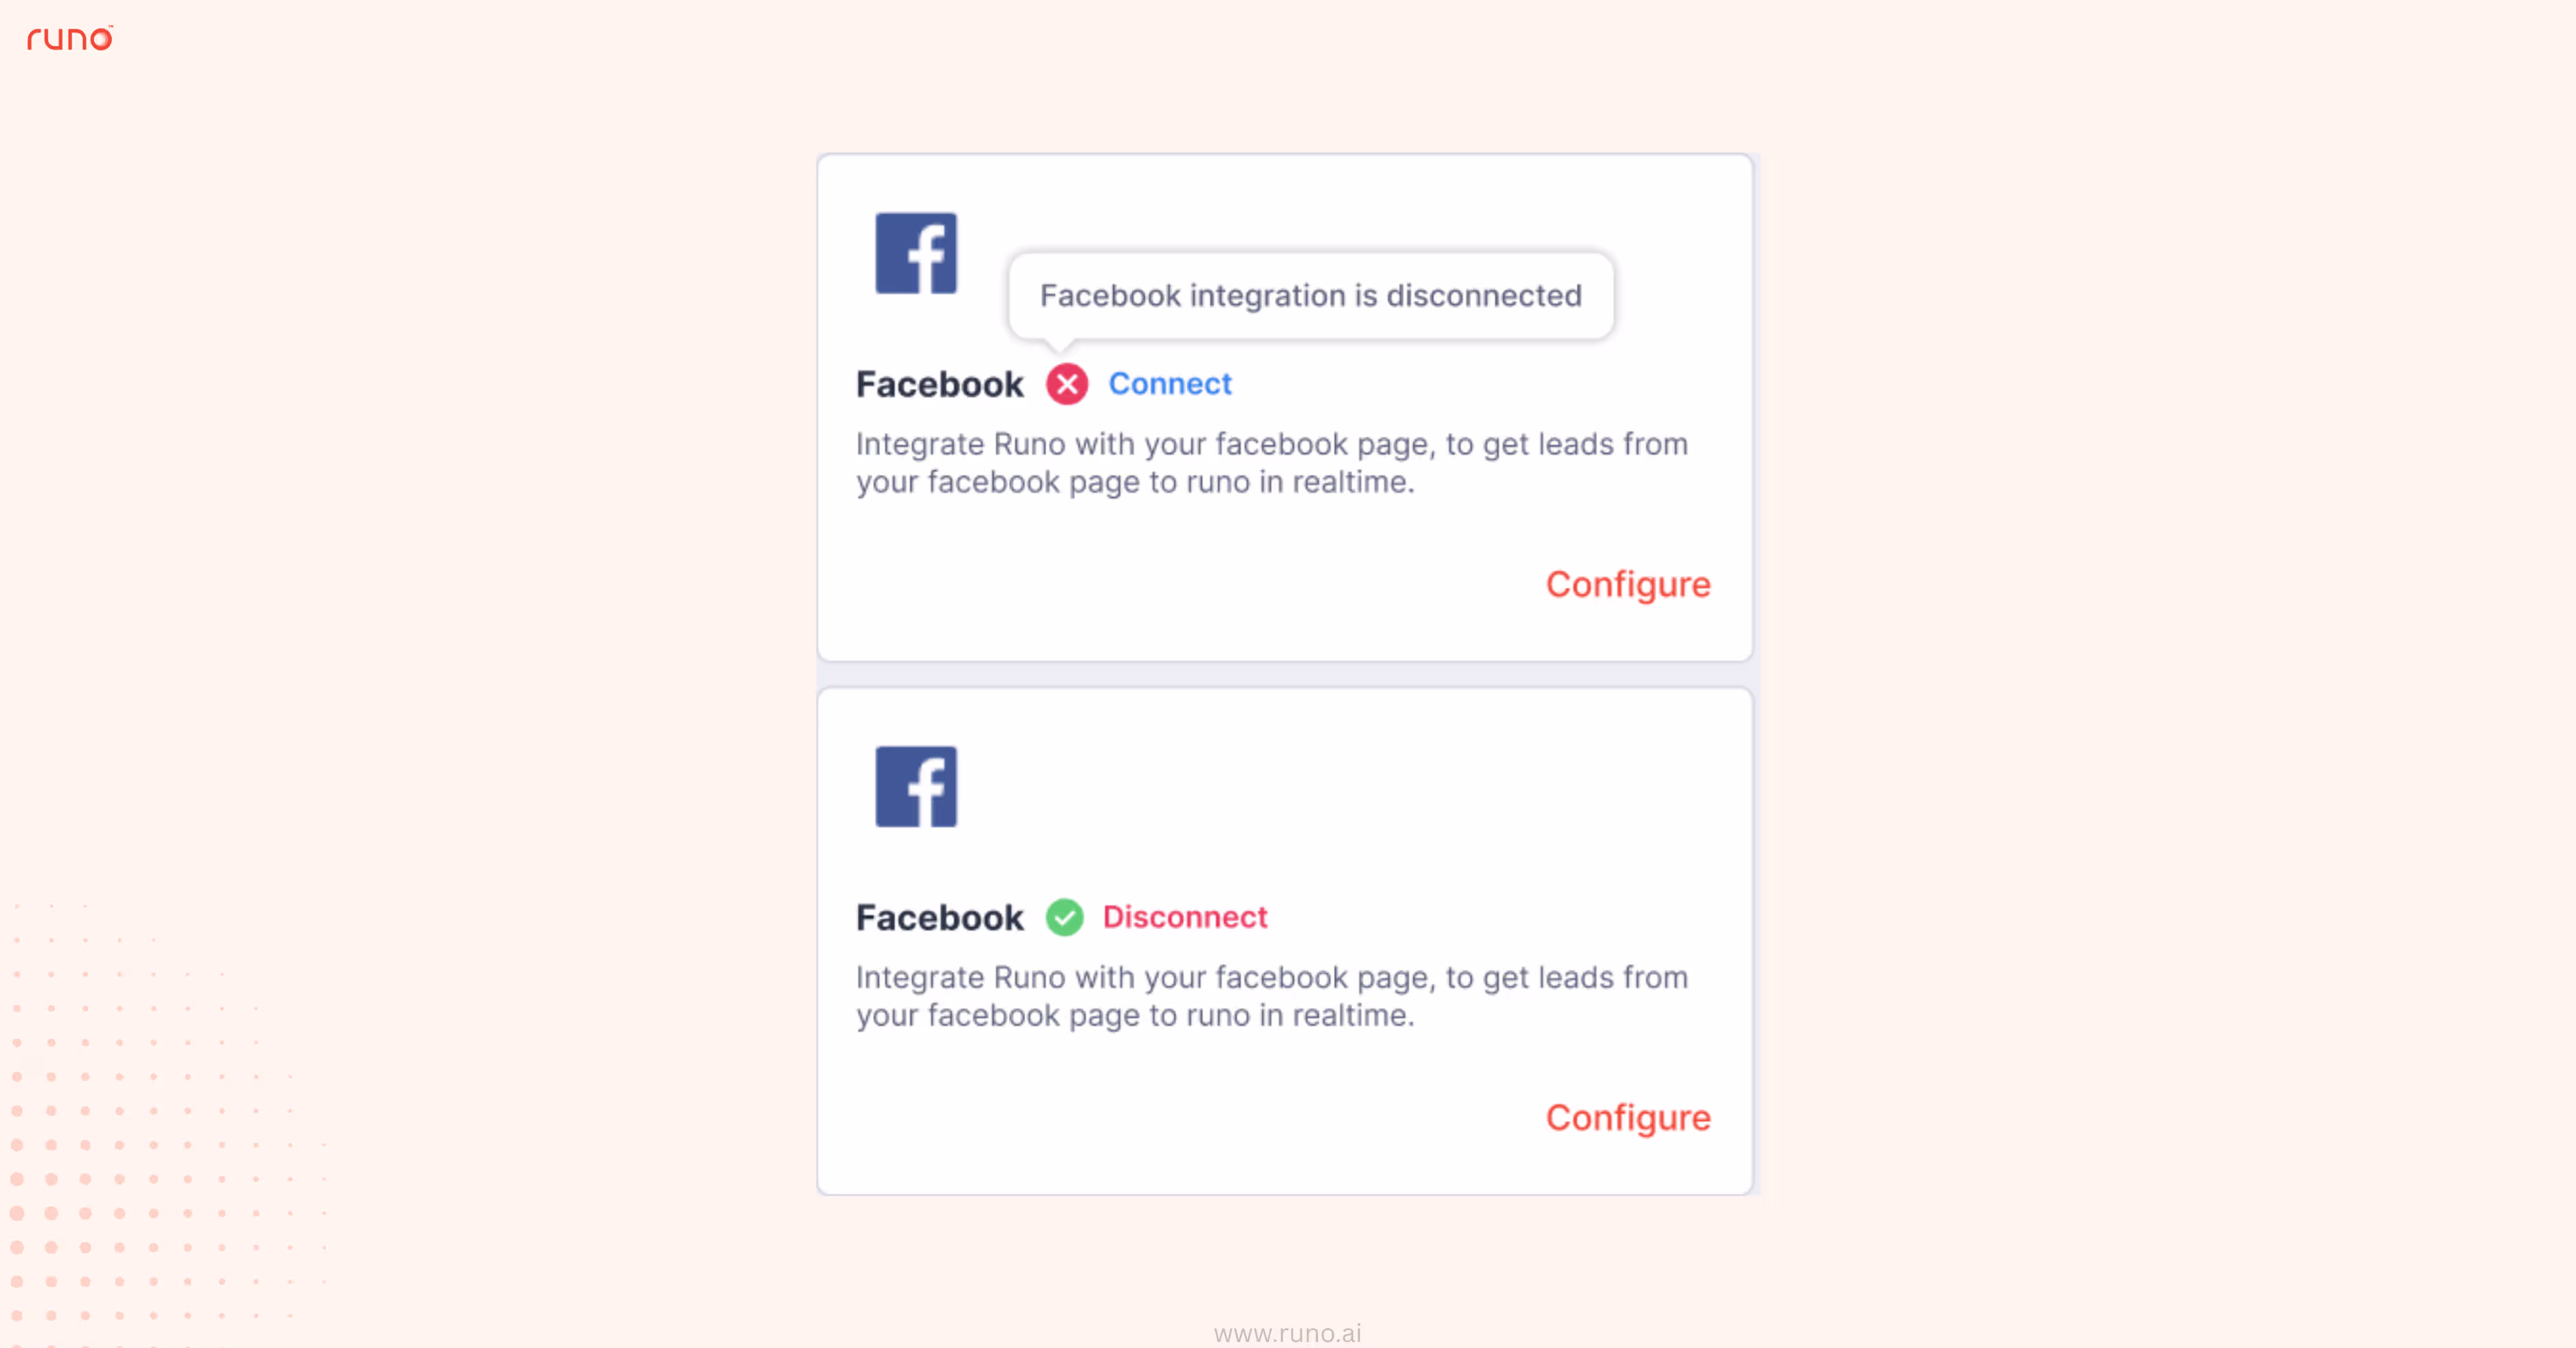
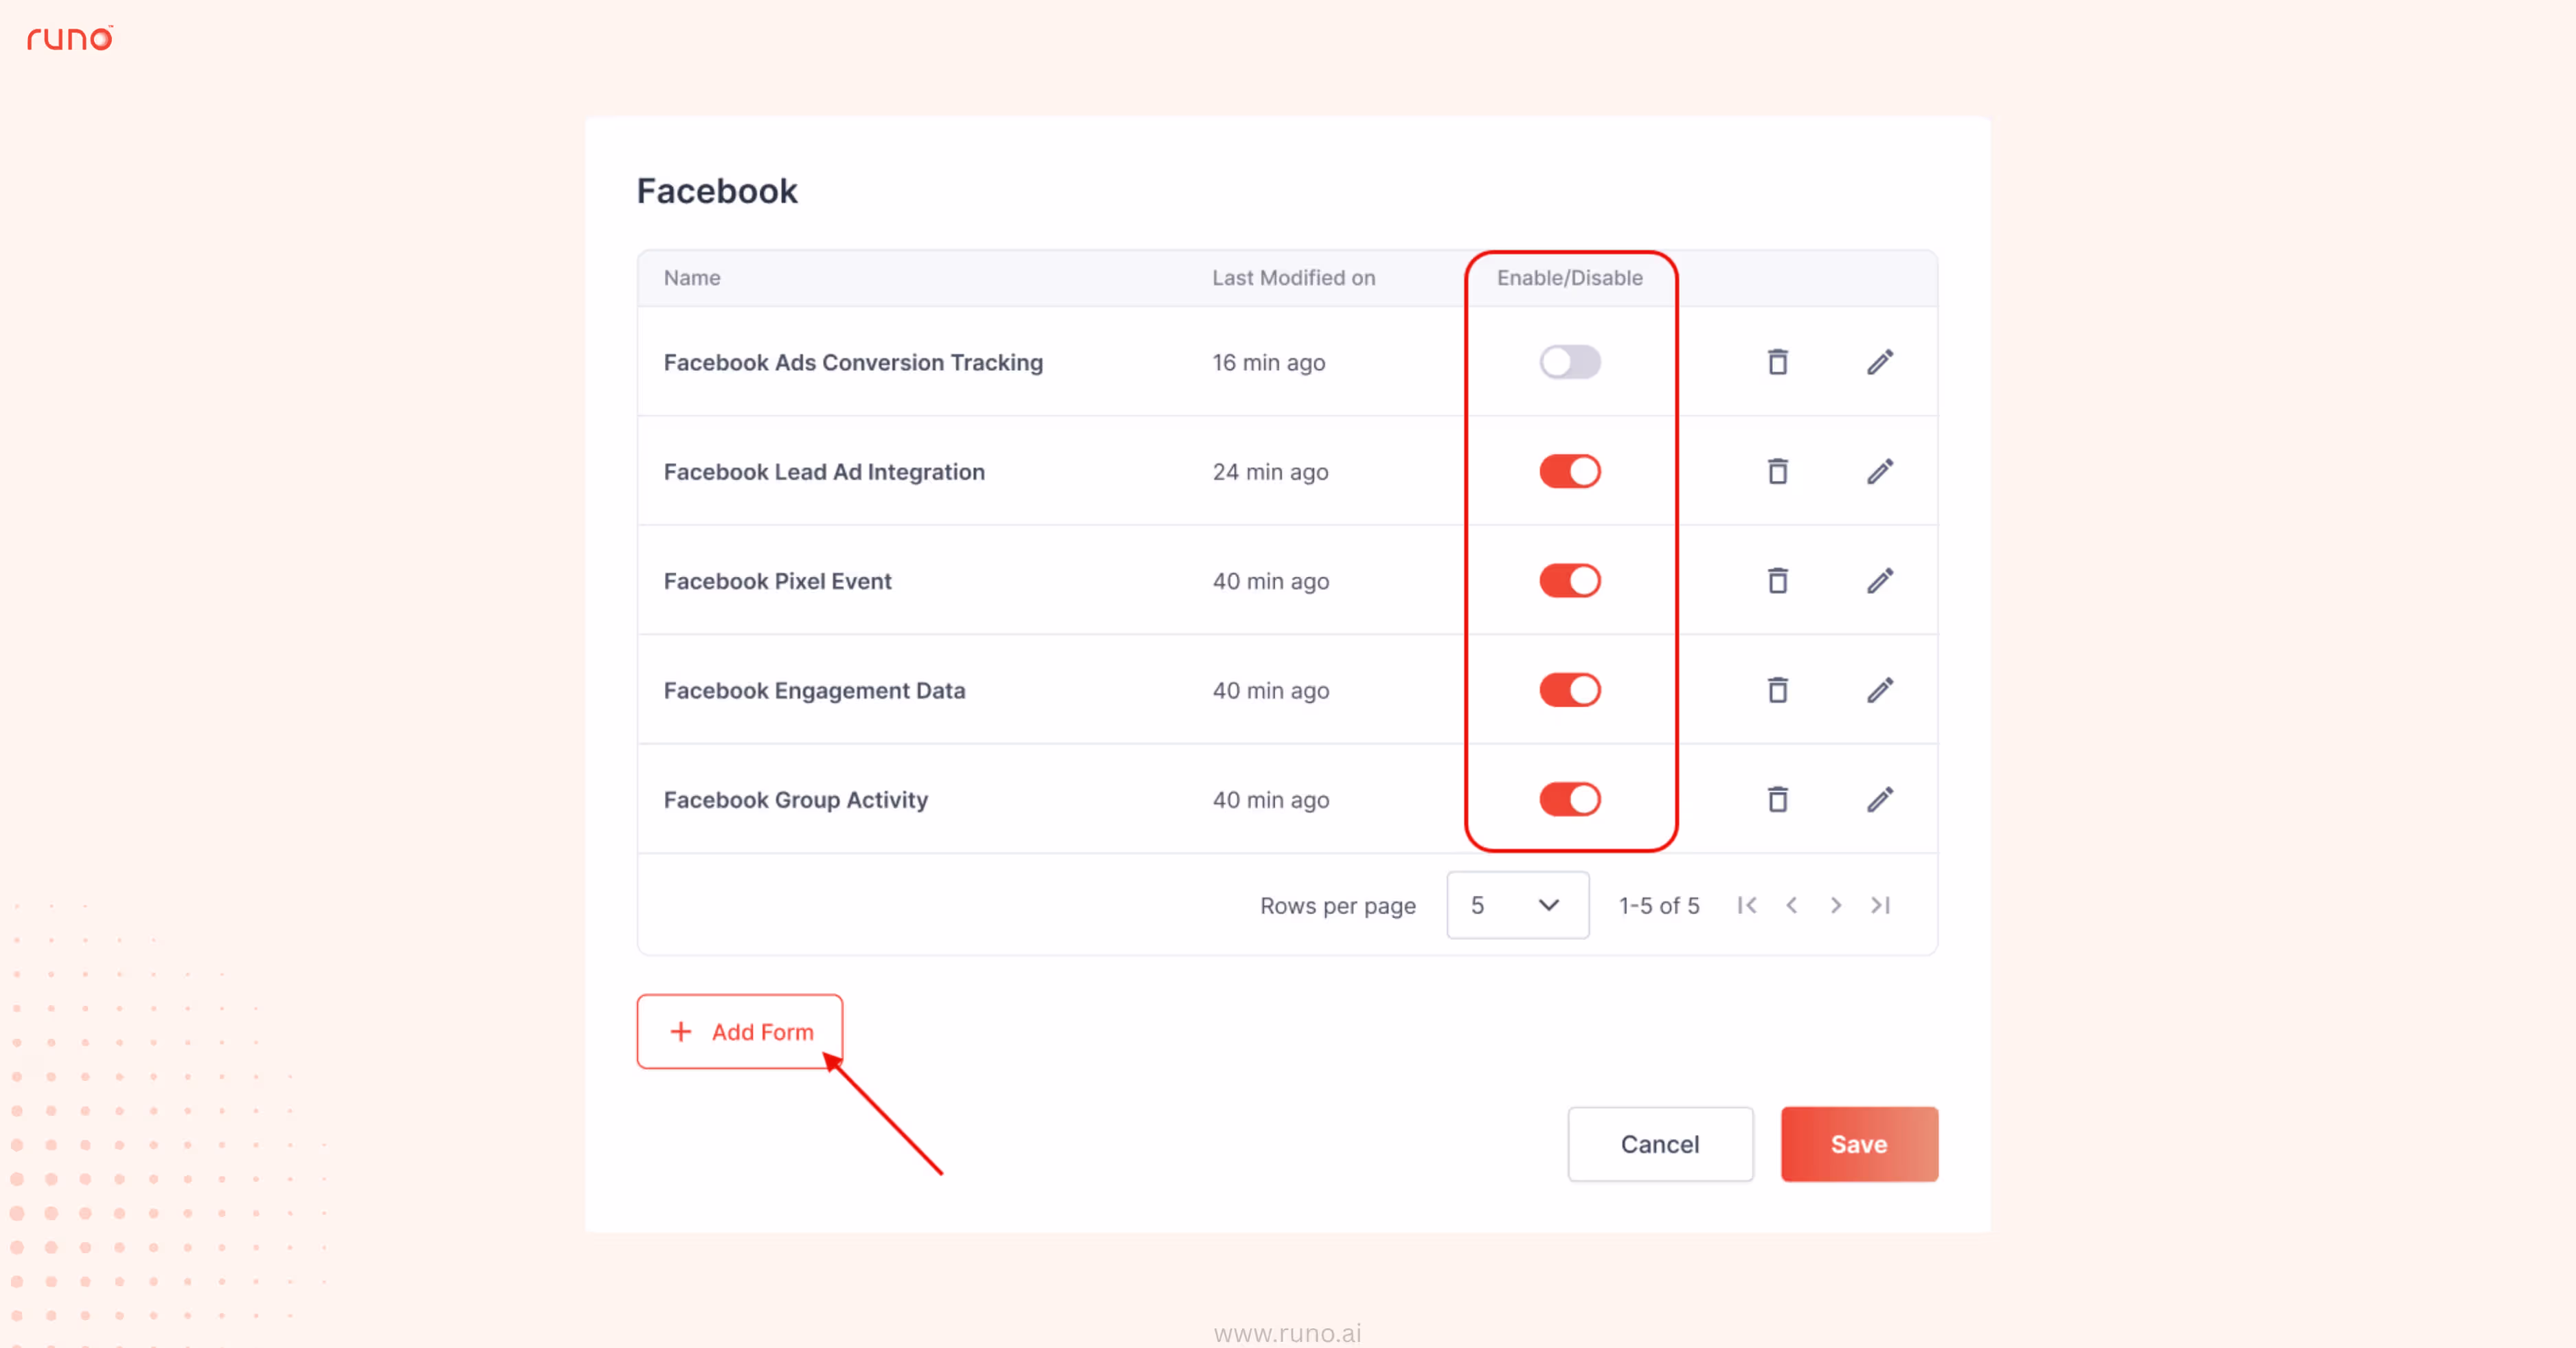
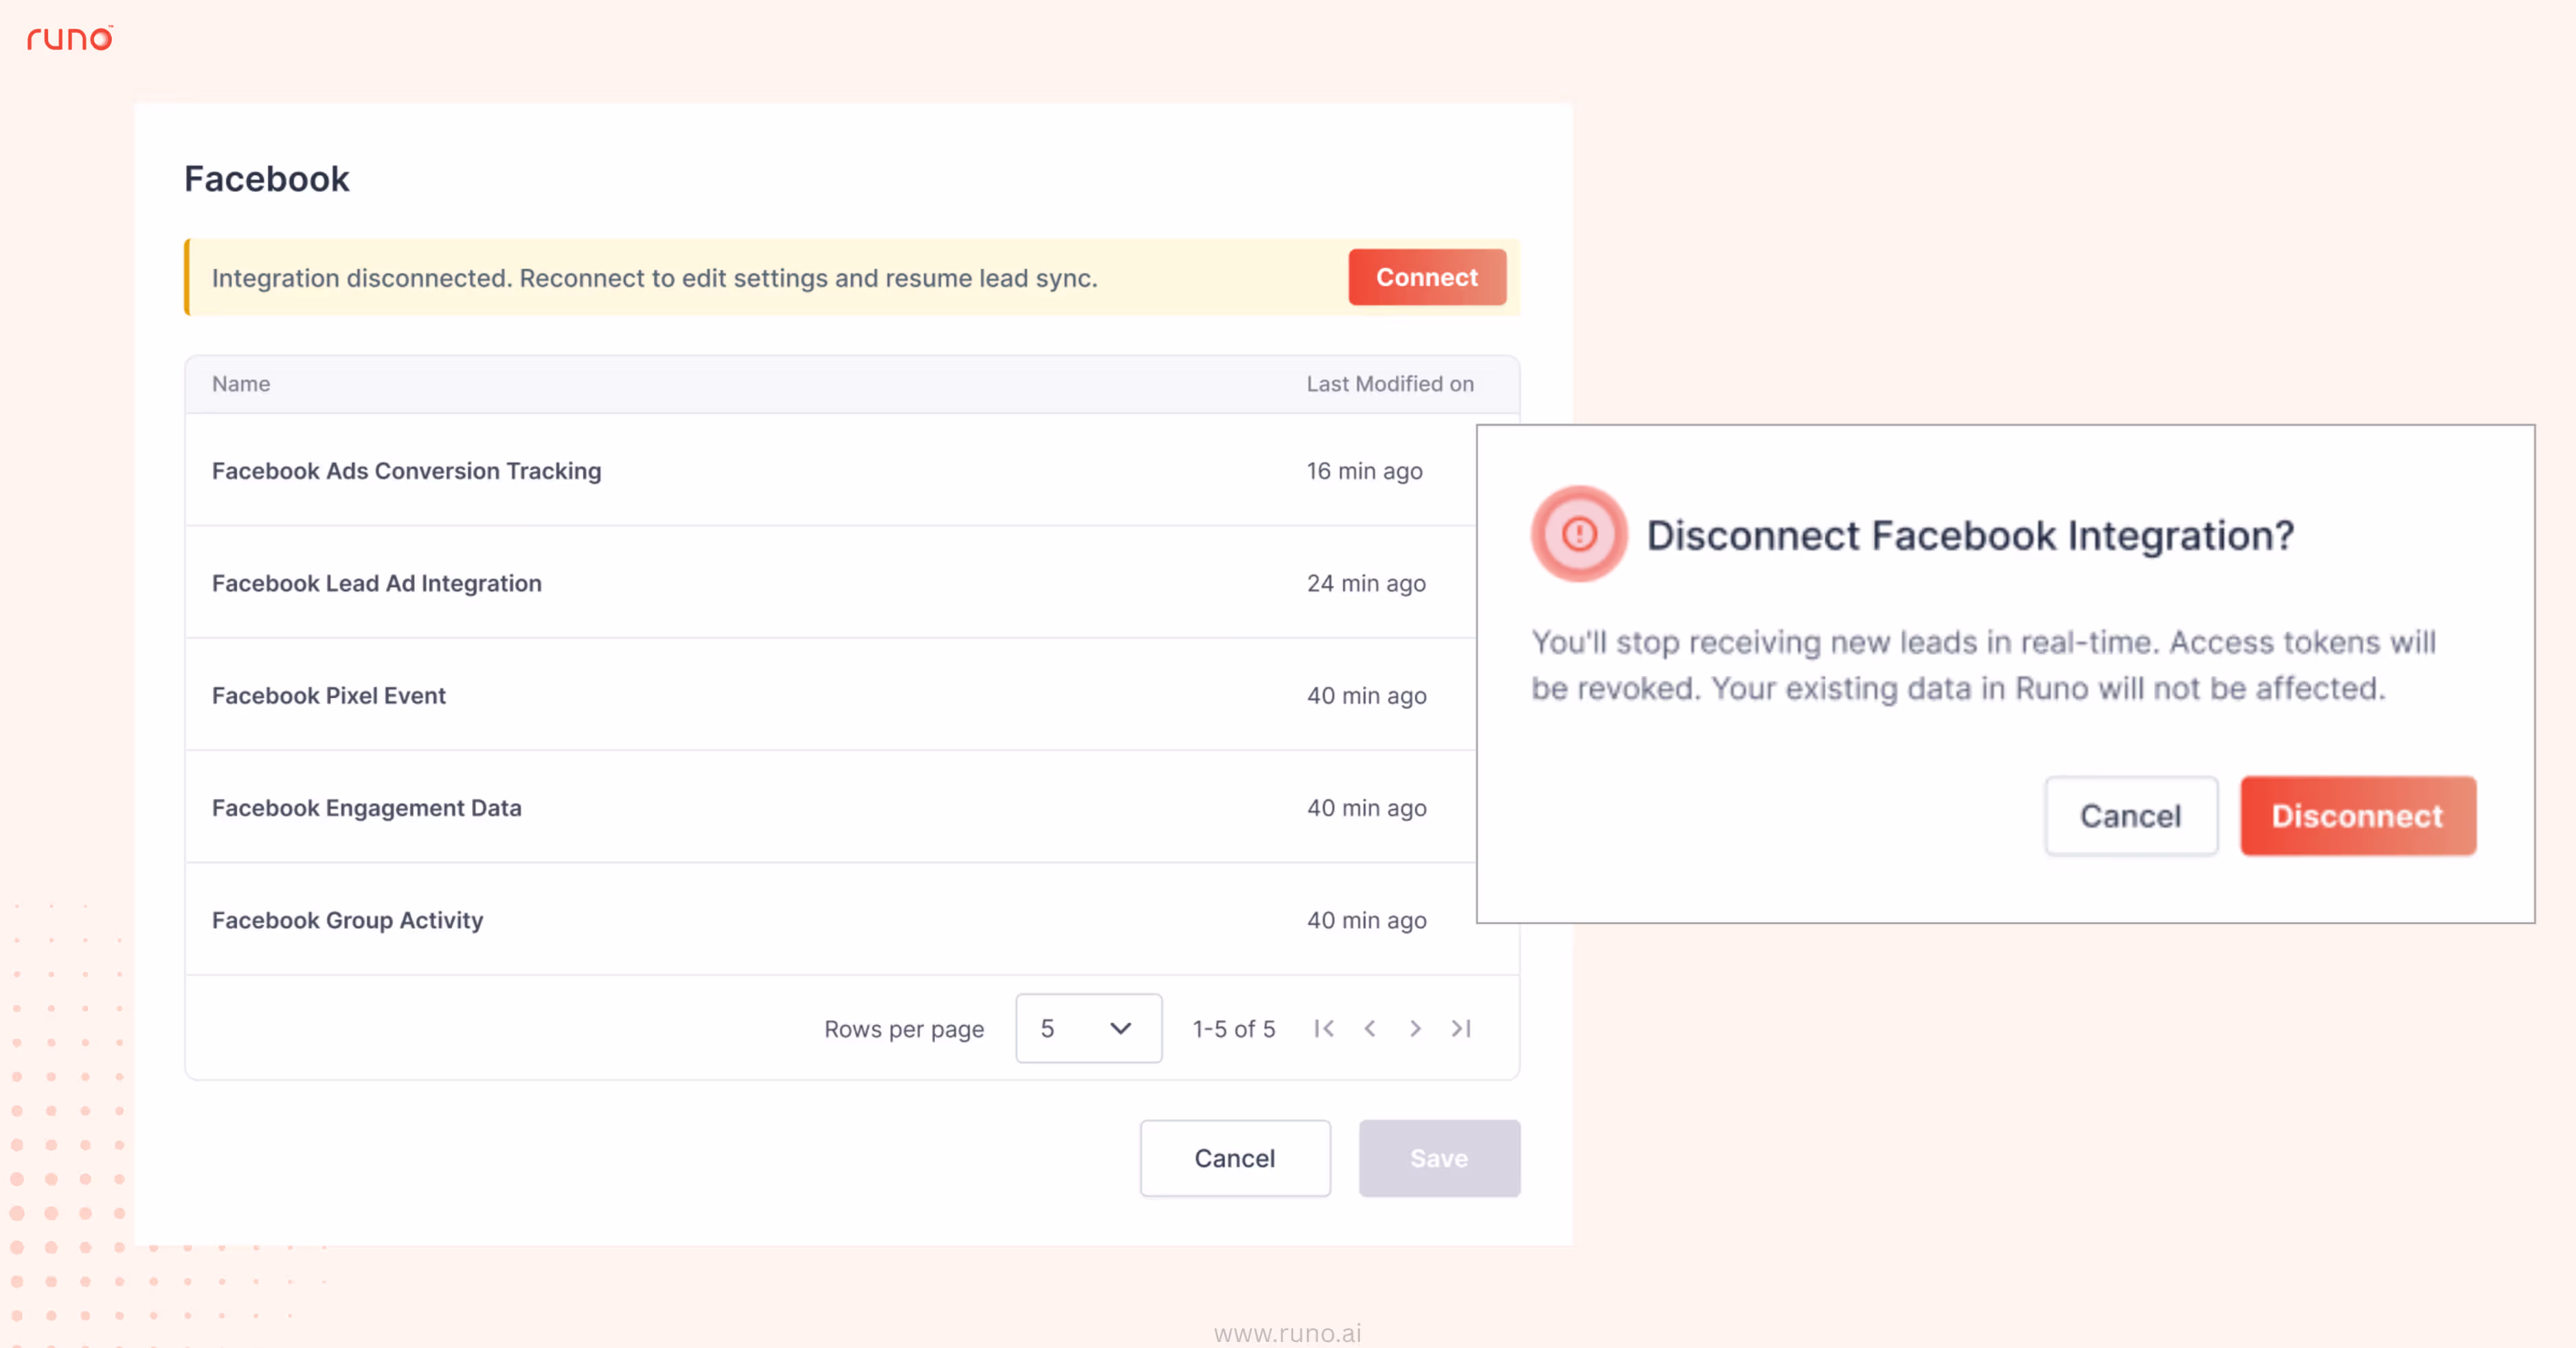
This gives you flexible, real-time control over your lead inflow without disrupting your overall setup.
Consistent Call Duration Format (hh: mm)
What’s new:
Caller Number in Call Reports
What’s new:
Managing leads across multiple processes often meant relying on manual workarounds.
With v8.1, you can now seamlessly transfer leads between processes without losing any critical context or history.
What’s new:
How to use:
This ensures smooth lead movement across workflows while maintaining complete data integrity and context.
Managing user access across systems can be time-consuming and error-prone when done manually.
With v8.1, you can now programmatically deactivate users in Runo through a secure API, ensuring smoother user lifecycle management and better control.
What’s new:
Refer to the API documentation to integrate and start deactivating users programmatically.
Handling high volumes of lead assignments often requires multiple steps and constant coordination.
With v8.1, you can now streamline this process by creating and assigning leads/customers in bulk through a single API request.
What’s new:
Below is a sample payload.
Accessing customer and allocation data shouldn’t depend on manual exports and delays.
With v8.1, you can now fetch this data programmatically through secure APIs, making real-time syncing with your systems faster and more reliable.
What’s new:
While default AI Intents provide a strong foundation for conversation analysis, every business has unique nuances.
With v8.1, you can now extend these capabilities by adding custom intents, ensuring AI insights are even more aligned with your specific goals.
What’s new:
How to use:
This update gives you more control over how AI interprets conversations, making insights more relevant, contextual, and business-specific.
Managing admin settings and access controls may become complex as teams grow.
With v8.1, the Admin experience has been restructured to bring better organization, clearer navigation, and more granular control over user permissions.
What’s new:
How to use:
This makes admin management more intuitive, secure, and scalable as your team grows.
With v8.1, solo admins can now securely delete their accounts on their own, making account management faster and more flexible.
What’s new:
How to use:
This reduces friction for users while maintaining safeguards to prevent misuse and protect business integrity.
Understanding system usage is key to avoiding unexpected limits and optimizing costs.
With v8.1, technical admins now get deeper visibility into usage patterns, helping them plan more effectively.
What’s new:
How to use:
This helps teams proactively manage usage, avoid disruptions, and make more informed cost decisions.
Tracking past data transfers can be chenging without clear visibility into what moved, when, and by whom.
With v8.1, a dedicated history view brings complete transparency to all your data transfer activities, making audits and troubleshooting much simpler.
What’s new:
How to use:
This gives you complete visibility and control over data movements, making audits and issue resolution faster and more reliable.
Controlling when and how leads flow into the system is critical for campaign management.
With v8.1, you can now directly manage your Facebook Lead Ads connection, ensuring smoother control over lead inflow without risking accidental disruptions.
What’s new:
How to use:
This gives you flexible, real-time control over your lead inflow without disrupting your overall setup.
Consistent Call Duration Format (hh: mm)
What’s new:
Cer Number in Call Reports
What’s new:
Introducing Runo v8.0 - bringing seamless CRM and webhook integrations, the next phase of AI capabilities with smarter configuration controls and improved call analysis, along with enhanced reporting, visibility, and a lot more.
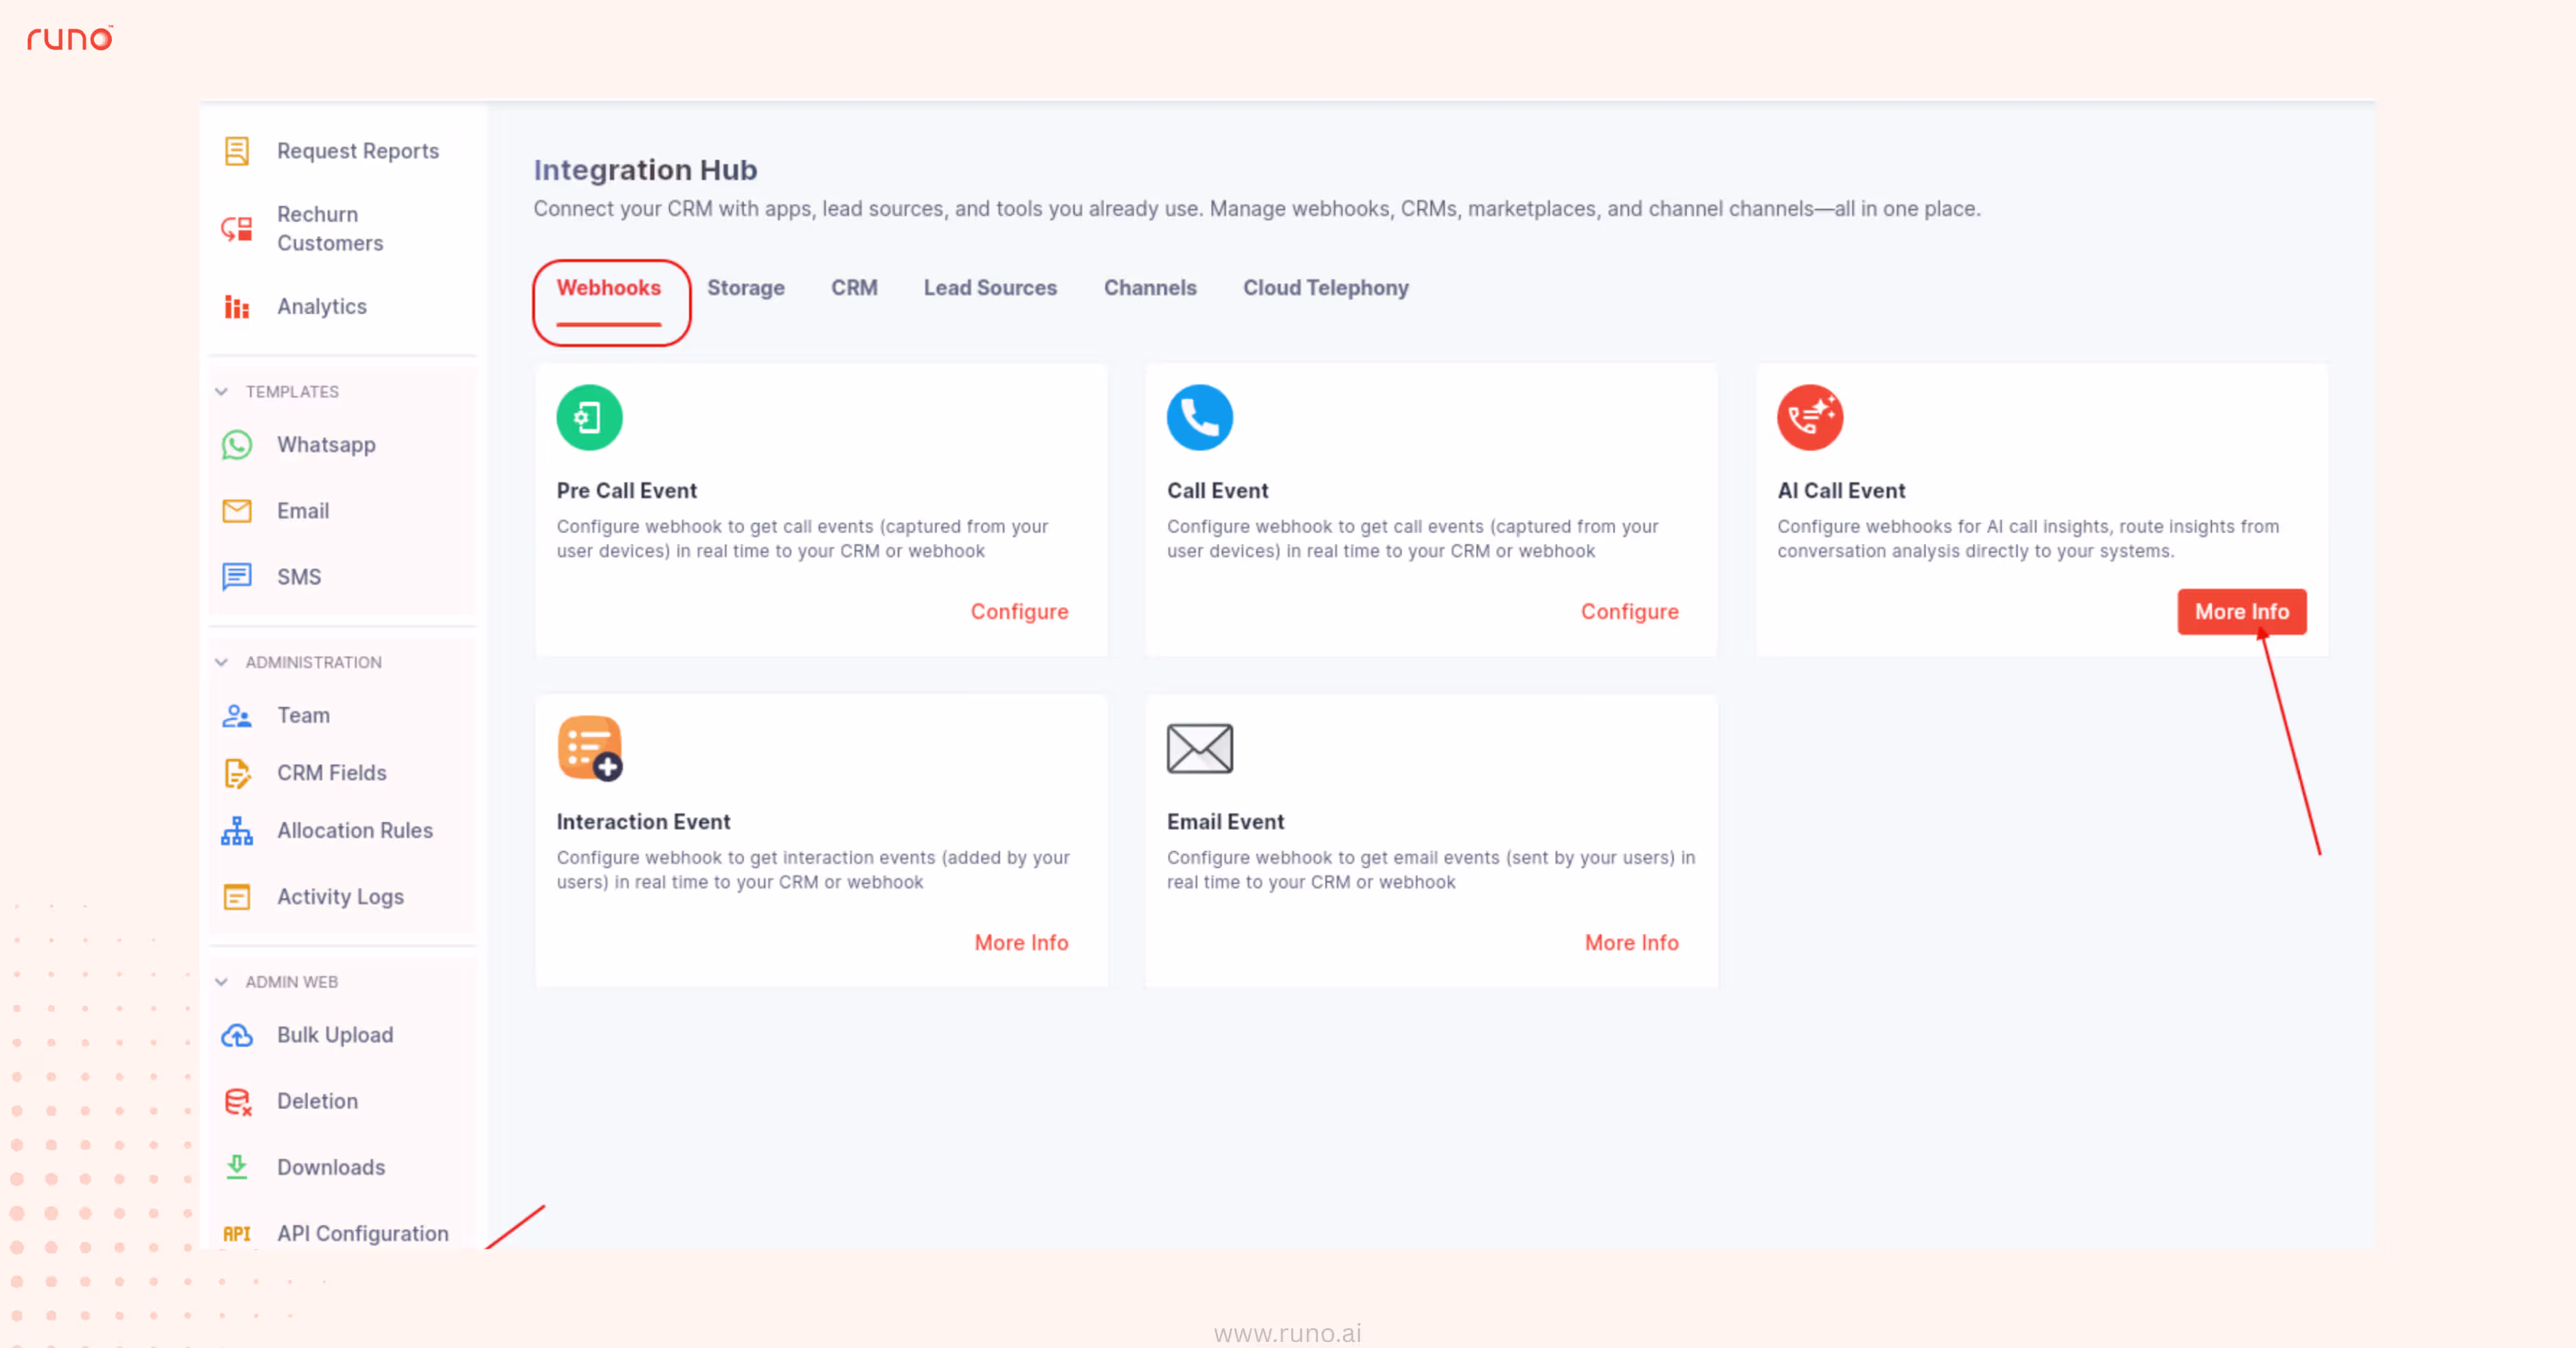
With v8.0, teams can now trigger webhooks at call initiation and send pre-call event data to external systems.
Admins can map available event variables to their own webhook payload structure and configure integrations directly from the product.
This enables real-time workflows without waiting for the call to end or relying on backend configuration.
What’s new:
How to use:

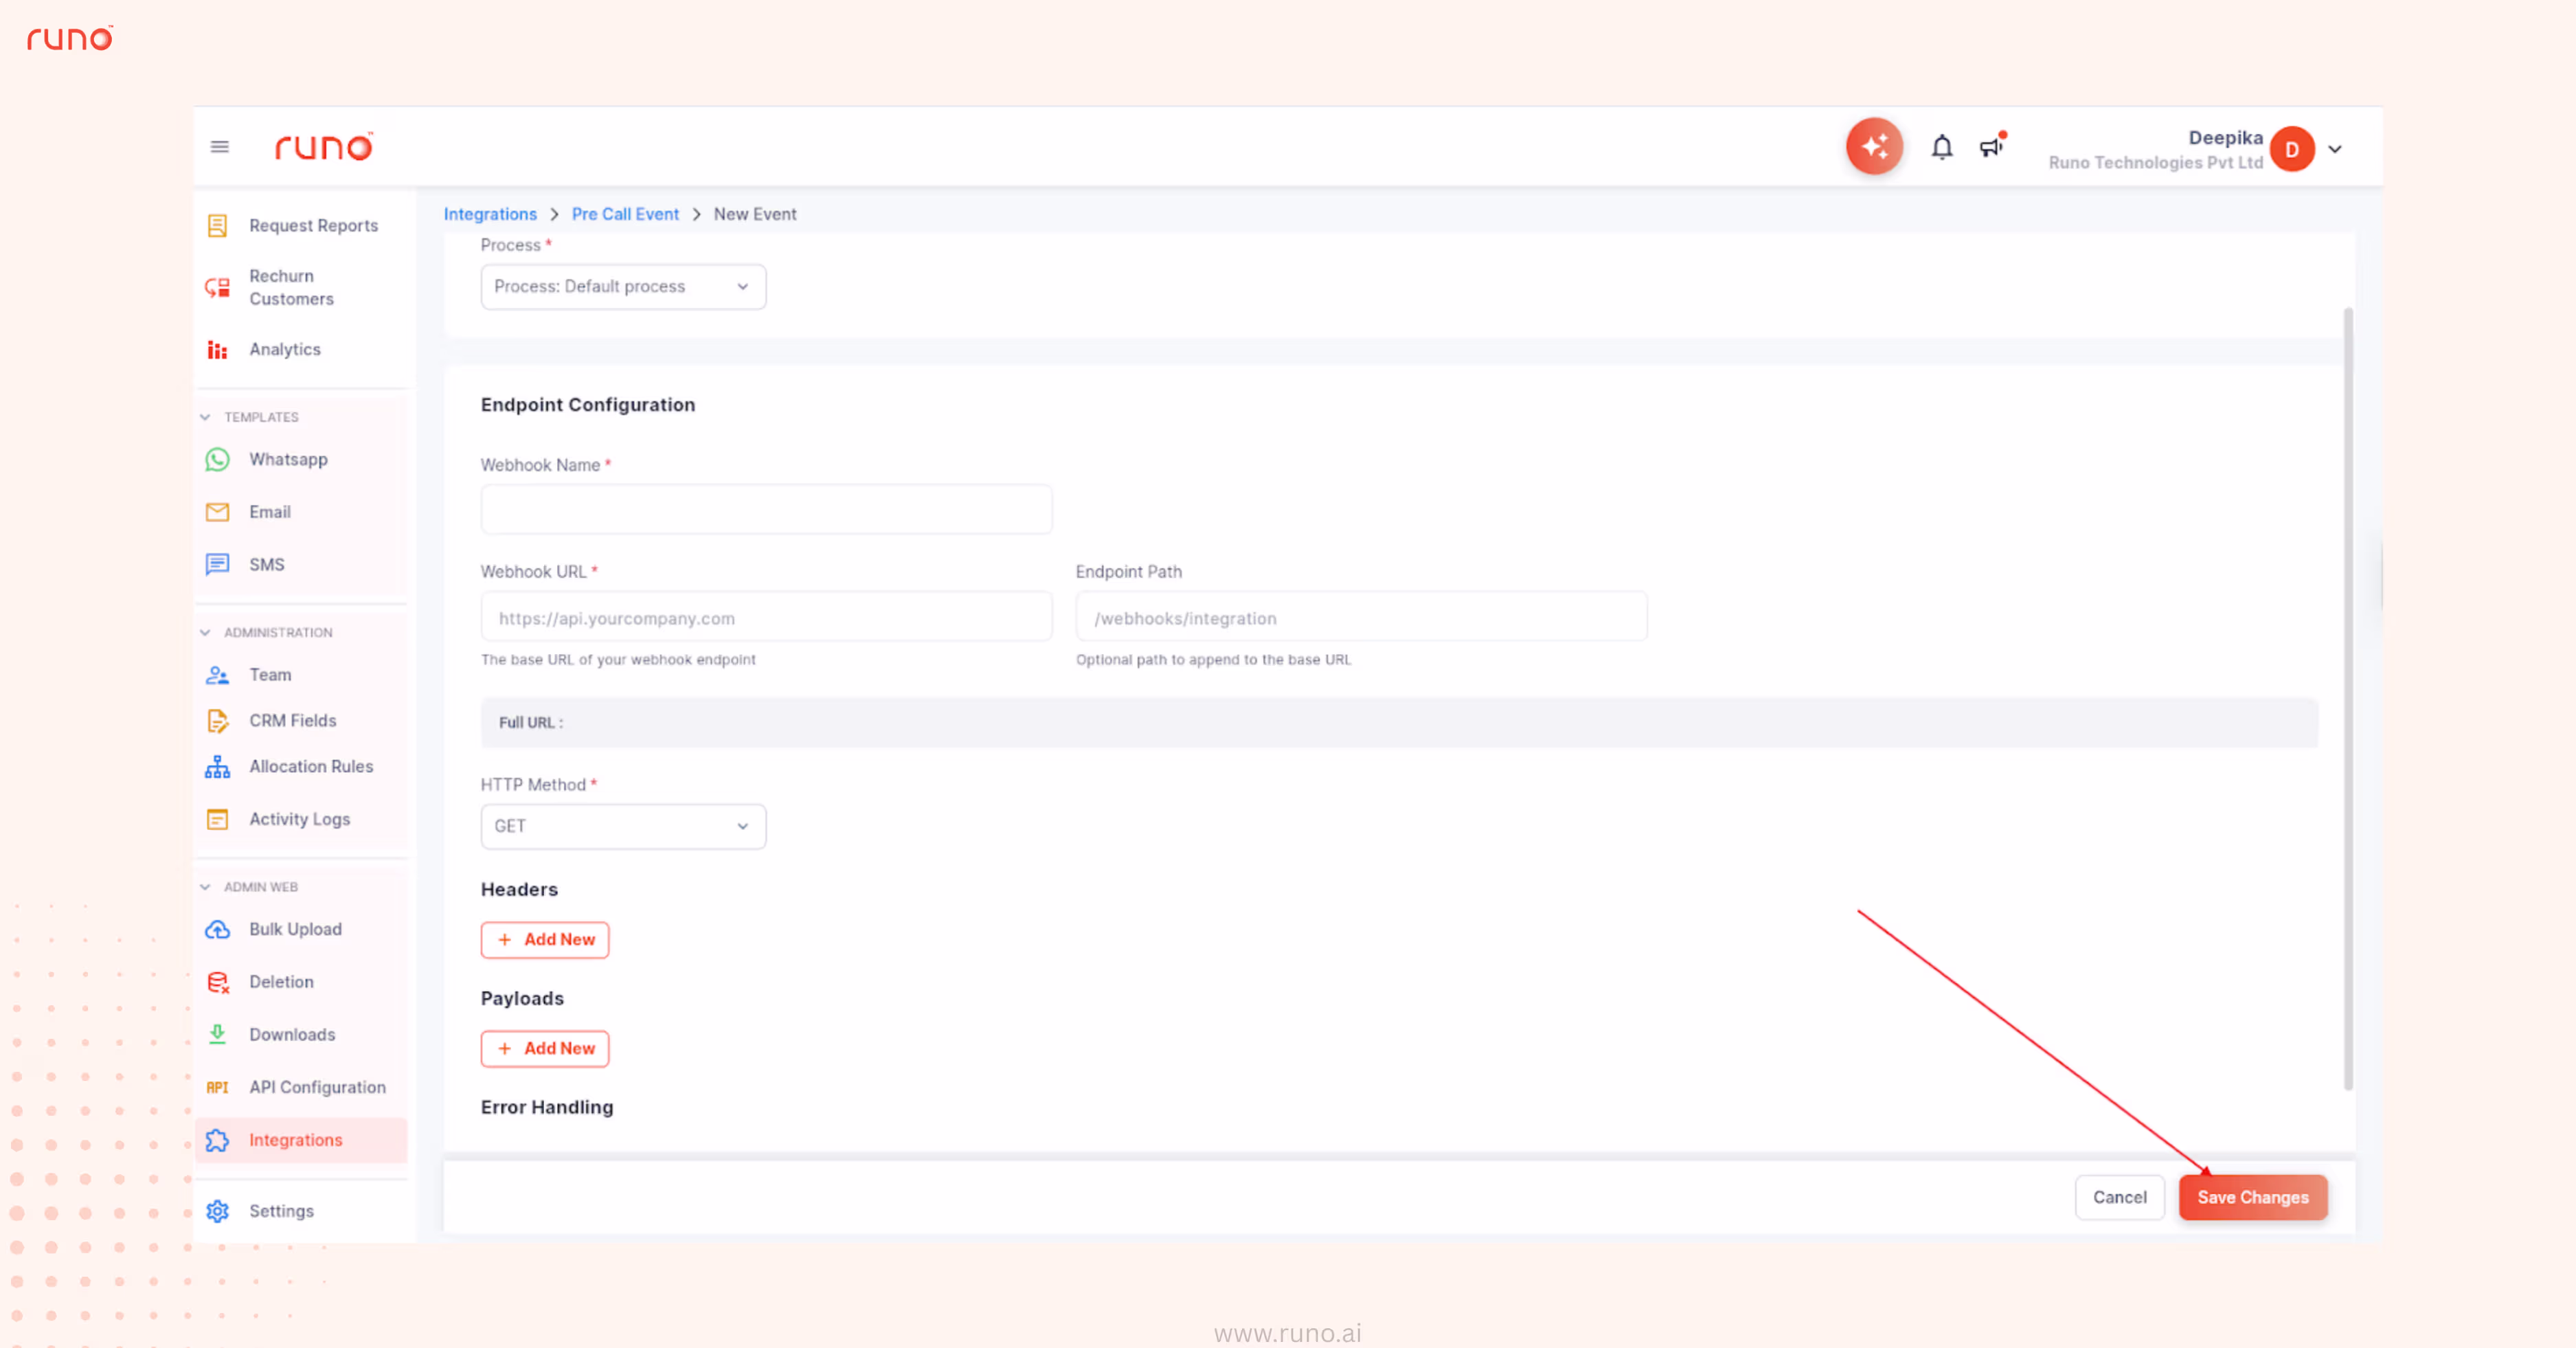
As simple as that to activate a webhook and start receiving call initiation event data with out any dependency.
AI insights are most valuable when they can flow into the tools teams already use.
With this release, AI-generated call insights from Runo can now be automatically shared with external systems through webhooks.
Admins can map AI analysis variables and send them directly to their own systems.
What’s new
How to use
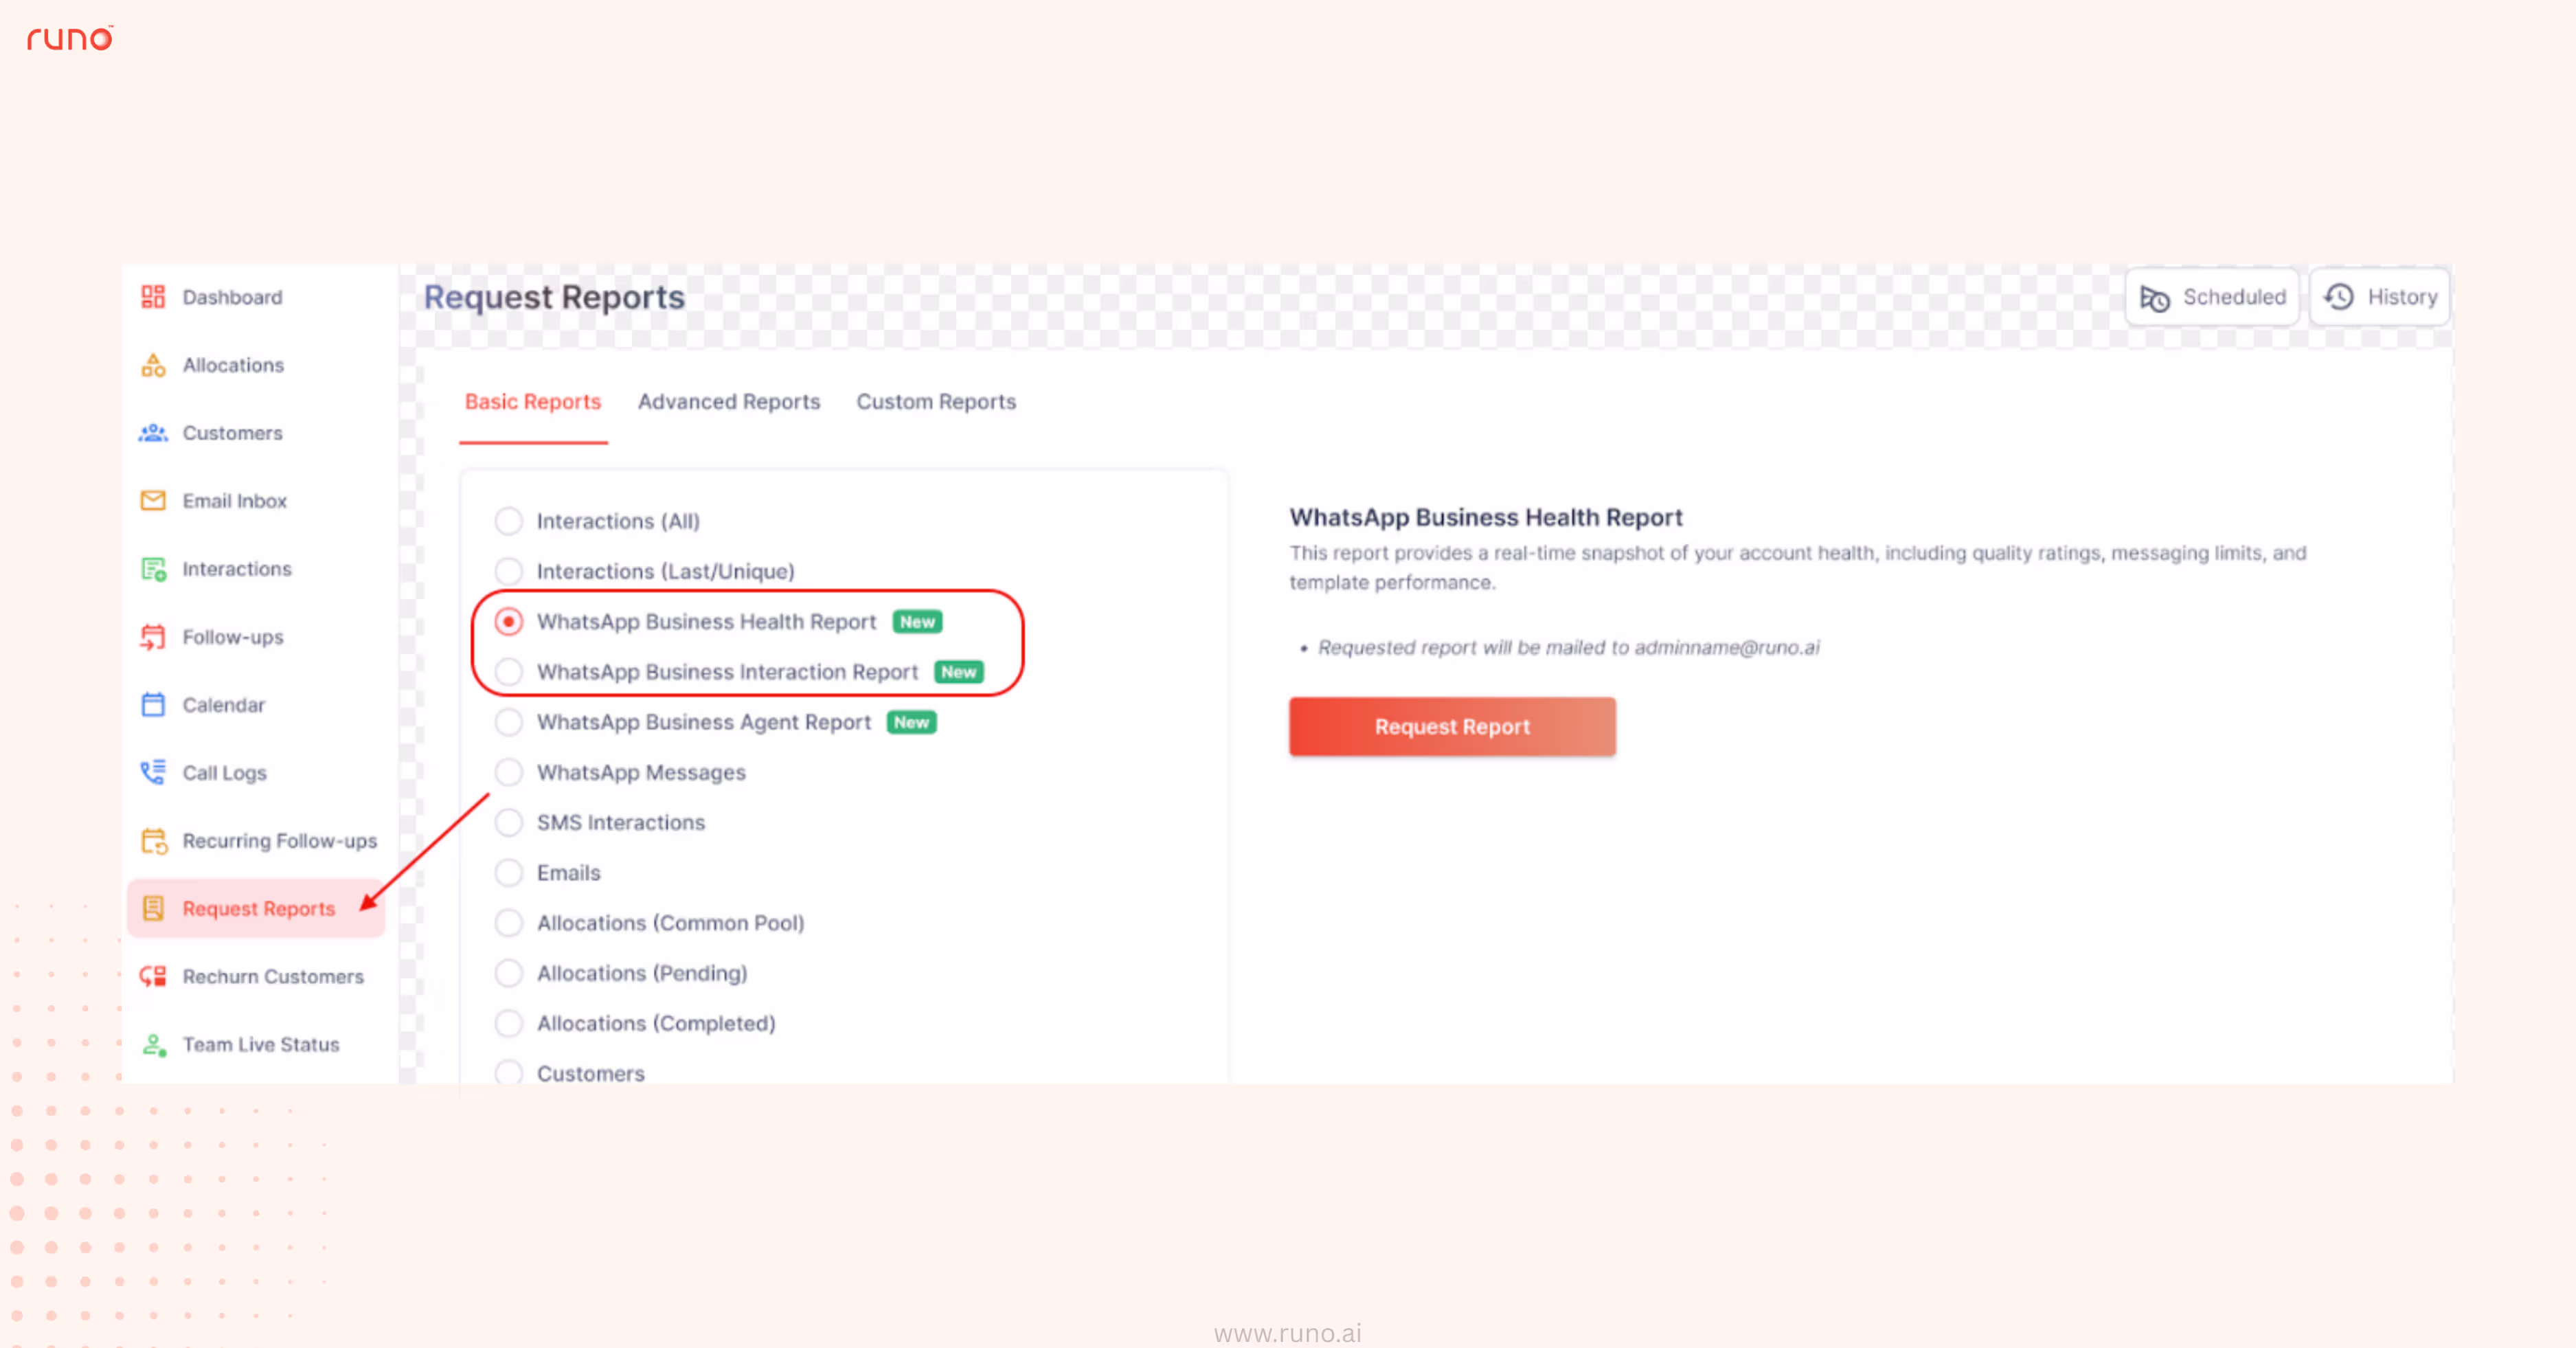
Understanding WABA performance is critical as messaging volumes grow.
With 8.0, we introduced the WABA Health Report, giving teams a clear overview of WhatsApp Business Account activity, delivery performance, and template usage.
What’s new:
CRM updates shouldn’t depend on backend support.
With v8.0, Runo now provides a centralized interface to sync interaction data with Zoho, HubSpot, and custom webhook endpoints. Admins can configure integrations, map fields, and manage webhook payloads directly from the product.
This brings faster setup and more reliable data flow across systems.
What’s new:
How to use
This ensures every interaction event is automatically synced with your connected systems.
Post-call data needs to flow into CRMs and other systems for tracking, reporting, and automation.
With v8.0, admins can now map post-call data fields according to their own CRM structure.
Instead of relying on a fixed payload or backend support, you can configure your own key-value mappings and control exactly what data gets shared with external systems.
This gives businesses greater flexibility while ensuring secure data syncing.
What’s new
How to use
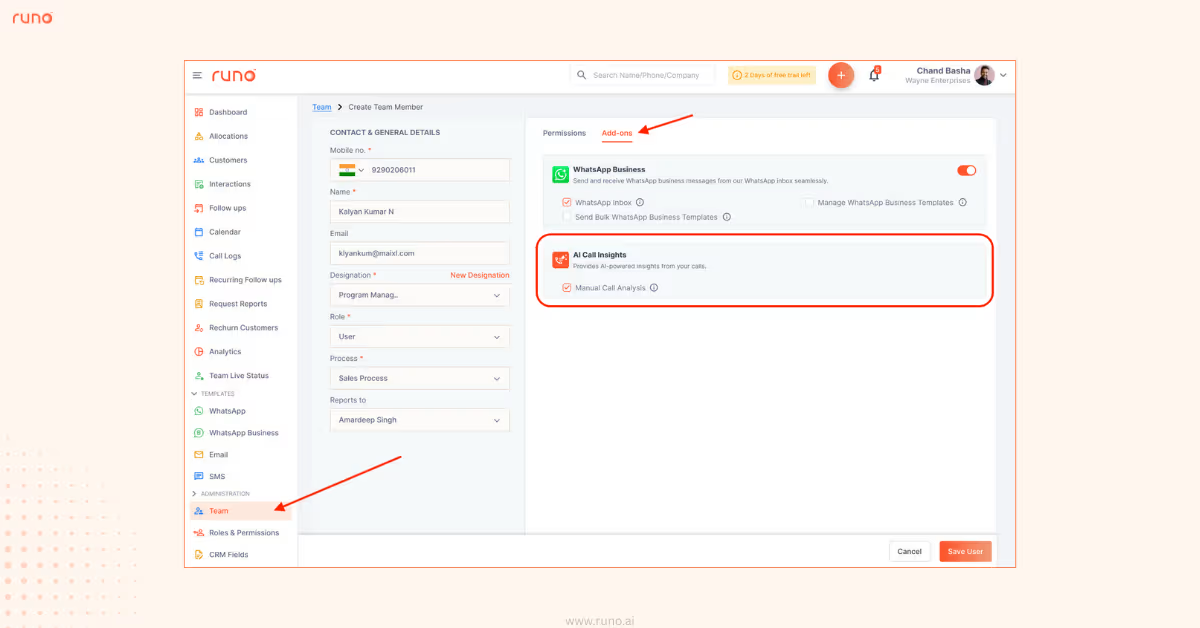
With v8.0, AI configurations can now be managed at the process level, giving admins more control over who can access AI insights and when call analysis should run.
This makes AI usage more structured while ensuring better operational control.
Admins can also define accessibility rules, set call duration limits for auto analysis, and manage AI report permissions more clearly.
What’s new:
How to use
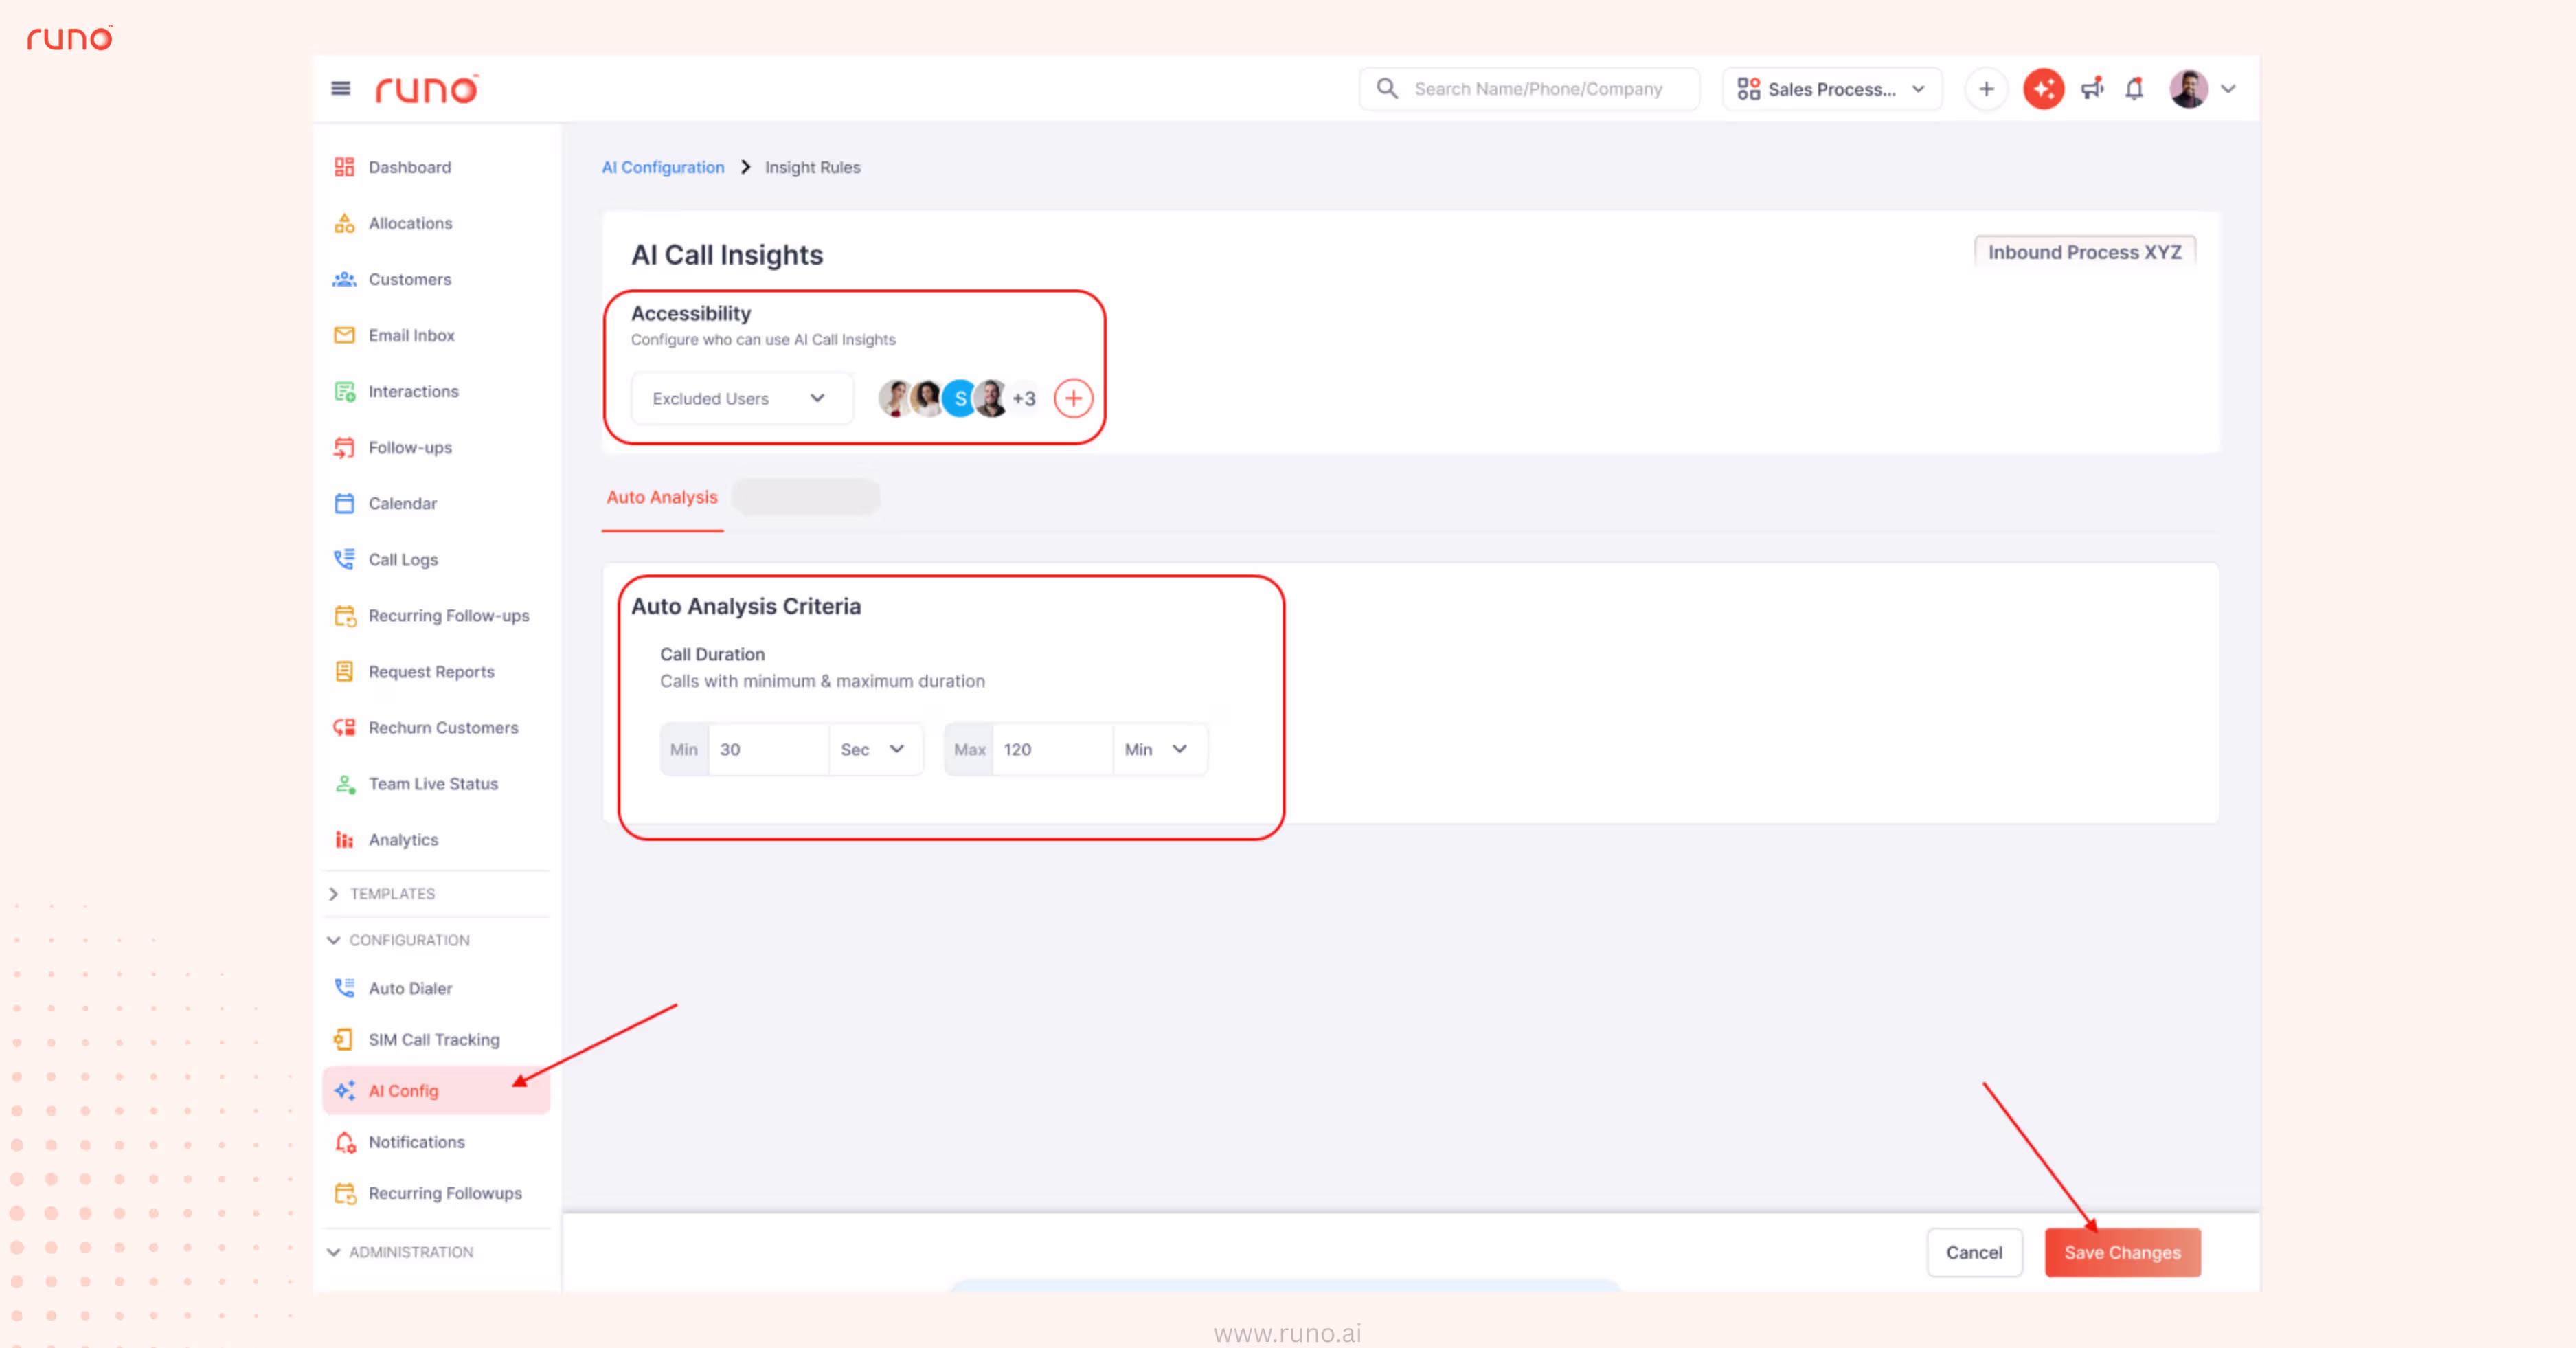
To manage AI report access, go to the Roles & Permissions tab.
Under AI Add-ons , enable the “Allow to Request Reports” permission for the required users.
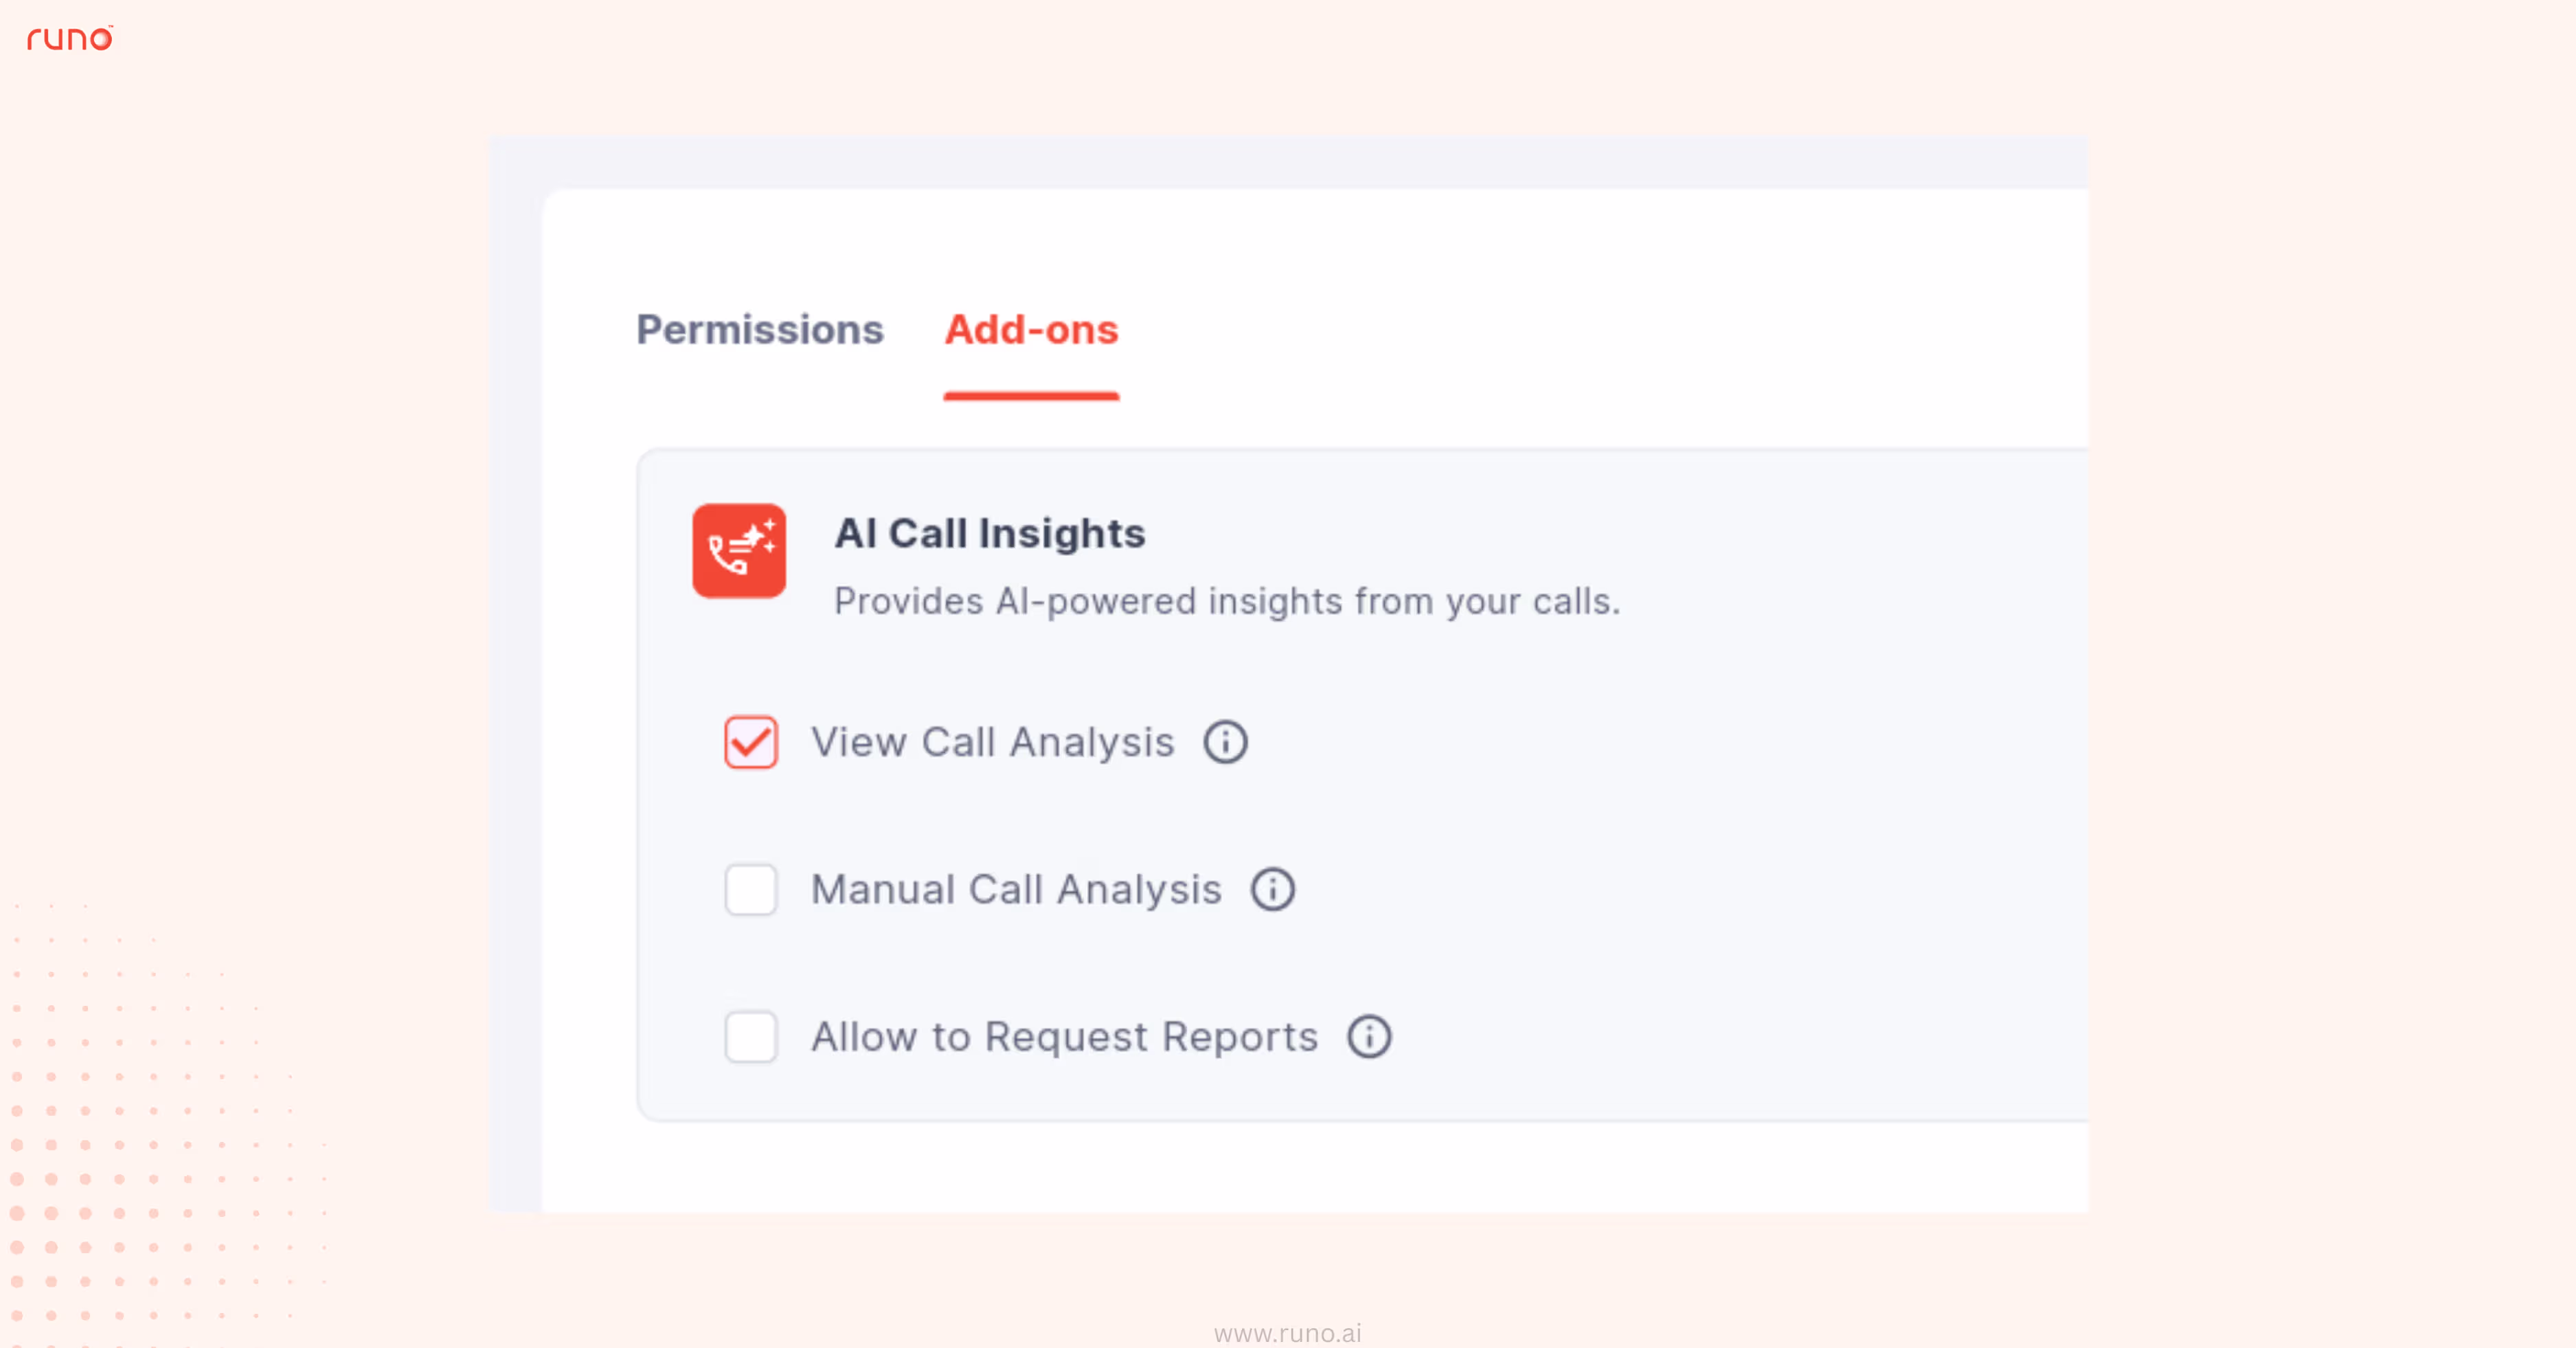
This ensures only the right users can request AI reports within your team.
Some Processes handle inbound support, while others focus on outbound sales or deal discussions.
With this release, admins can now add a Process description while creating or editing a Process in Runo. This description helps AI understand the purpose of the Process and the type of conversations expected within it.
By giving AI better context, call analysis becomes more accurate, and insights become more meaningful.
What’s new

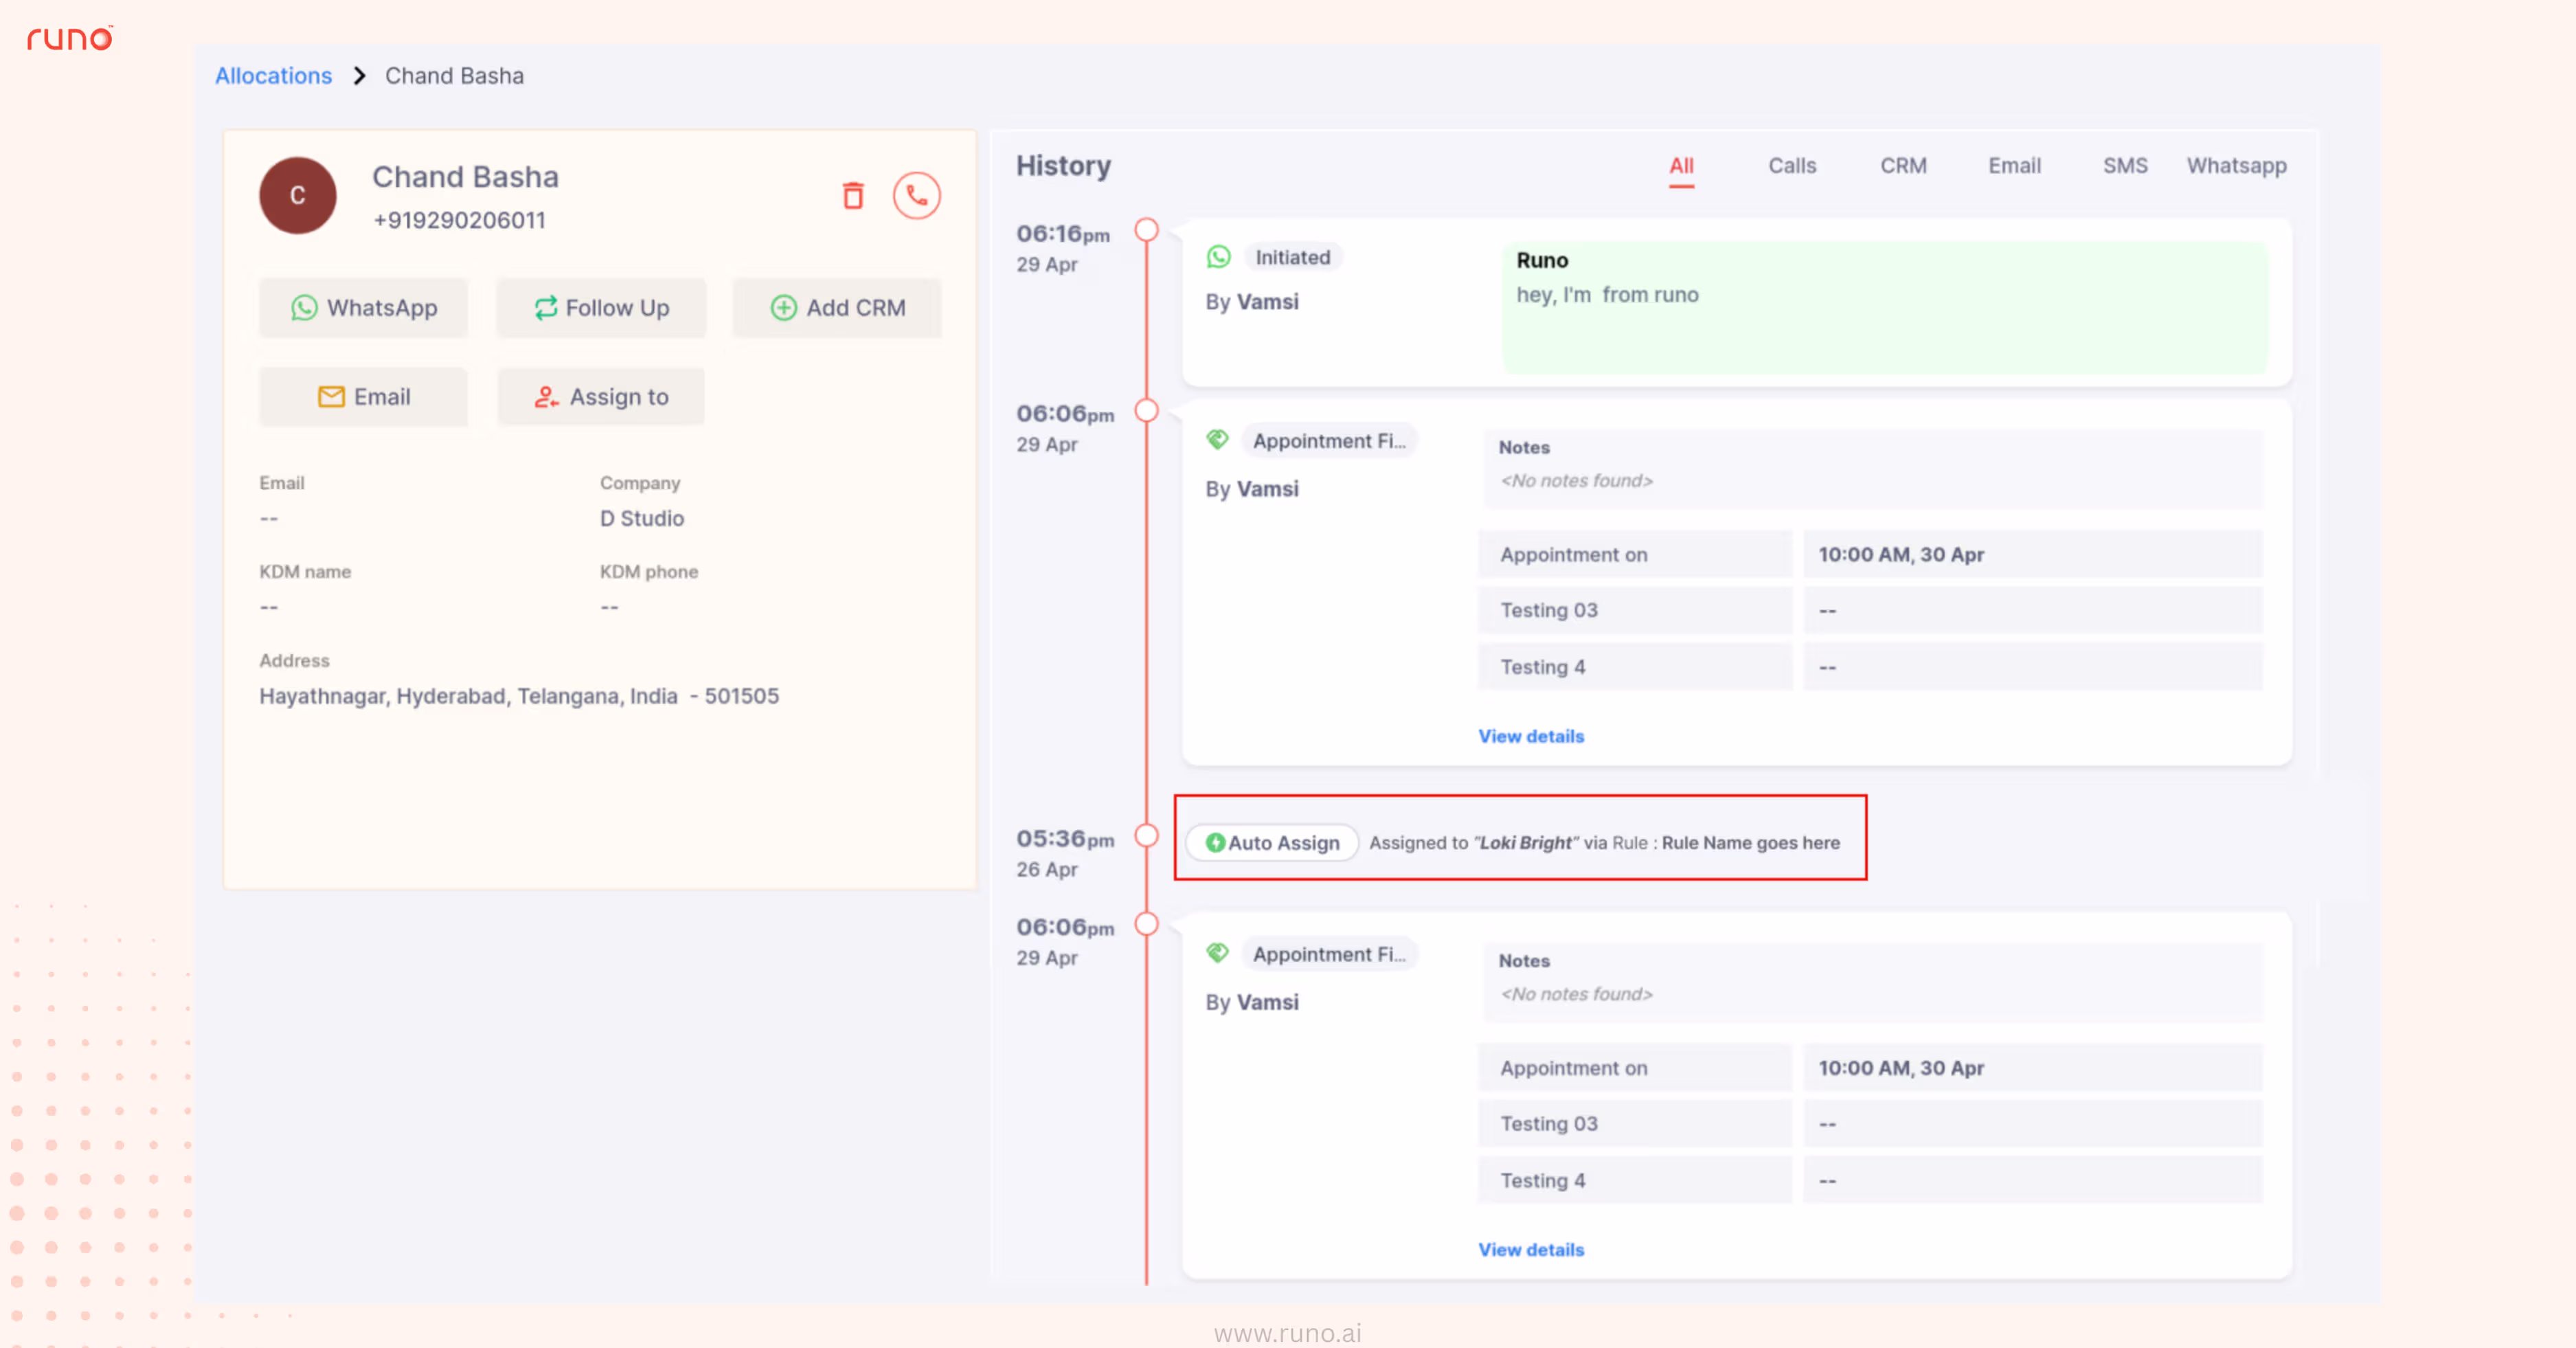
When leads are assigned automatically through Allocation Rules, visibility is important.
With this enhancement, Runo provides detailed activity logs for Allocation Rules, giving teams clear visibility into how leads are assigned and how rules are executed.
What’s new:
With v8.0, teams can now trigger webhooks at call initiation and send pre-call event data to external systems.
Admins can map available event variables to their own webhook payload structure and configure integrations directly from the product.
This enables real-time workflows without waiting for the call to end or relying on backend configuration.
What’s new:
How to use:
As simple as that to activate a webhook and start receiving call initiation event data with out any dependency.
AI insights are most valuable when they can flow into the tools teams already use.
With this release, AI-generated call insights from Runo can now be automatically shared with external systems through webhooks.
Admins can map AI analysis variables and send them directly to their own systems.
What’s new
How to use
Understanding WABA performance is critical as messaging volumes grow.
With 8.0, we introduced the WABA Health Report, giving teams a clear overview of WhatsApp Business Account activity, delivery performance, and template usage.
What’s new:
CRM updates shouldn’t depend on backend support.
With v8.0, Runo now provides a centralized interface to sync interaction data with Zoho, HubSpot, and custom webhook endpoints. Admins can configure integrations, map fields, and manage webhook payloads directly from the product.
This brings faster setup and more reliable data flow across systems.
What’s new:
How to use
This ensures every interaction event is automatically synced with your connected systems.
Post-call data needs to flow into CRMs and other systems for tracking, reporting, and automation.
With v8.0, admins can now map post-call data fields according to their own CRM structure.
Instead of relying on a fixed payload or backend support, you can configure your own key-value mappings and control exactly what data gets shared with external systems.
This gives businesses greater flexibility while ensuring secure data syncing.
What’s new
How to use
With v8.0, AI configurations can now be managed at the process level, giving admins more control over who can access AI insights and when call analysis should run.
This makes AI usage more structured while ensuring better operational control.
Admins can also define accessibility rules, set call duration limits for auto analysis, and manage AI report permissions more clearly.
What’s new:
How to use
To manage AI report access, go to the Roles & Permissions tab.
Under AI Add-ons , enable the “Allow to Request Reports” permission for the required users.
This ensures only the right users can request AI reports within your team.
Some Processes handle inbound support, while others focus on outbound sales or deal discussions.
With this release, admins can now add a Process description while creating or editing a Process in Runo. This description helps AI understand the purpose of the Process and the type of conversations expected within it.
By giving AI better context, call analysis becomes more accurate, and insights become more meaningful.
What’s new
When leads are assigned automatically through Allocation Rules, visibility is important.
With this enhancement, Runo provides detailed activity logs for Allocation Rules, giving teams clear visibility into how leads are assigned and how rules are executed.
What’s new:
Introducing Runo v7.2 - enabling cloud telephony with SIM-series virtual numbers for better connectivity and complete call recording, default AI insights, advanced AI & WABA reports, stronger admin control and lot more…
As call volumes grow, recording storage needs to scale without adding operational complexity.
With v7.2, cloud telephony users can now archive call recordings in a secure, scalable cloud environment powered by Google Cloud Storage (GCS).
This enables compliant, long-term storage without relying on local infrastructure or manual backups.
What’s new:
How to use:
Purchase the GCS storage add-on and then configure it from the Integrations tab in your account.
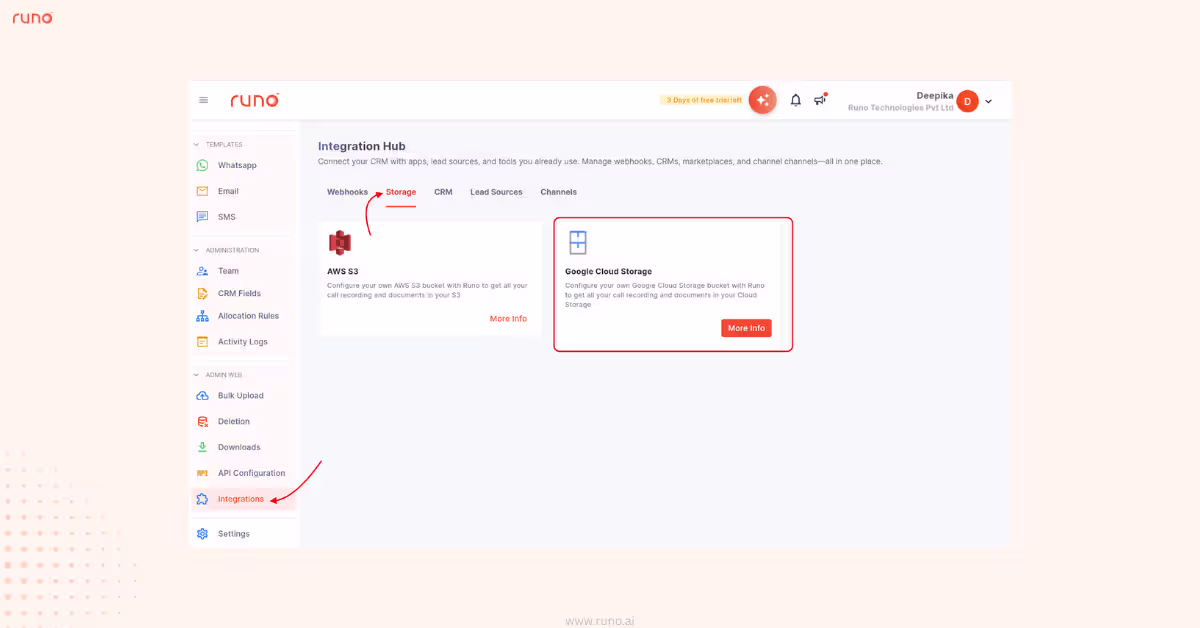
Your recording infrastructure now scales seamlessly with your business — securely and reliably.
With v7.2, Cloud Telephony now offers SIM Series virtual numbers, giving your team better call connectivity and higher pickup rates without managing physical SIMs.
Behind the scenes, every call is routed through Runo’s unified dialer, ensuring 100% call recording coverage across web and mobile.
Once a one-time SIM verification to activate your virtual number is done, you can operate fully without physical SIMs.
This advanced cloud telephony infrastructure is an add on, available for opted-in clients.
What’s new:
How to use:
Enable Cloud Telephony Add-on: Cloud Telephony add-on must be purchased and enabled before integrating your Airtel IQ account.
Connect Airtel IQ (Admin Setup):
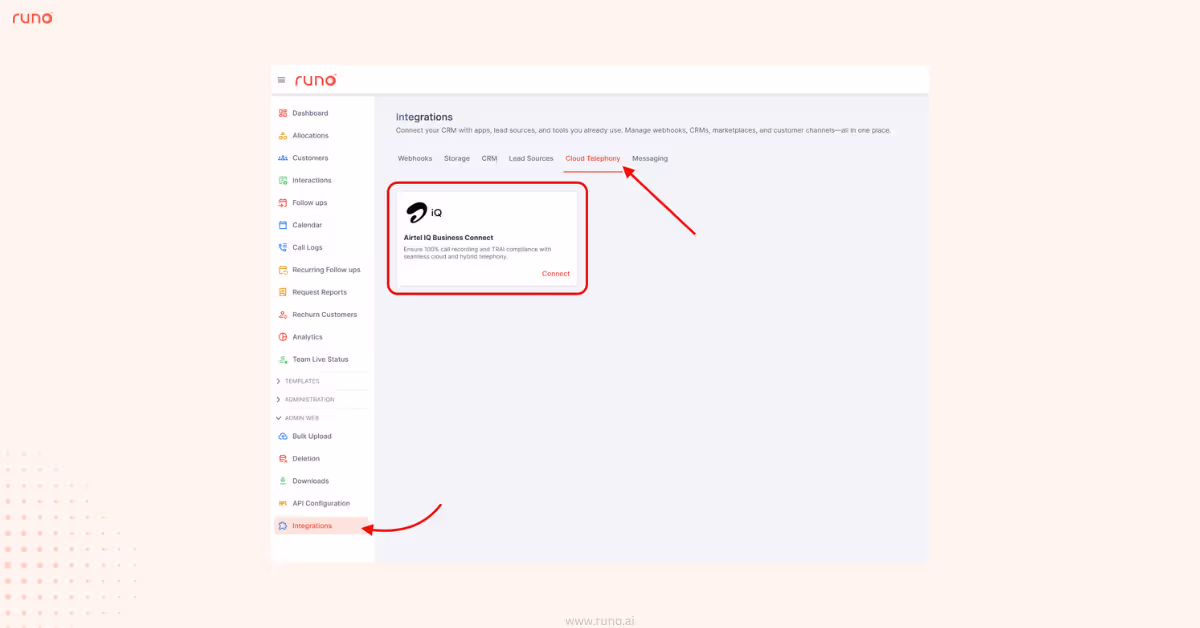
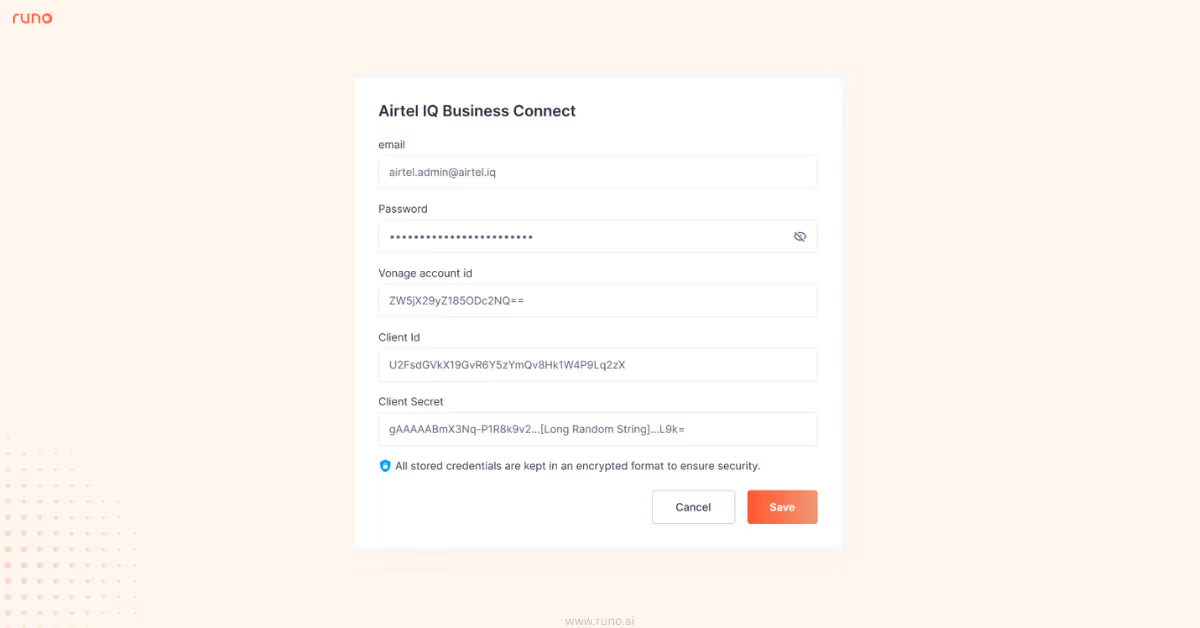
Enable Cloud Telephony for Users
Each user must authenticate Airtel IQ from their account under the Profile section.
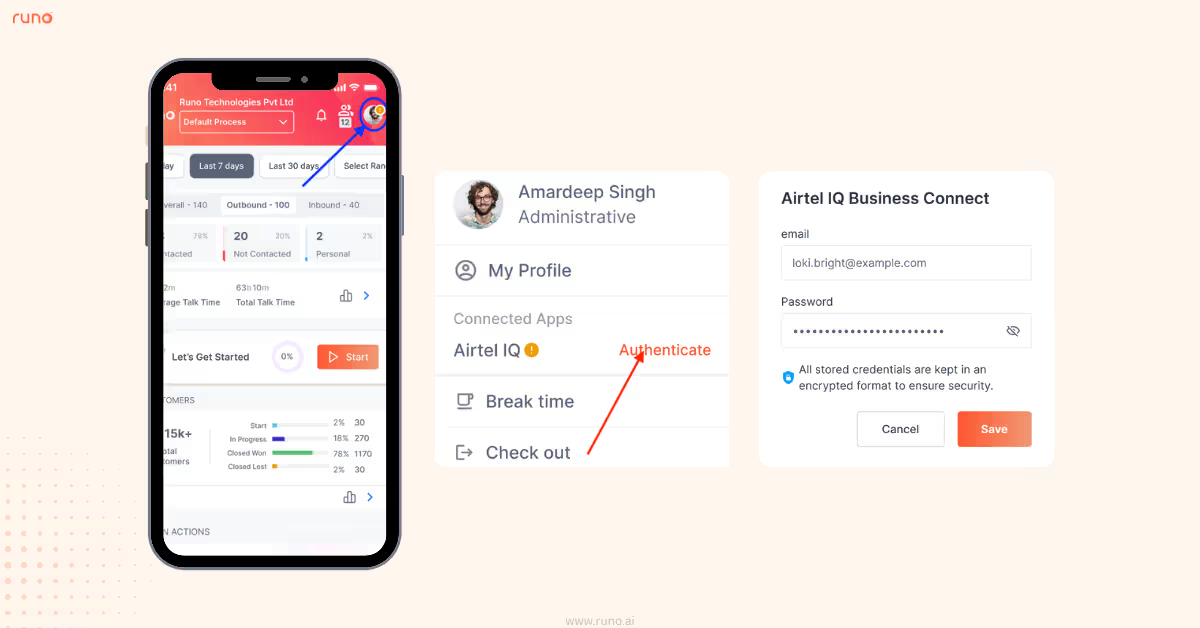
Once connected, all calls will route through the unified cloud dialer automatically.
This upgrade ensures every conversation is captured, analyzed, and measurable, without gaps in visibility.
As WhatsApp volumes grow, visibility becomes critical.
With v7.2, we’ve introduced centralized WABA-level reporting to give teams structured insight into usage, delivery performance, conversations, and agent contribution — all in one place.
What’s new:
How to use:
This brings clarity and structured performance tracking to WhatsApp workflows.
Every team has its own definition of a “good call.” Now, your AI can reflect that.
With v7.2, admins can create custom scoring parameters for AI Call Scoring. This allows evaluations to reflect your exact business standards.
Instead of fixed logic, AI Scoring now follows rules defined by you.
What’s new:
How to use:
As teams scale, call quality needs structure.
With v7.2, we’ve introduced a centralized AI Analytics Dashboard that transforms conversations into measurable performance insights.
What’s new:
How to use:
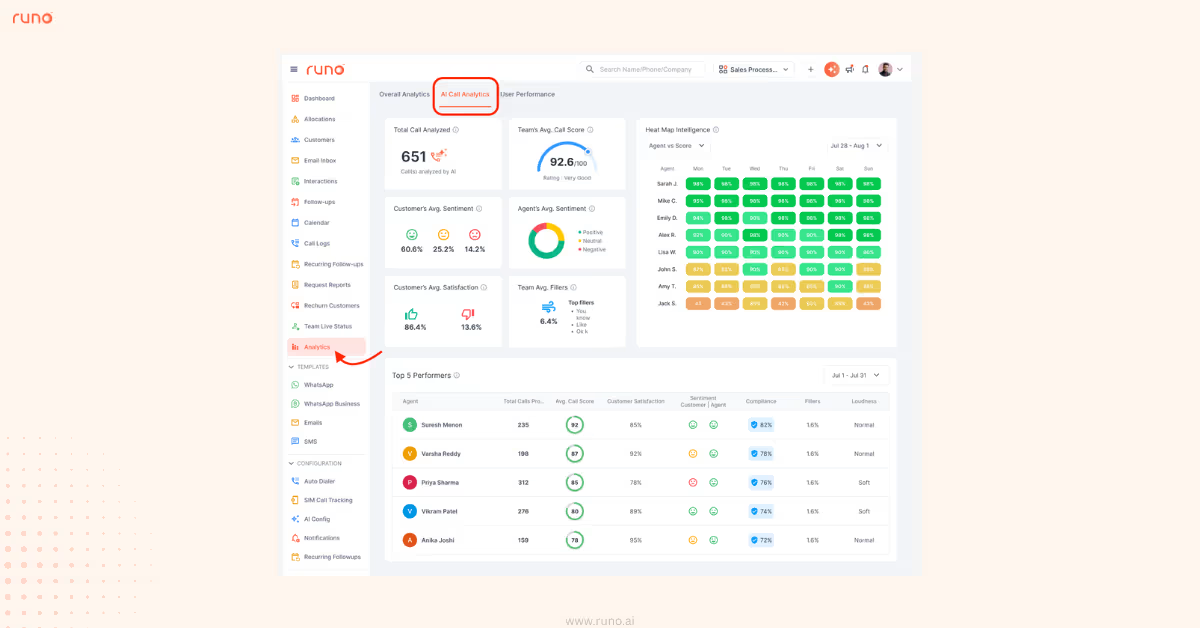
One dashboard that drives structured visibility and consistent performance.
With v7.2, Call Logs now include AI insights in the same report. You can see call details and AI analysis together in one place.
No separate views. No manual merging.
What’s new:
How to use:

Every call now carries context, quality signals, and behavioral insights… in one report.
As AI becomes central to operations, control becomes critical.
With v7.2, AI Insights are now enabled by default across all existing and new processes. This ensures consistent analysis without gaps.
Admins remain in full control.
What’s new:
This ensures AI runs consistently, while maintaining structured control and permissions.
No more replaying calls to understand context.
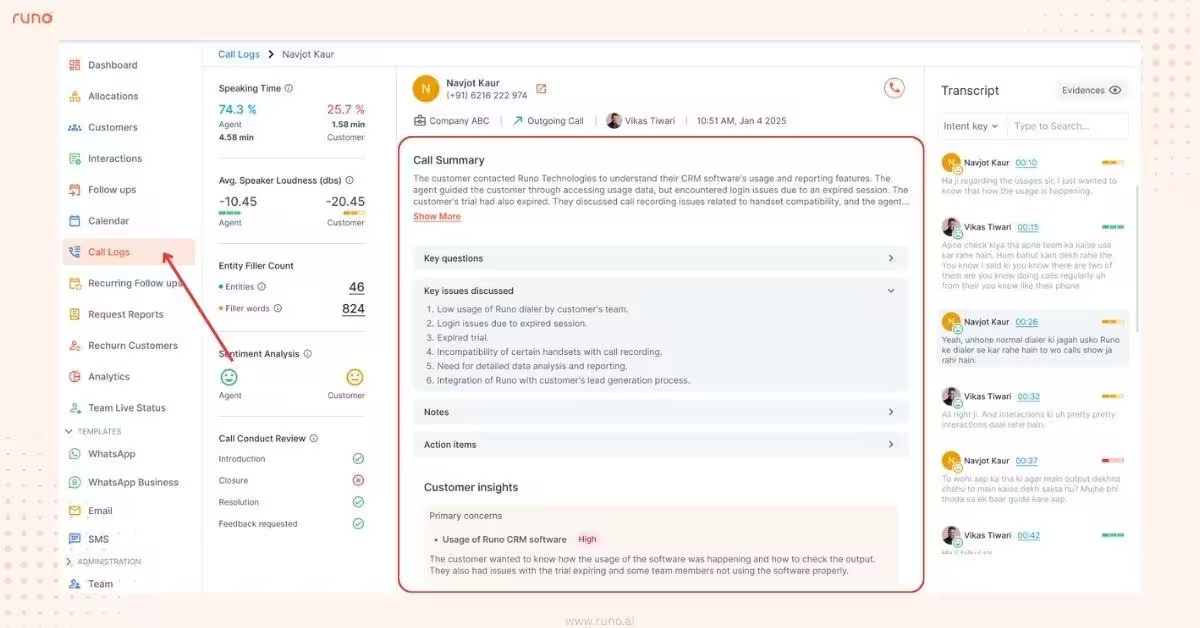
With v7.2, Interaction History now includes AI-generated call summaries - helping you quickly understand what happened in a conversation at a glance.
Short. Clear. Context-ready.
What’s new:
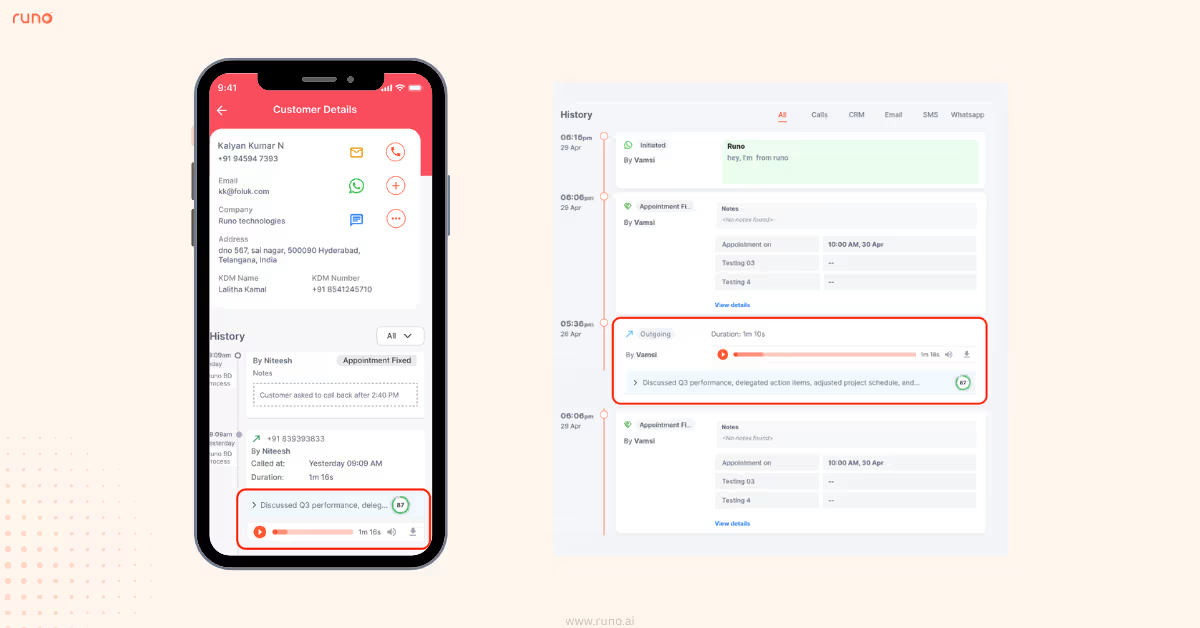
This makes follow-ups faster, handovers smoother, and reviews more efficient.
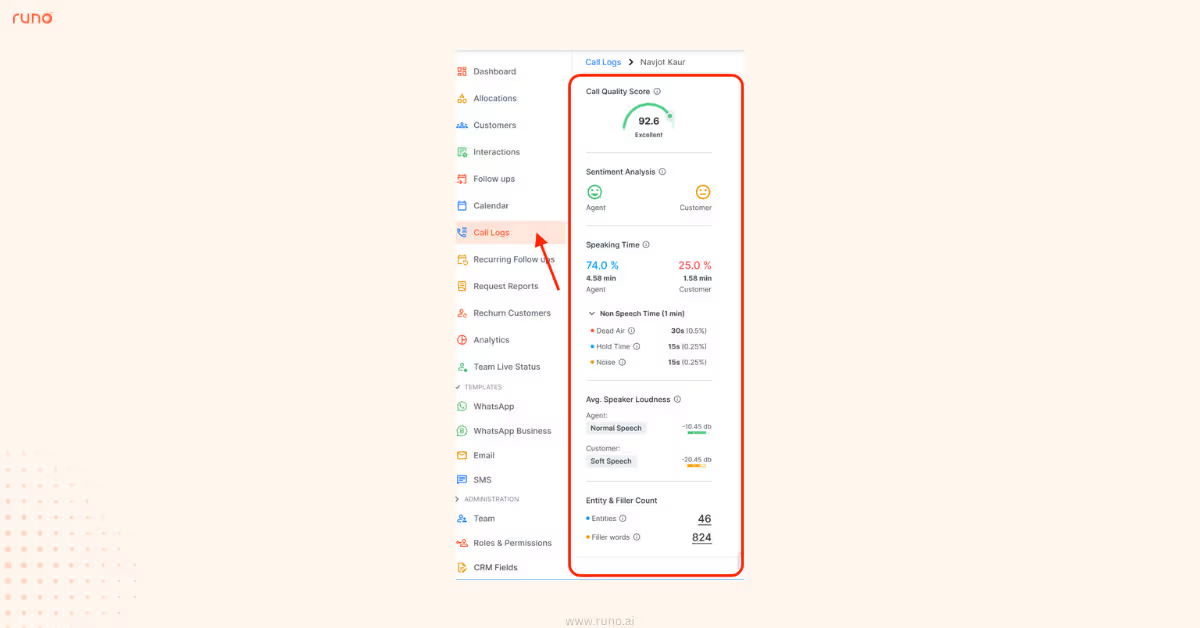
With v7.2, Call Analytics now includes descriptive loudness labels that make audio levels easy to understand at a glance.
Instead of just seeing dB values, you now see labels like Normal Speech or Soft Speech, making it easier to assess call quality instantly.
What’s new:

Admins now have the ability to control the logout permissions for users.
With v7.2, admins can disable manual logout permission separately for web and mobile apps from General Settings
What’s new:
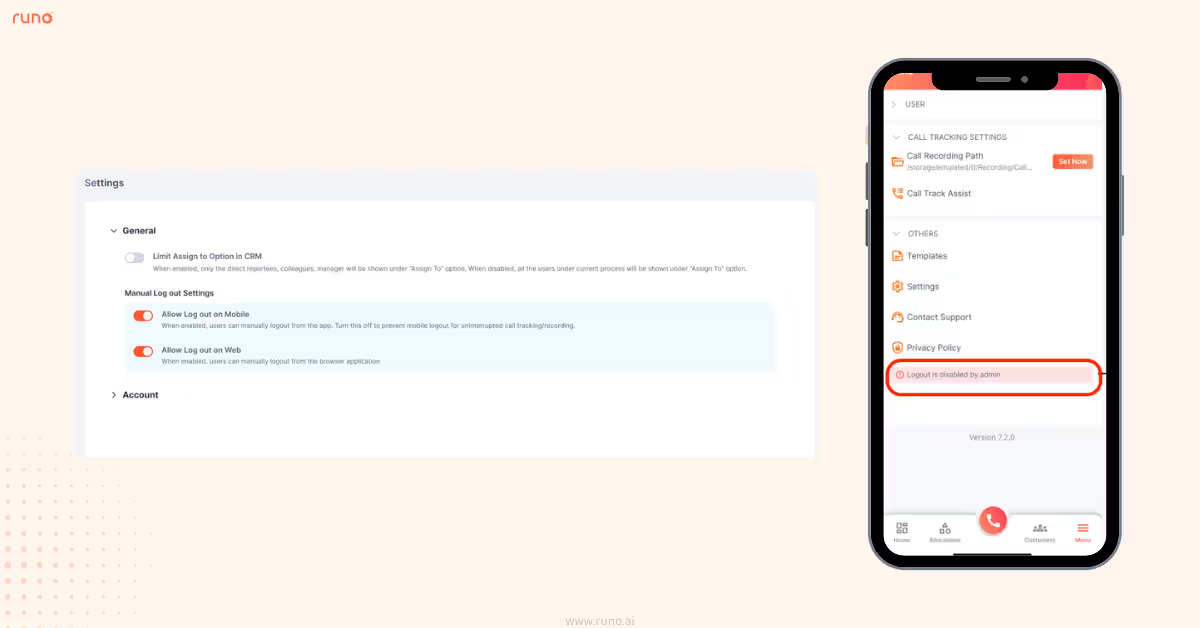
This ensures better control for admins. Fewer interruptions for operations.
We’ve introduced a new All vs Unique filter in the Analytics tab to give you clearer call volume insights.
What’s new:
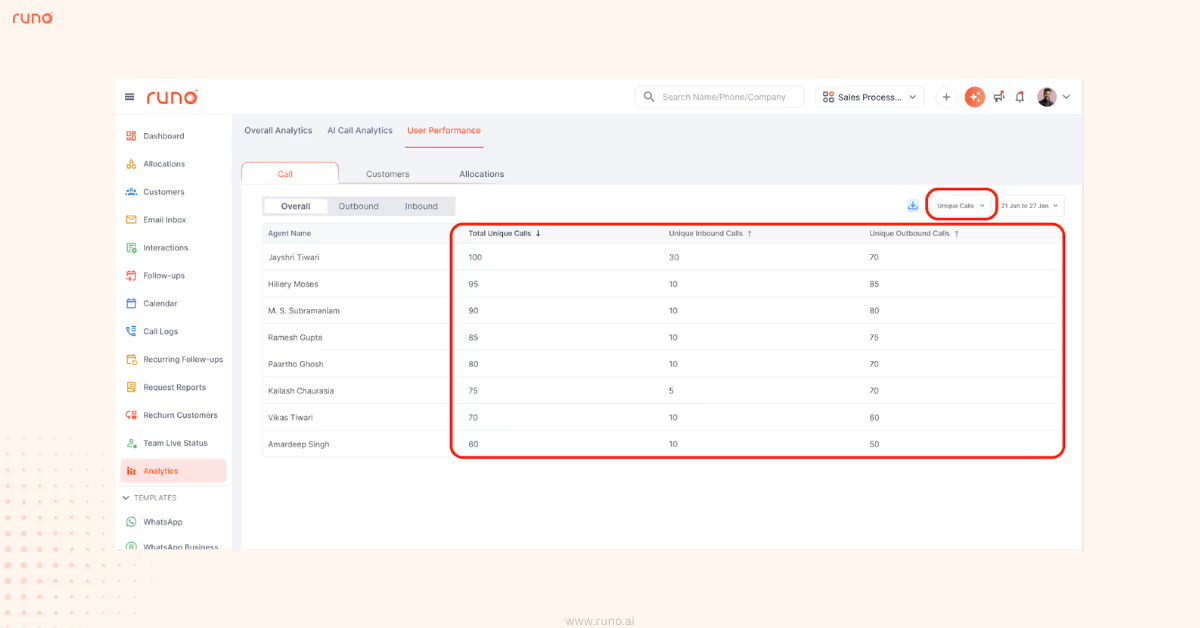
This helps teams measure engagement more accurately without inflated numbers.
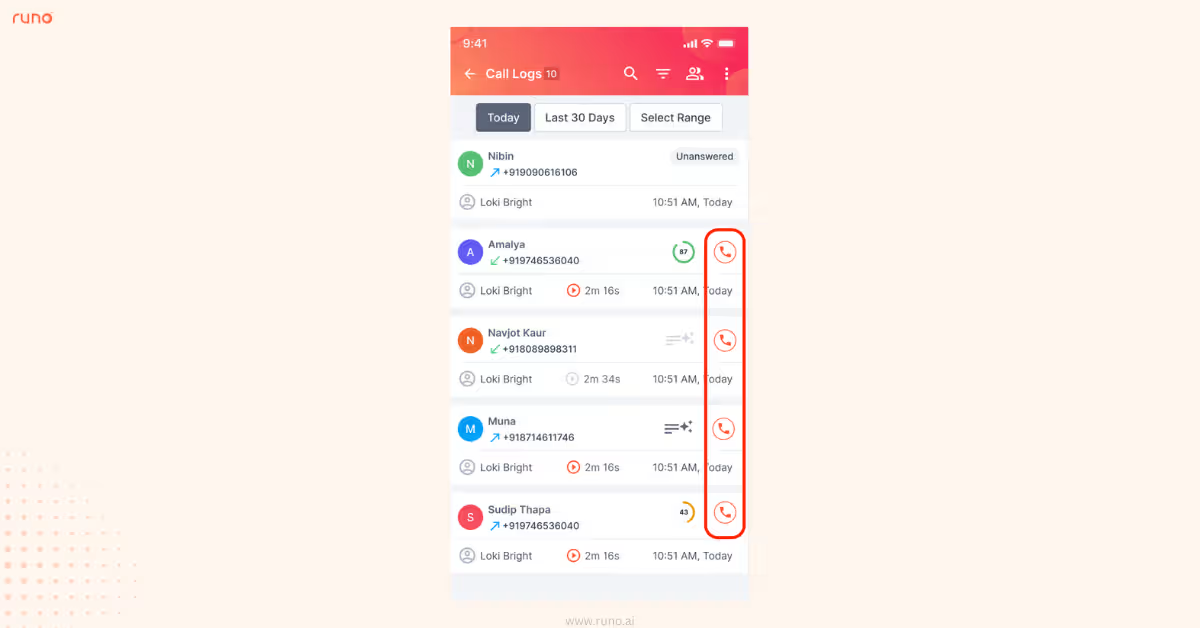
In the mobile app, the call icon is now visible even in collapsed view within the Call Logs section.
This allows users to initiate a call instantly without expanding the call record.
What’s new:
As call volumes grow, recording storage needs to scale without adding operational complexity.
With v7.2, cloud telephony users can now archive call recordings in a secure, scalable cloud environment powered by Google Cloud Storage (GCS).
This enables compliant, long-term storage without relying on local infrastructure or manual backups.
What’s new:
How to use:
Purchase the GCS storage add-on and then configure it from the Integrations tab in your account.
Your recording infrastructure now scales seamlessly with your business — securely and reliably.
With v7.2, Cloud Telephony now offers SIM Series virtual numbers, giving your team better call connectivity and higher pickup rates without managing physical SIMs.
Behind the scenes, every call is routed through Runo’s unified dialer, ensuring 100% call recording coverage across web and mobile.
Once a one-time SIM verification to activate your virtual number is done, you can operate fully without physical SIMs.
This advanced cloud telephony infrastructure is an add on, available for opted-in clients.
What’s new:
How to use:
Enable Cloud Telephony Add-on: Cloud Telephony add-on must be purchased and enabled before integrating your Airtel IQ account.
Connect Airtel IQ (Admin Setup):
Enable Cloud Telephony for Users
Each user must authenticate Airtel IQ from their account under the Profile section.
Once connected, all calls will route through the unified cloud dialer automatically.
This upgrade ensures every conversation is captured, analyzed, and measurable, without gaps in visibility.
As WhatsApp volumes grow, visibility becomes critical.
With v7.2, we’ve introduced centralized WABA-level reporting to give teams structured insight into usage, delivery performance, conversations, and agent contribution — all in one place.
What’s new:
How to use:
This brings clarity and structured performance tracking to WhatsApp workflows.
Every team has its own definition of a “good call.” Now, your AI can reflect that.
With v7.2, admins can create custom scoring parameters for AI Call Scoring. This allows evaluations to reflect your exact business standards.
Instead of fixed logic, AI Scoring now follows rules defined by you.
What’s new:
How to use:
As teams scale, call quality needs structure.
With v7.2, we’ve introduced a centralized AI Analytics Dashboard that transforms conversations into measurable performance insights.
What’s new:
How to use:
One dashboard that drives structured visibility and consistent performance.
With v7.2, Call Logs now include AI insights in the same report. You can see call details and AI analysis together in one place.
No separate views. No manual merging.
What’s new:
How to use:
Every call now carries context, quality signals, and behavioral insights… in one report.
As AI becomes central to operations, control becomes critical.
With v7.2, AI Insights are now enabled by default across all existing and new processes. This ensures consistent analysis without gaps.
Admins remain in full control.
What’s new:
This ensures AI runs consistently, while maintaining structured control and permissions.
No more replaying calls to understand context.
With v7.2, Interaction History now includes AI-generated call summaries - helping you quickly understand what happened in a conversation at a glance.
Short. Clear. Context-ready.
What’s new:
This makes follow-ups faster, handovers smoother, and reviews more efficient.
With v7.2, Call Analytics now includes descriptive loudness labels that make audio levels easy to understand at a glance.
Instead of just seeing dB values, you now see labels like Normal Speech or Soft Speech, making it easier to assess call quality instantly.
What’s new:
Admins now have the ability to control the logout permissions for users.
With v7.2, admins can disable manual logout permission separately for web and mobile apps from General Settings
What’s new:
This ensures better control for admins. Fewer interruptions for operations.
We’ve introduced a new All vs Unique filter in the Analytics tab to give you clearer call volume insights.
What’s new:
This helps teams measure engagement more accurately without inflated numbers.
In the mobile app, the call icon is now visible even in collapsed view within the Call Logs section.
This allows users to initiate a call instantly without expanding the call record.
What’s new:
Introducing Runo v7.1, a big step forward in AI-driven insights, automated reporting, and a lot of customisations… making your sales operations smarter, more transparent, and more efficient than ever.
With v7.1, our advanced AI Call Analytics is now expanded to cloud telephony.
Teams can now apply both automatic and manual AI scoring to calls made from Virtual Numbers via Runo dialer. It makes it easier to evaluate conversations at scale or focus on specific calls that matter most.
What’s new:
As AI becomes a core part of daily calling workflows, visibility and control matter just as much as insights.
Runo v7.1 introduces end-to-end AI credit usage tracking, making it easy to understand and scale AI usage.
Teams can:
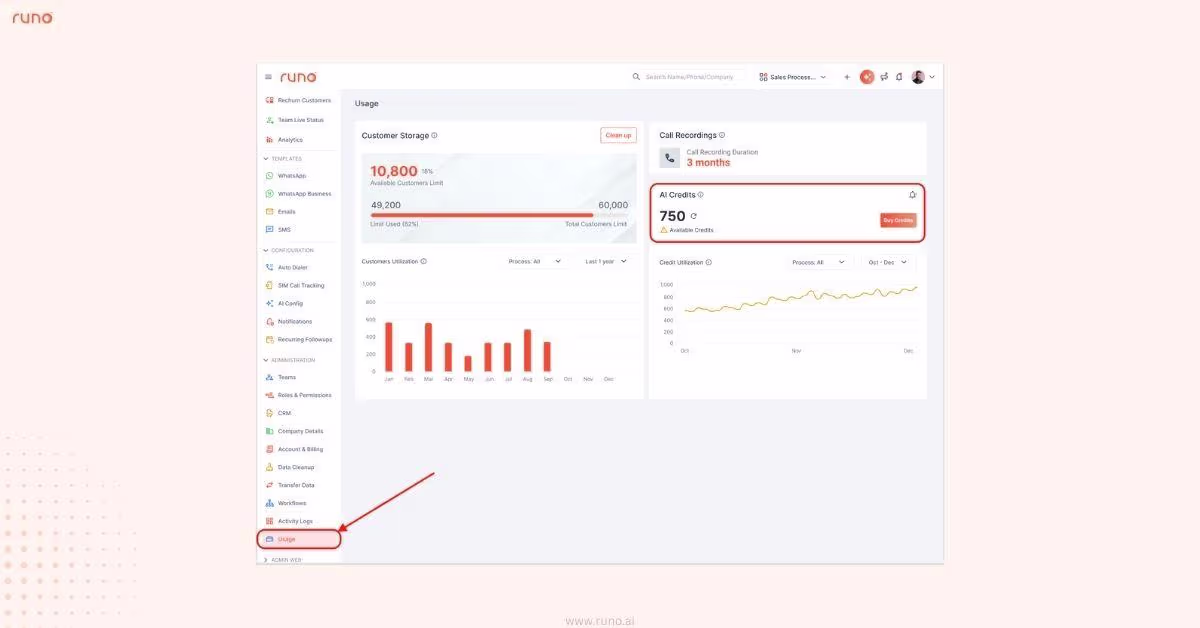
To make AI usage even more transparent and controllable, AI credit details are now available directly inside the Call Logs Report.
Each call entry now shows:
This helps teams:
Managing AI credits is now faster and fully self-serve.
Customers can now:
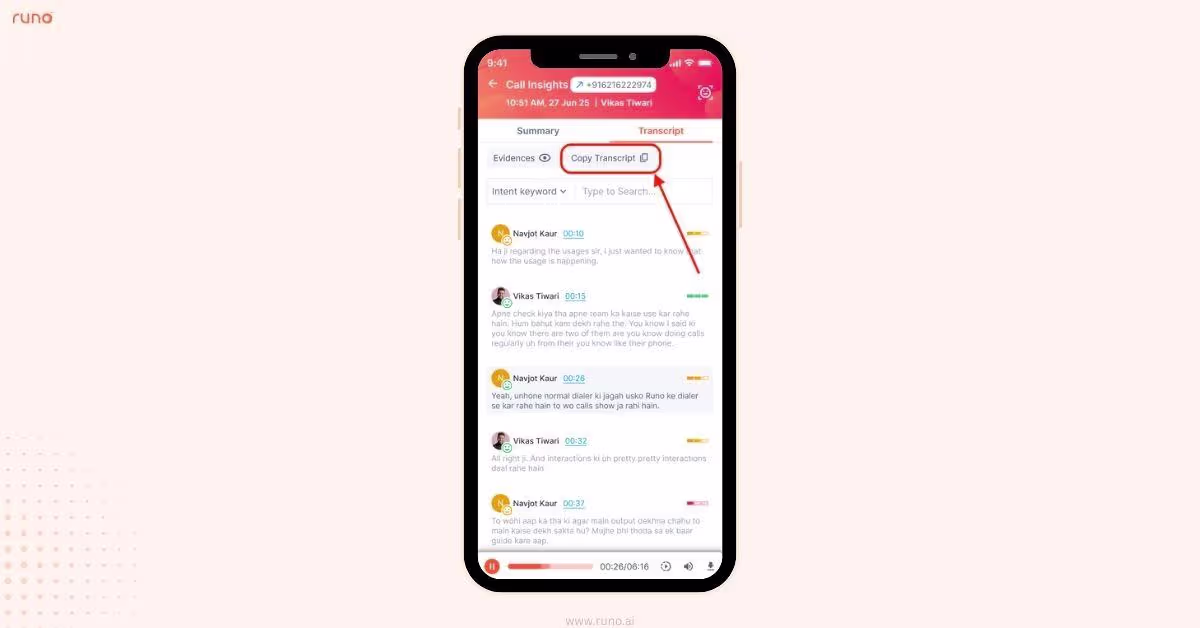
AI-generated call transcripts and summaries can now be copied instantly to the clipboard.
This makes it easier to:
The AI Call Score is now displayed directly on the Customer Details page, with a quick link to the full AI Call Analysis view.
This brings immediate context on call quality while viewing a customer.

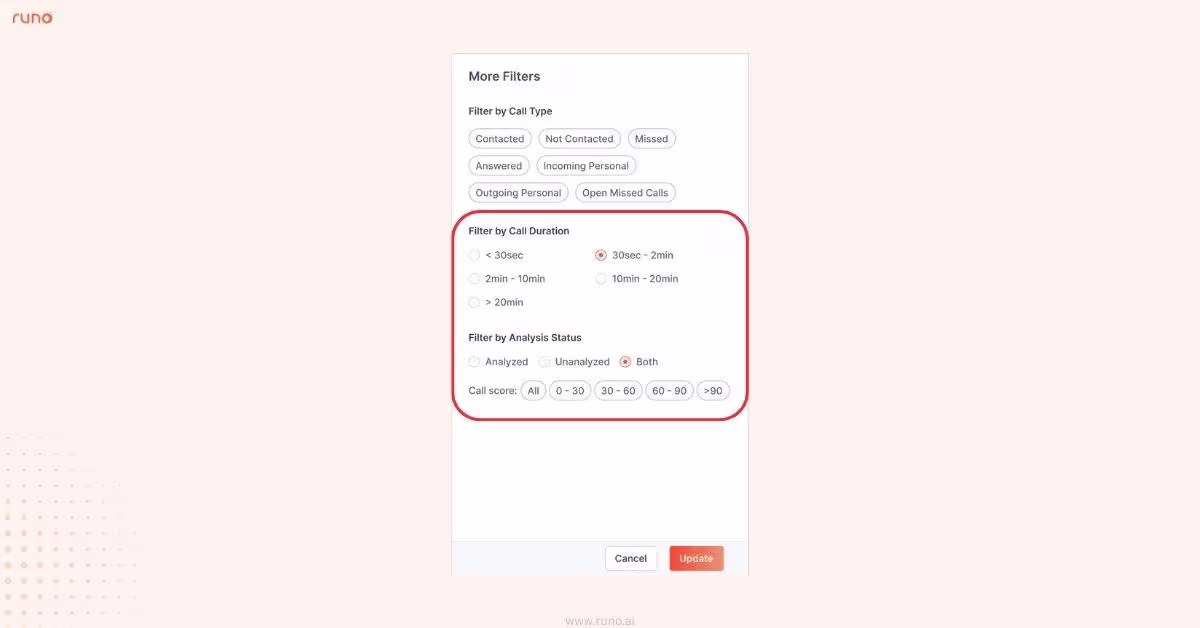
Runo v7.1 adds powerful filtering options to call logs based on AI analysis.
Teams can now:
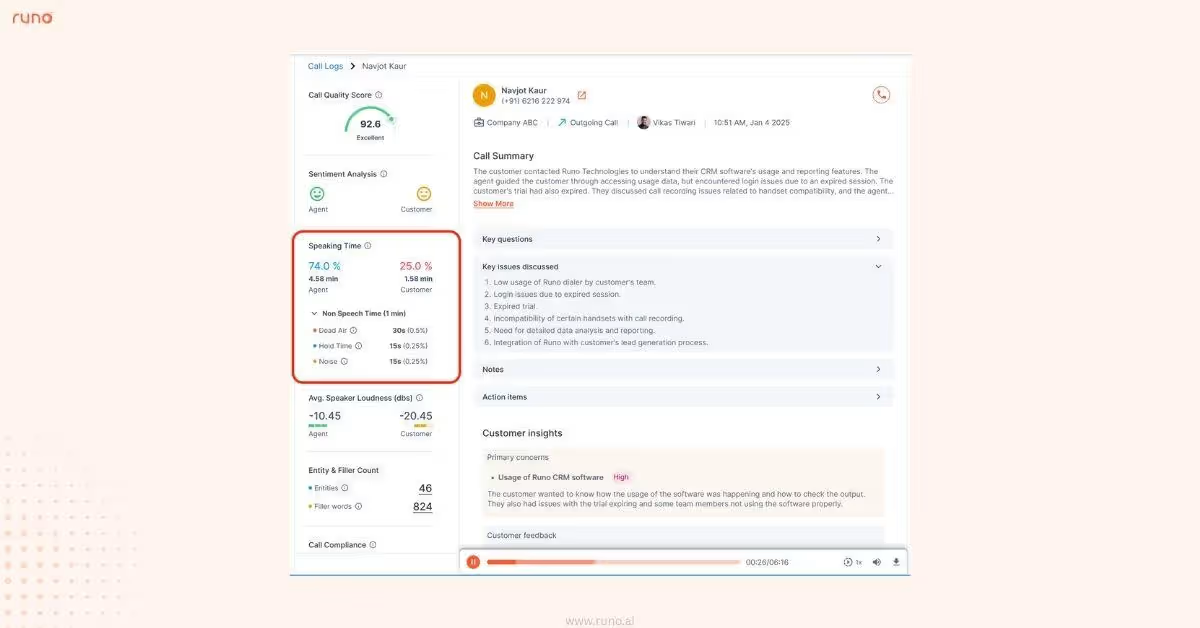
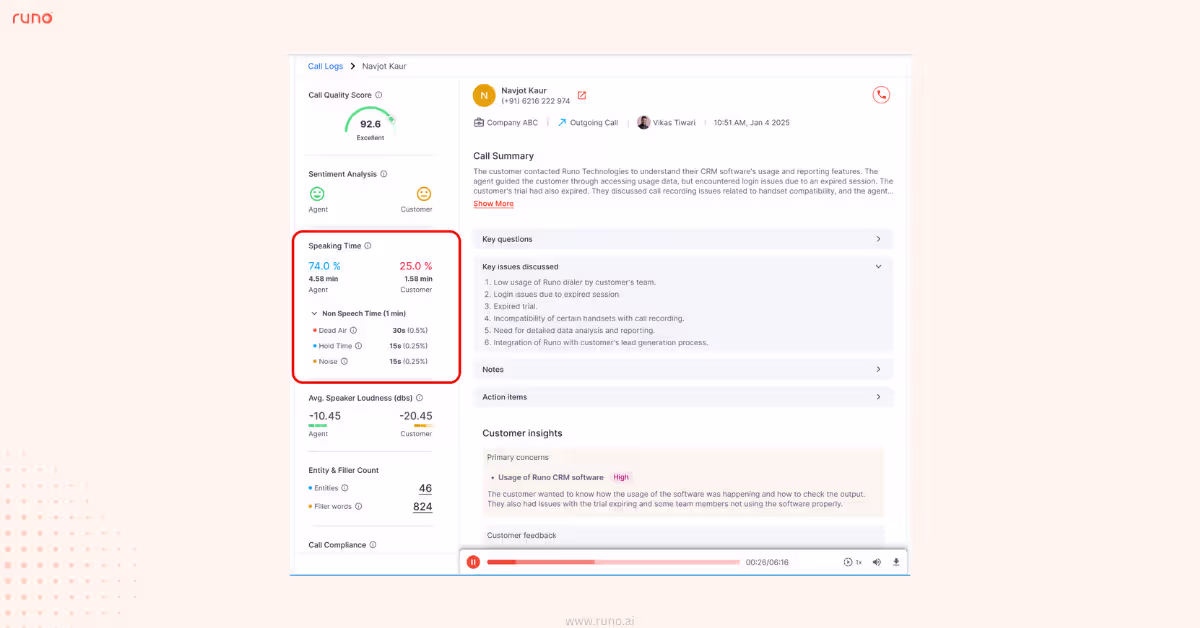
AI Call Analysis now highlights non-speech segments, including:
These insights add a new layer to call quality evaluation, helping teams understand not just what was said, but how efficiently the conversation flowed.
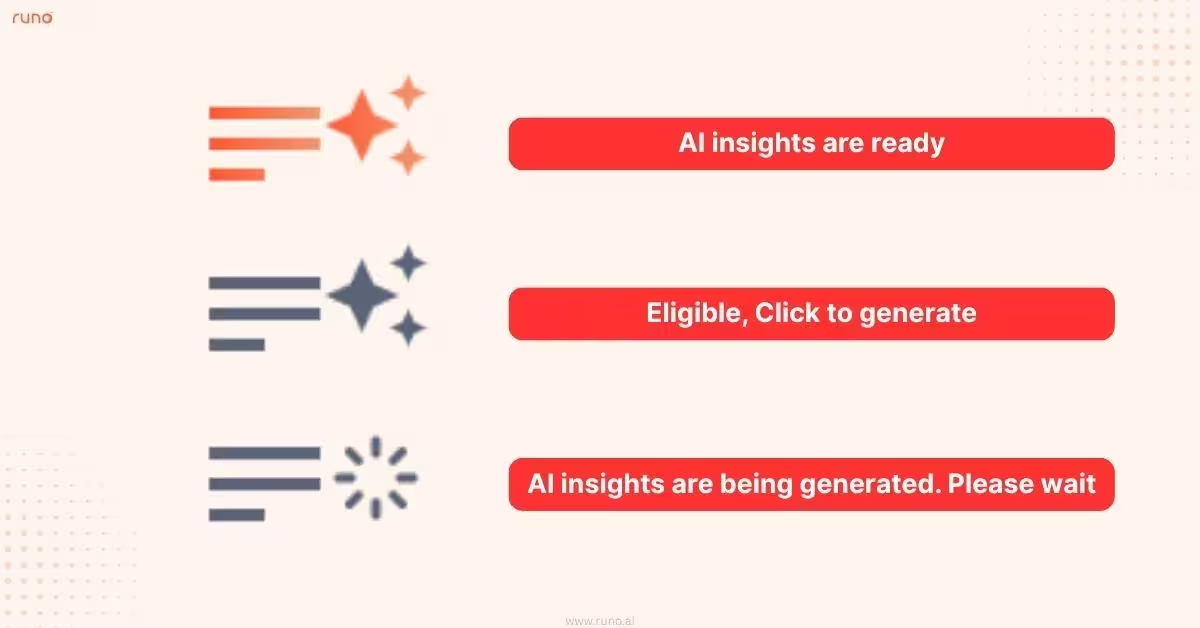
Runo now shows real-time progress indicators during AI processing. Users can clearly see when a call is being transcribed or analyzed.
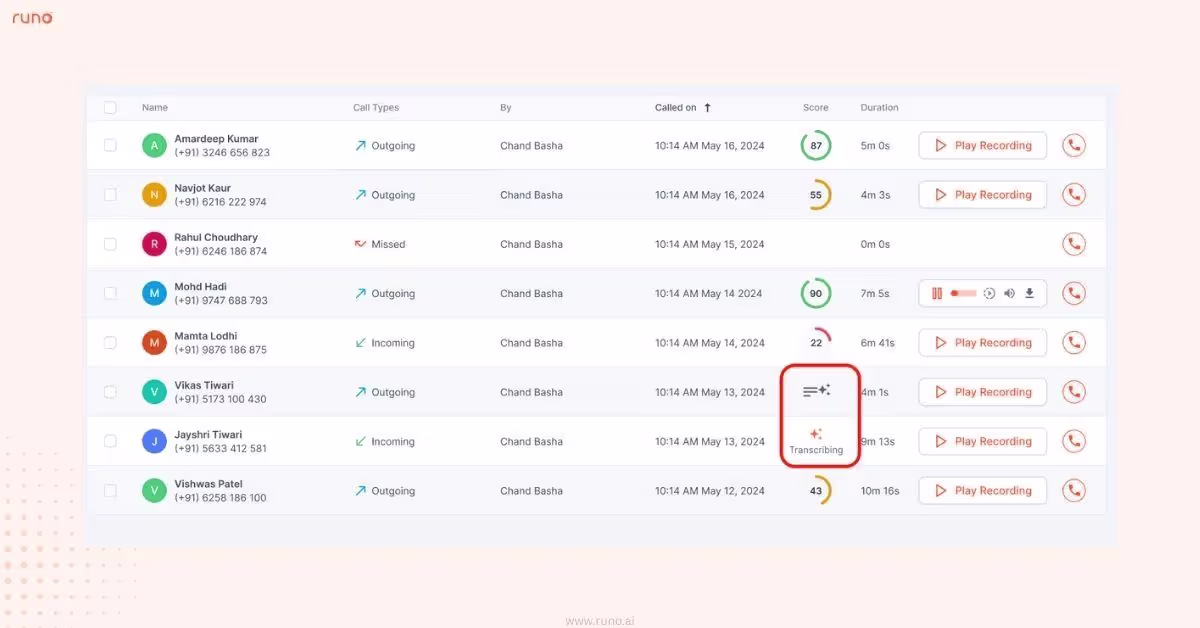
This provides better clarity on analysis status and builds confidence in the AI scoring process, especially for longer calls.
Runo v7.1 introduces a smarter list-view experience by remembering how you prefer to view your data.
When you select the number of items per page, Runo now preserves that preference across navigation and list returns, giving you a more consistent and personalized experience.
What’s improved:
It’s a small UX improvement that makes everyday workflows feel noticeably smoother.
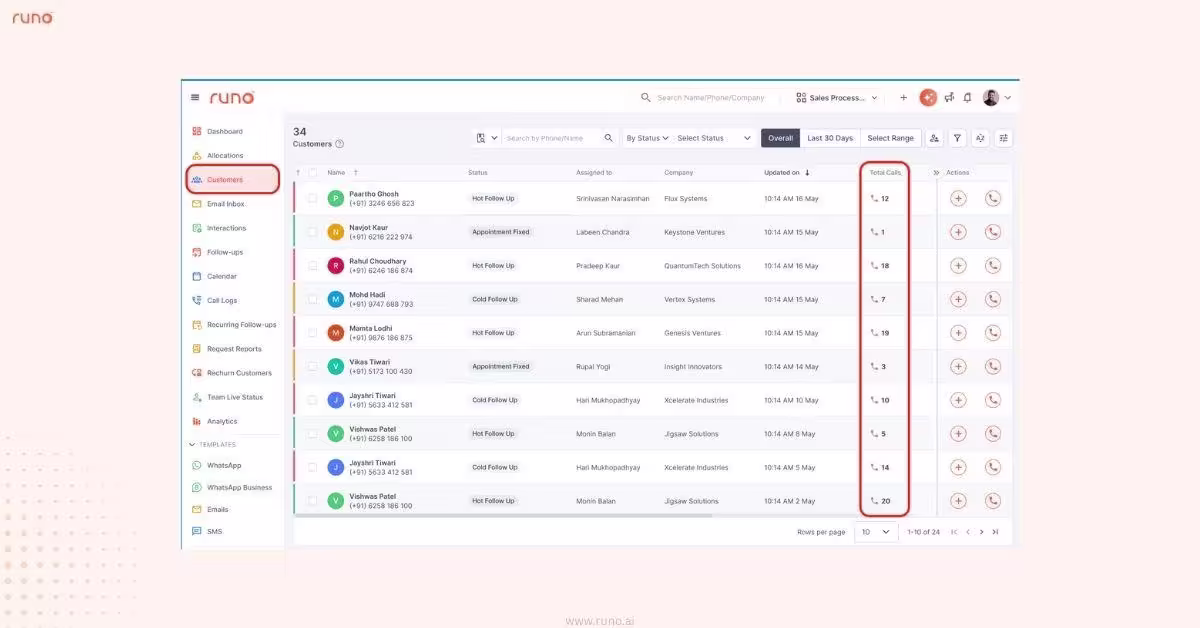
Numbers tell a story, and now you can see the full effort behind every lead.
With v7.1, we’ve introduced the ‘Total Calls Attempted’ column on the Customers page. This feature gives you a cumulative view of every outbound effort made to reach a customer, ensuring your team stays persistent without over-contacting.
Whether a call was connected, missed, or even auto-dismissed, every attempt is now tracked and visible at a glance.
What’s new:
These metrics are automatically included in your basic reports and persist across owner changes or re-allocations.
You can now schedule Basic Reports to be delivered directly to your inbox, ensuring you have the insights you need exactly when you need them.
Set it once, and let Runo handle the rest.
What’s new:
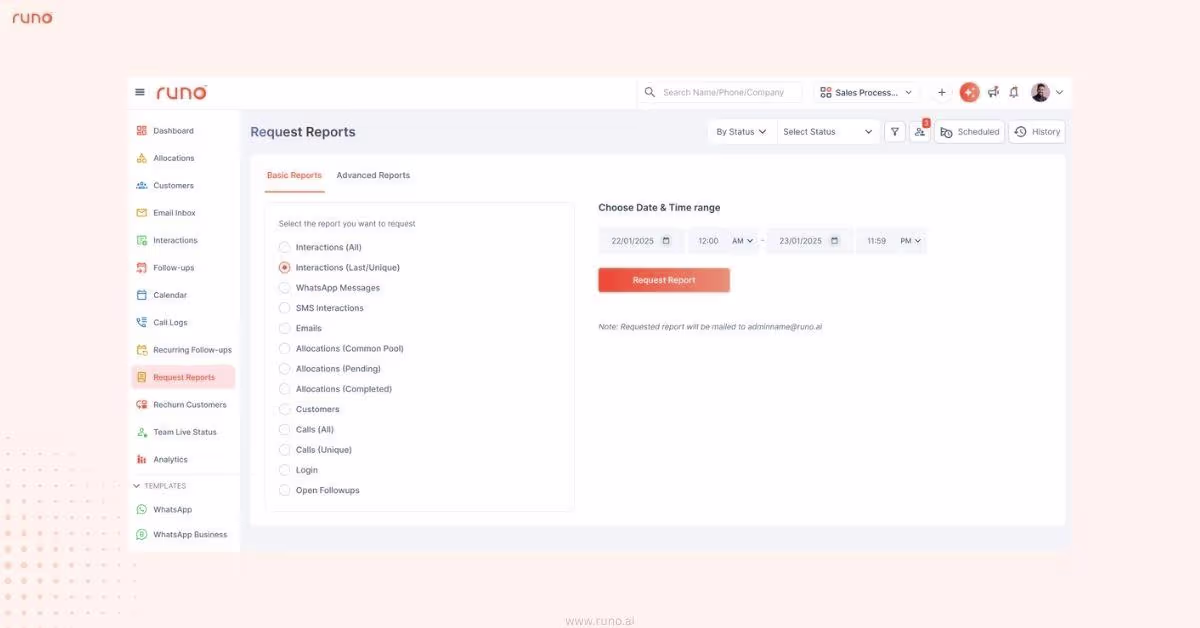
With Report Scheduling, your daily pulse check is now on autopilot.
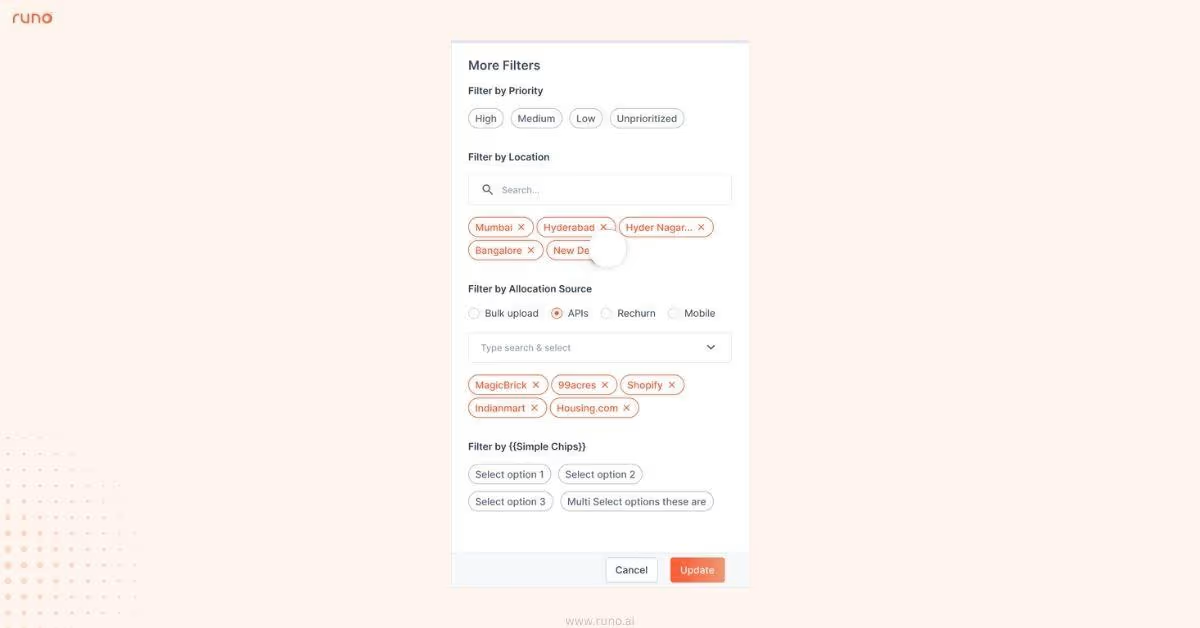
With v7.1, we’ve introduced Searchable Geography Filters across the Customers, Allocations, Reports, and Rechurn pages.
Whether you’re targeting a specific city or analyzing a whole country, you can now drill down into your data with pinpoint accuracy.
What’s new:
With searchable location filters, your data is always right where you need it to be.
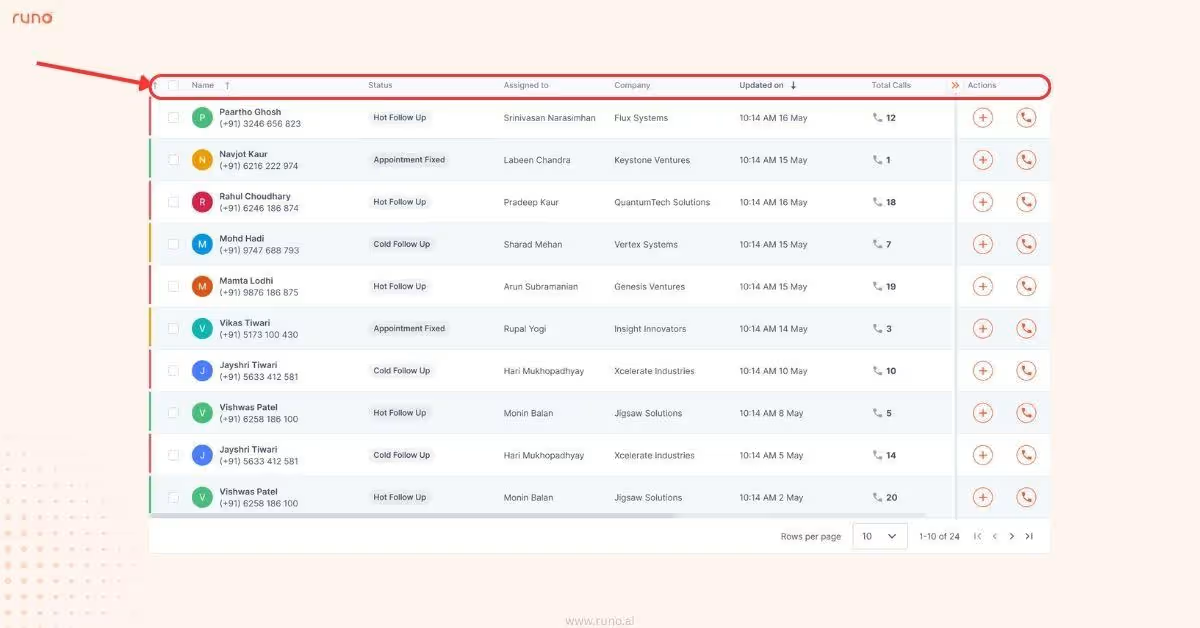
With v7.1, we’ve enhanced the UI with Column-Level Sorting.
You no longer have to navigate away from your list to a top-level dropdown just to reorganize your view. Now, managing your data is as simple and intuitive as using a spreadsheet.
What’s new:
With Column-Level Sorting, your workflow stays fluid and your data stays organized.
Other Minor Enhancements:
With v7.1, we’ve polished the Runo experience with several minor enhancements designed to save you time, reduce clutter, and make navigation effortless.
Next & Previous Navigation Across Web Pages: New Next and Previous buttons on key pages (like Customers, Allocations, and Call Logs) let you click through your records one by one, keeping your workflow moving. Smart skipping option to navigate intelligently over the duplicate records for the same customer.
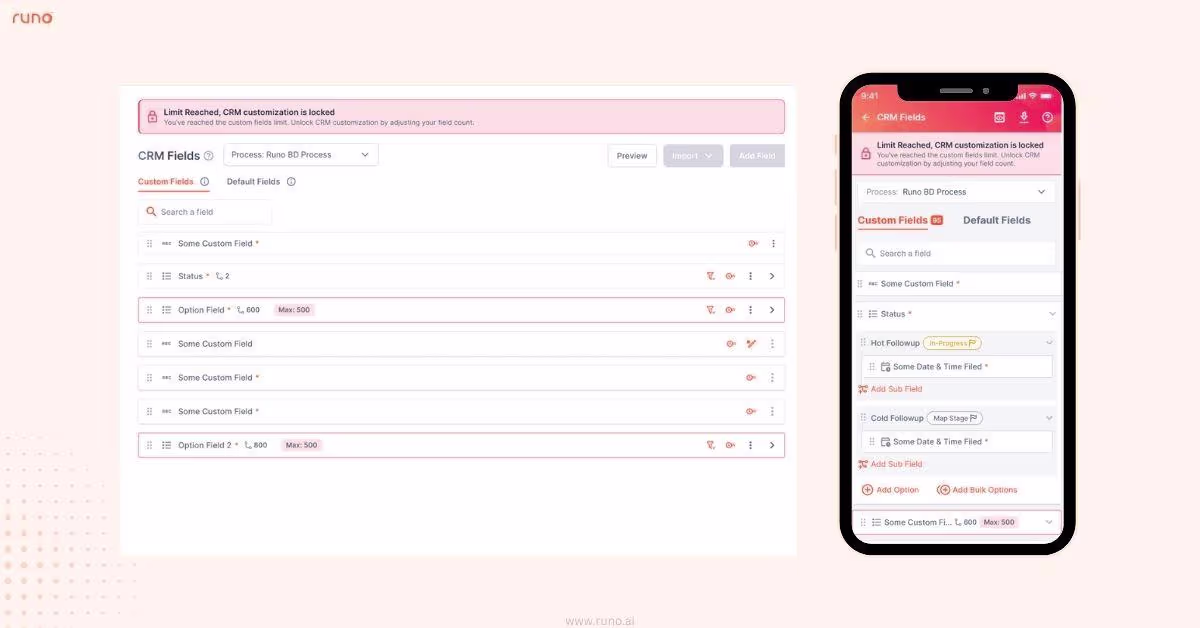
Expanded Character Limit for Bulk CRM Uploads: We’ve expanded the character limit for bulk CRM field uploads from 255 to 2,000 characters. This means you can add all your custom options in one single go rather than splitting them into multiple batches.
Limit number of options in CRM fields to 500: To keep your system fast and responsive, we’ve capped custom field options at 500.
Scrollable Options in Custom CRM Fields: We also added vertical scrolling to these lists, so you can manage long lists of options without cluttering your screen.
These updates ensure that while Runo gets more powerful, it also stays faster and easier to use.
With v7.1, our advanced AI Call Analytics is now expanded to cloud telephony.
Teams can now apply both automatic and manual AI scoring to calls made from Virtual Numbers via Runo dialer. It makes it easier to evaluate conversations at scale or focus on specific calls that matter most.
What’s new:
As AI becomes a core part of daily calling workflows, visibility and control matter just as much as insights.
Runo v7.1 introduces end-to-end AI credit usage tracking, making it easy to understand and scale AI usage.
Teams can:
To make AI usage even more transparent and controllable, AI credit details are now available directly inside the Call Logs Report.
Each call entry now shows:
This helps teams:
Managing AI credits is now faster and fully self-serve.
Customers can now:
AI-generated call transcripts and summaries can now be copied instantly to the clipboard.
This makes it easier to:
The AI Call Score is now displayed directly on the Customer Details page, with a quick link to the full AI Call Analysis view.
This brings immediate context on call quality while viewing a customer.
Runo v7.1 adds powerful filtering options to call logs based on AI analysis.
Teams can now:
AI Call Analysis now highlights non-speech segments, including:
These insights add a new layer to call quality evaluation, helping teams understand not just what was said, but how efficiently the conversation flowed.
Runo now shows real-time progress indicators during AI processing. Users can clearly see when a call is being transcribed or analyzed.
This provides better clarity on analysis status and builds confidence in the AI scoring process, especially for longer calls.
Runo v7.1 introduces a smarter list-view experience by remembering how you prefer to view your data.
When you select the number of items per page, Runo now preserves that preference across navigation and list returns, giving you a more consistent and personalized experience.
What’s improved:
It’s a small UX improvement that makes everyday workflows feel noticeably smoother.
Numbers tell a story, and now you can see the full effort behind every lead.
With v7.1, we’ve introduced the ‘Total Calls Attempted’ column on the Customers page. This feature gives you a cumulative view of every outbound effort made to reach a customer, ensuring your team stays persistent without over-contacting.
Whether a call was connected, missed, or even auto-dismissed, every attempt is now tracked and visible at a glance.
What’s new:
These metrics are automatically included in your basic reports and persist across owner changes or re-allocations.
You can now schedule Basic Reports to be delivered directly to your inbox, ensuring you have the insights you need exactly when you need them.
Set it once, and let Runo handle the rest.
What’s new:
With Report Scheduling, your daily pulse check is now on autopilot.
With v7.1, we’ve introduced Searchable Geography Filters across the Customers, Allocations, Reports, and Rechurn pages.
Whether you’re targeting a specific city or analyzing a whole country, you can now drill down into your data with pinpoint accuracy.
What’s new:
With searchable location filters, your data is always right where you need it to be.
With v7.1, we’ve enhanced the UI with Column-Level Sorting.
You no longer have to navigate away from your list to a top-level dropdown just to reorganize your view. Now, managing your data is as simple and intuitive as using a spreadsheet.
What’s new:
With Column-Level Sorting, your workflow stays fluid and your data stays organized.
Other Minor Enhancements:
With v7.1, we’ve polished the Runo experience with several minor enhancements designed to save you time, reduce clutter, and make navigation effortless.
Next & Previous Navigation Across Web Pages: New Next and Previous buttons on key pages (like Customers, Allocations, and Call Logs) let you click through your records one by one, keeping your workflow moving. Smart skipping option to navigate intelligently over the duplicate records for the same customer.
Expanded Character Limit for Bulk CRM Uploads: We’ve expanded the character limit for bulk CRM field uploads from 255 to 2,000 characters. This means you can add all your custom options in one single go rather than splitting them into multiple batches.
Limit number of options in CRM fields to 500: To keep your system fast and responsive, we’ve capped custom field options at 500.
Scrollable Options in Custom CRM Fields: We also added vertical scrolling to these lists, so you can manage long lists of options without cluttering your screen.
These updates ensure that while Runo gets more powerful, it also stays faster and easier to use.
Introducing Runo v7.0 - a powerful blend of privacy, smarter search, better access, and configurable AI controls - making workflows faster, cleaner, and more secure than ever.
Finding the right conversation just got faster and easier.
With the new search experience inside WhatsApp Business Messaging, users can now quickly locate messages, customer threads, and any previous interactions… without endless scrolling.
What’s new?
How to use it?
That’s it… fast, simple, and designed to save time.
Managing reporting structures is now faster and more efficient.
With this update, admins can update reporting managers for multiple users at once, eliminating the need to modify each profile individually.
Bulk select users and assign/change the reporting manager for all selected users in a single click.
How to use it?
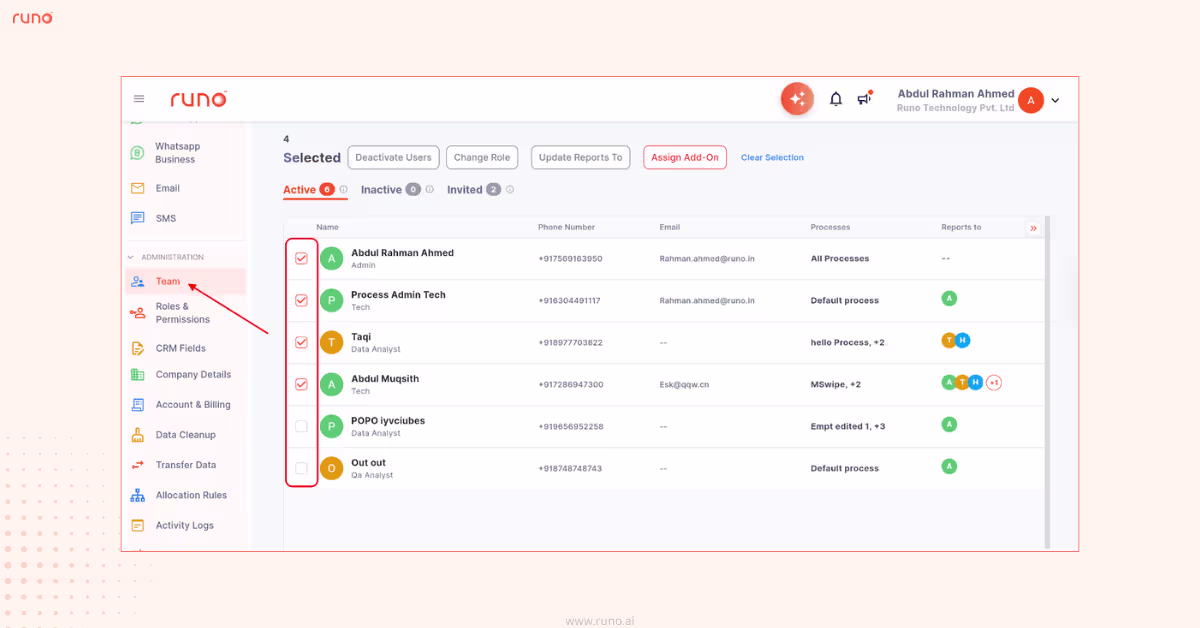
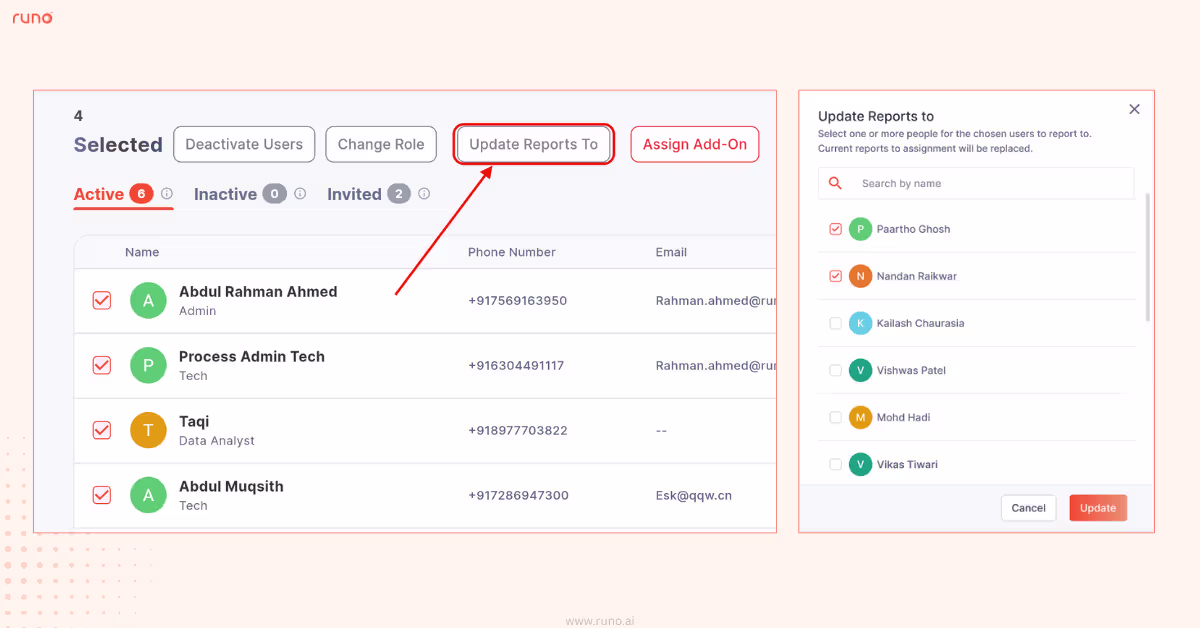
Quick, simple, and efficient.
Assigning multiple customers to a user is now much simpler.
You can now bulk-assign customer ownership to a user directly from the Customers page without having to update them one by one.
This makes handovers, onboarding and rechurning leads faster and more seamless.
What’s new?
How to use it?
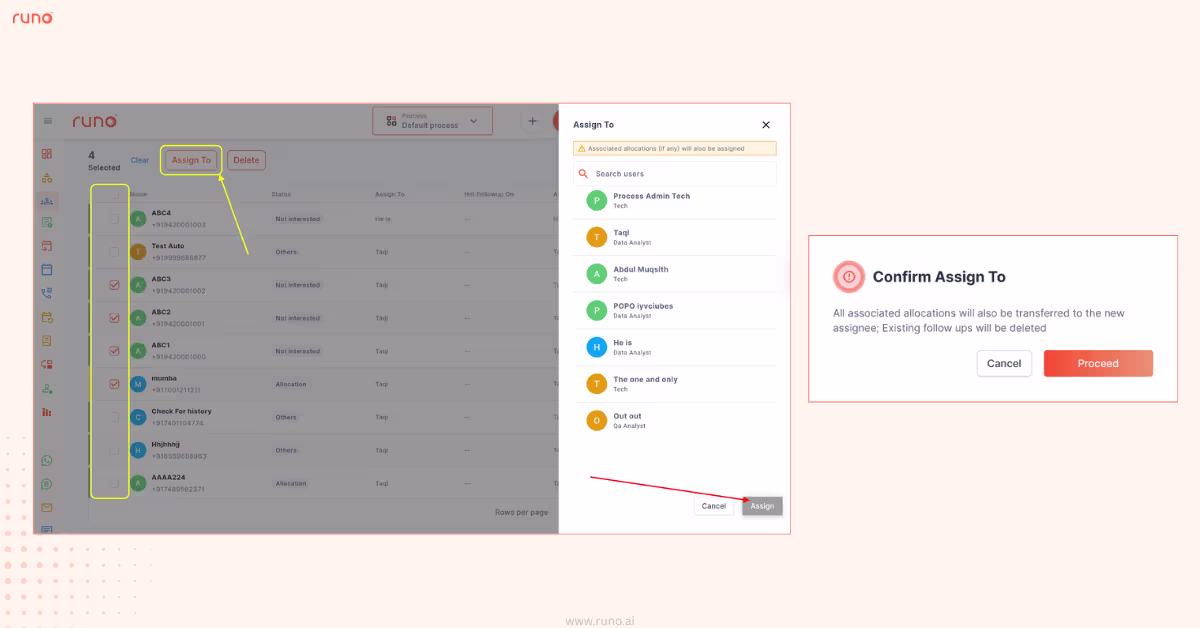
Smooth handovers, clearer ownership, and less manual bookkeeping.
Protecting customer privacy just got even better.
With number masking enabled, phone numbers across the app and reports are hidden by default. This prevents data loss of customers as the calling agents would be restricted from viewing the customer’s phone number.
What’s new?
How to use it?
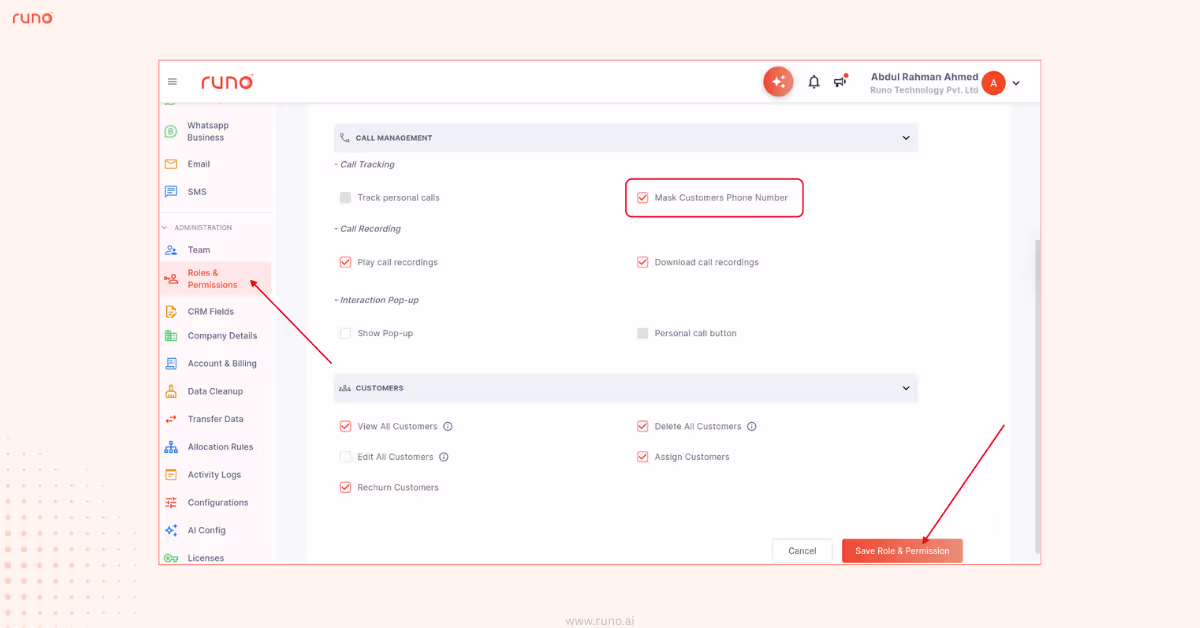
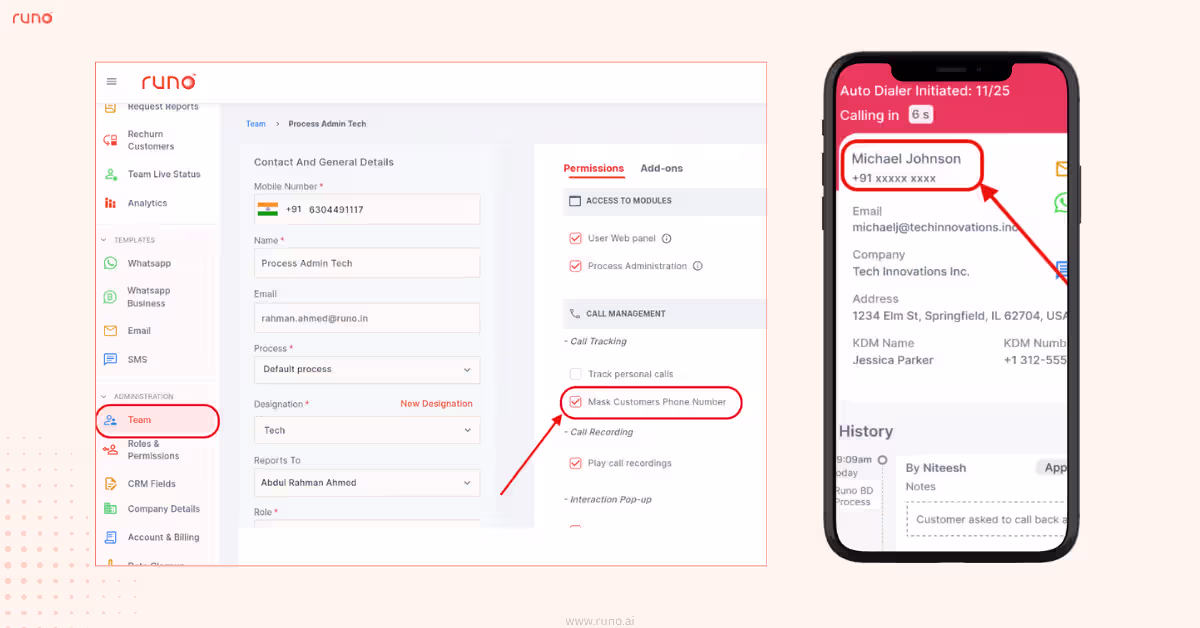
Simple setup. Stronger privacy.
Calling through already-attempted leads is now more organized and efficient.
With this update, you can enable Auto-dialer for leads from the Attempted bucket.
This helps with rechurning leads and makes follow-up calling far more efficient, especially for larger lead pools.
What’s new?
How to use it?
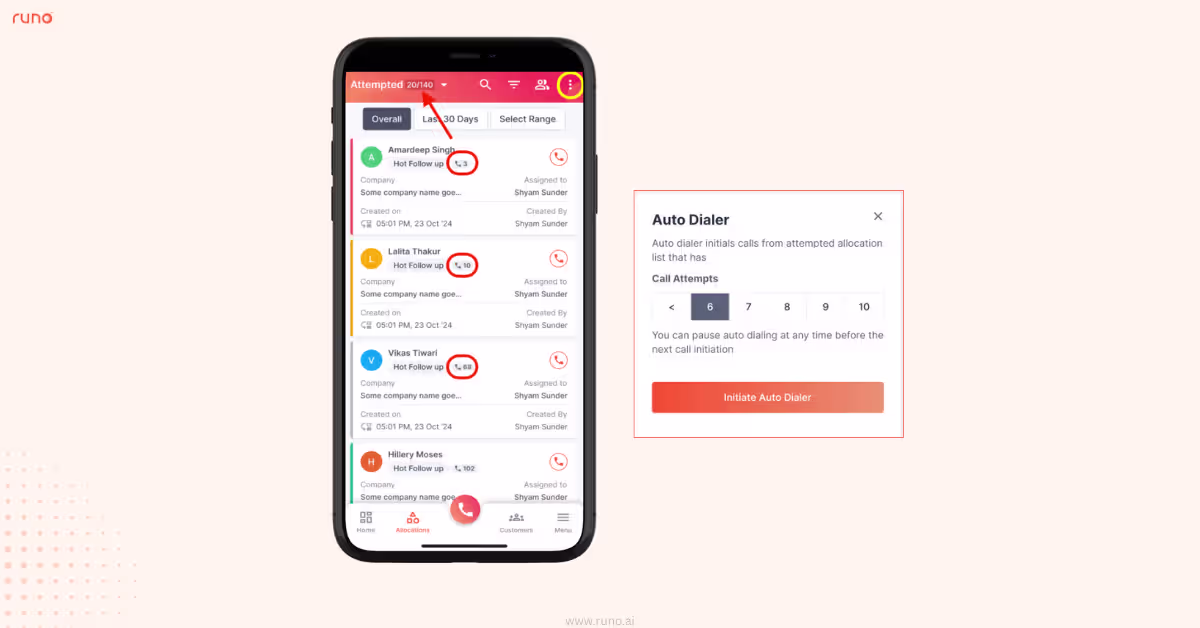
Efficient dialing. Better rotation. Less manual effort.
WhatsApp inbox visibility now follows the same privacy level as the rest of Runo.
With this update, only select users, based on ownership, hierarchy, and permissions, can view or interact with WhatsApp conversations.
This ensures customer data stays protected and access remains aligned with internal workflows.
What’s new?
If the WABA add-on is disabled, WhatsApp history remains visible in Customer Details based on existing permissions, not inbox access.
Sending WhatsApp template messages is now more transparent than ever.
Instead of guessing why a message didn’t go through, users will now see clear error indicators and Meta-provided reasons, helping teams quickly fix issues and avoid repeated failed attempts.
What’s new?
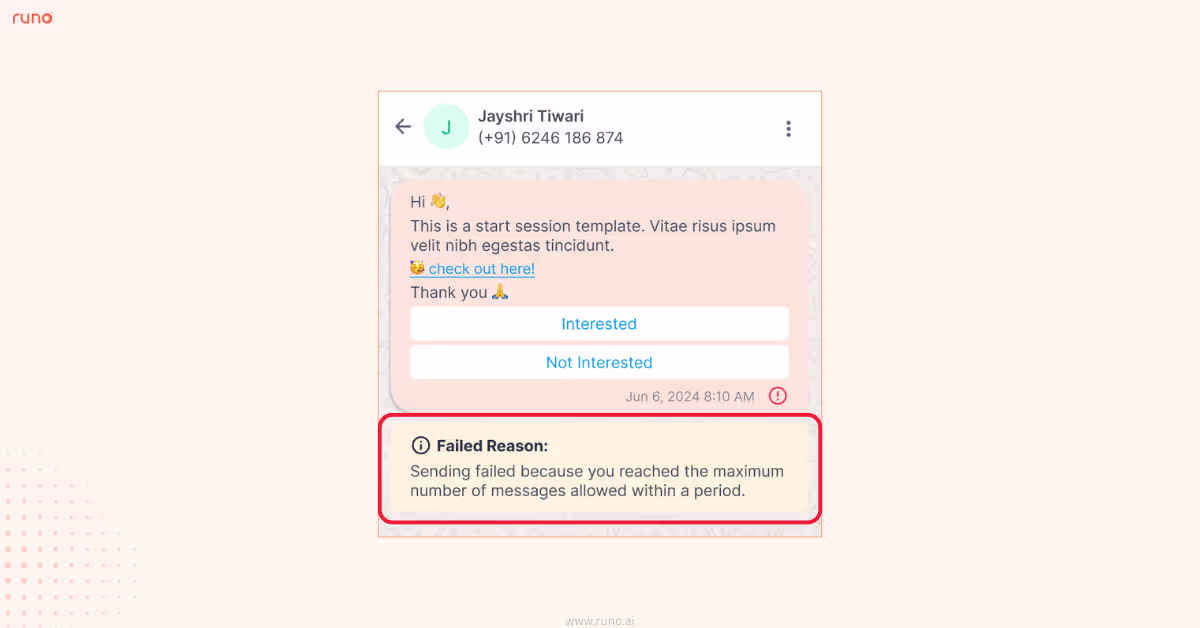
This update ensures faster troubleshooting, better compliance, and more reliable WhatsApp communication.
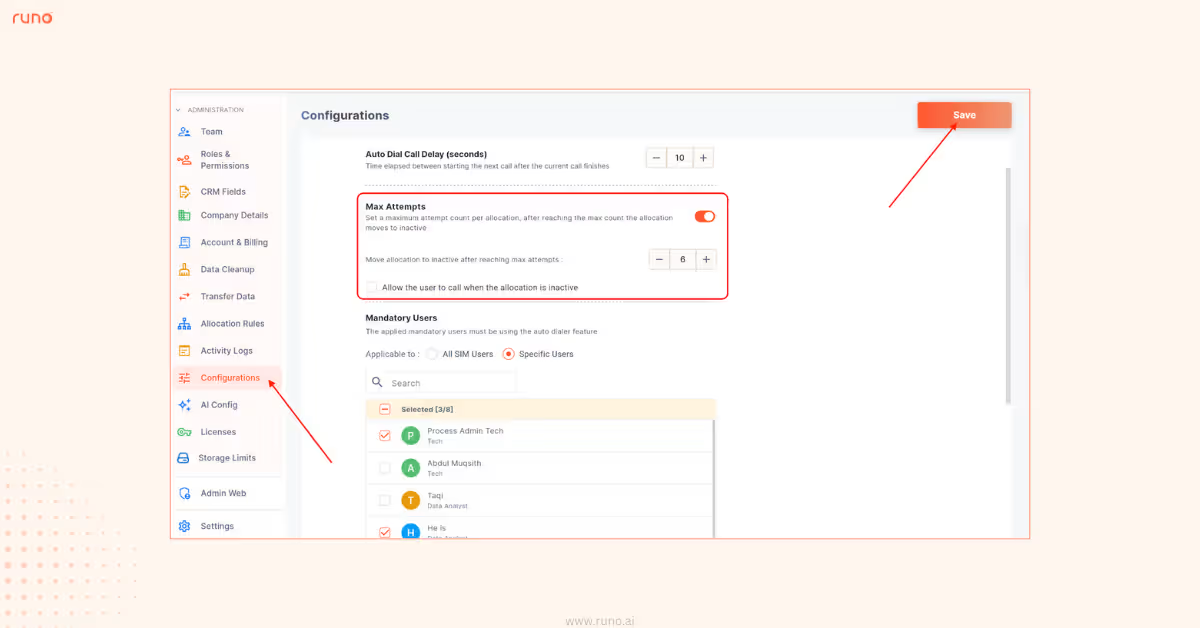
Follow-ups should be consistent and not endless.
With this update, admins can now define the maximum number of call attempts allowed per lead.
What’s new?
Admin can:
Attempted Allocations:
Inactive Allocations:
How to use it?
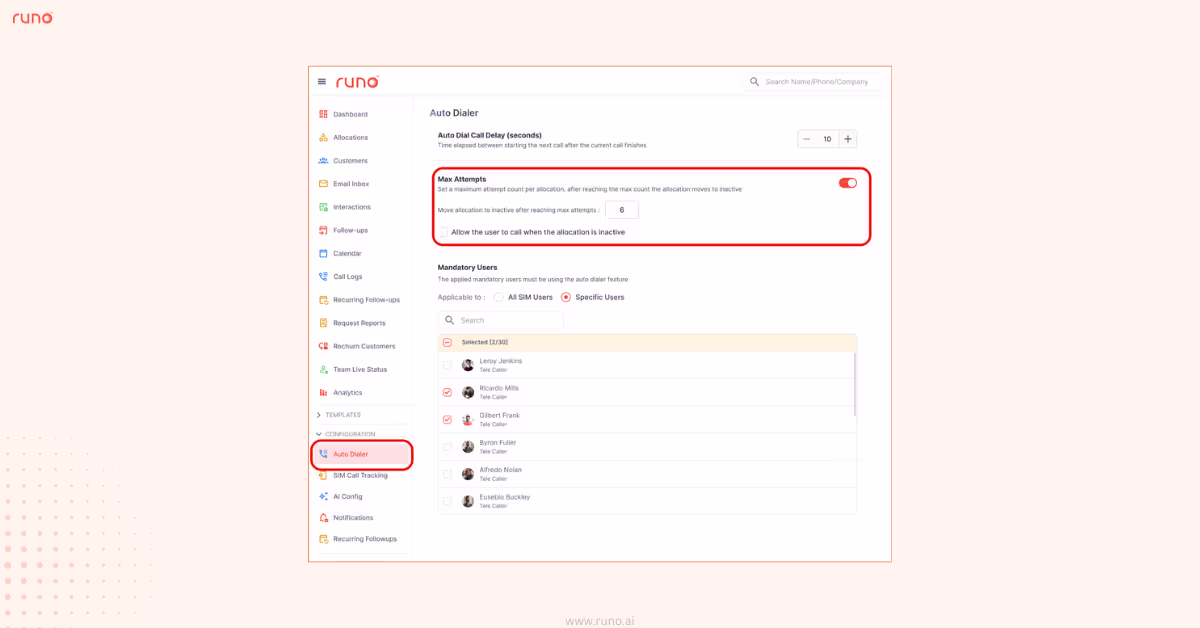
A simple rule that brings structure and control to calling sequences.
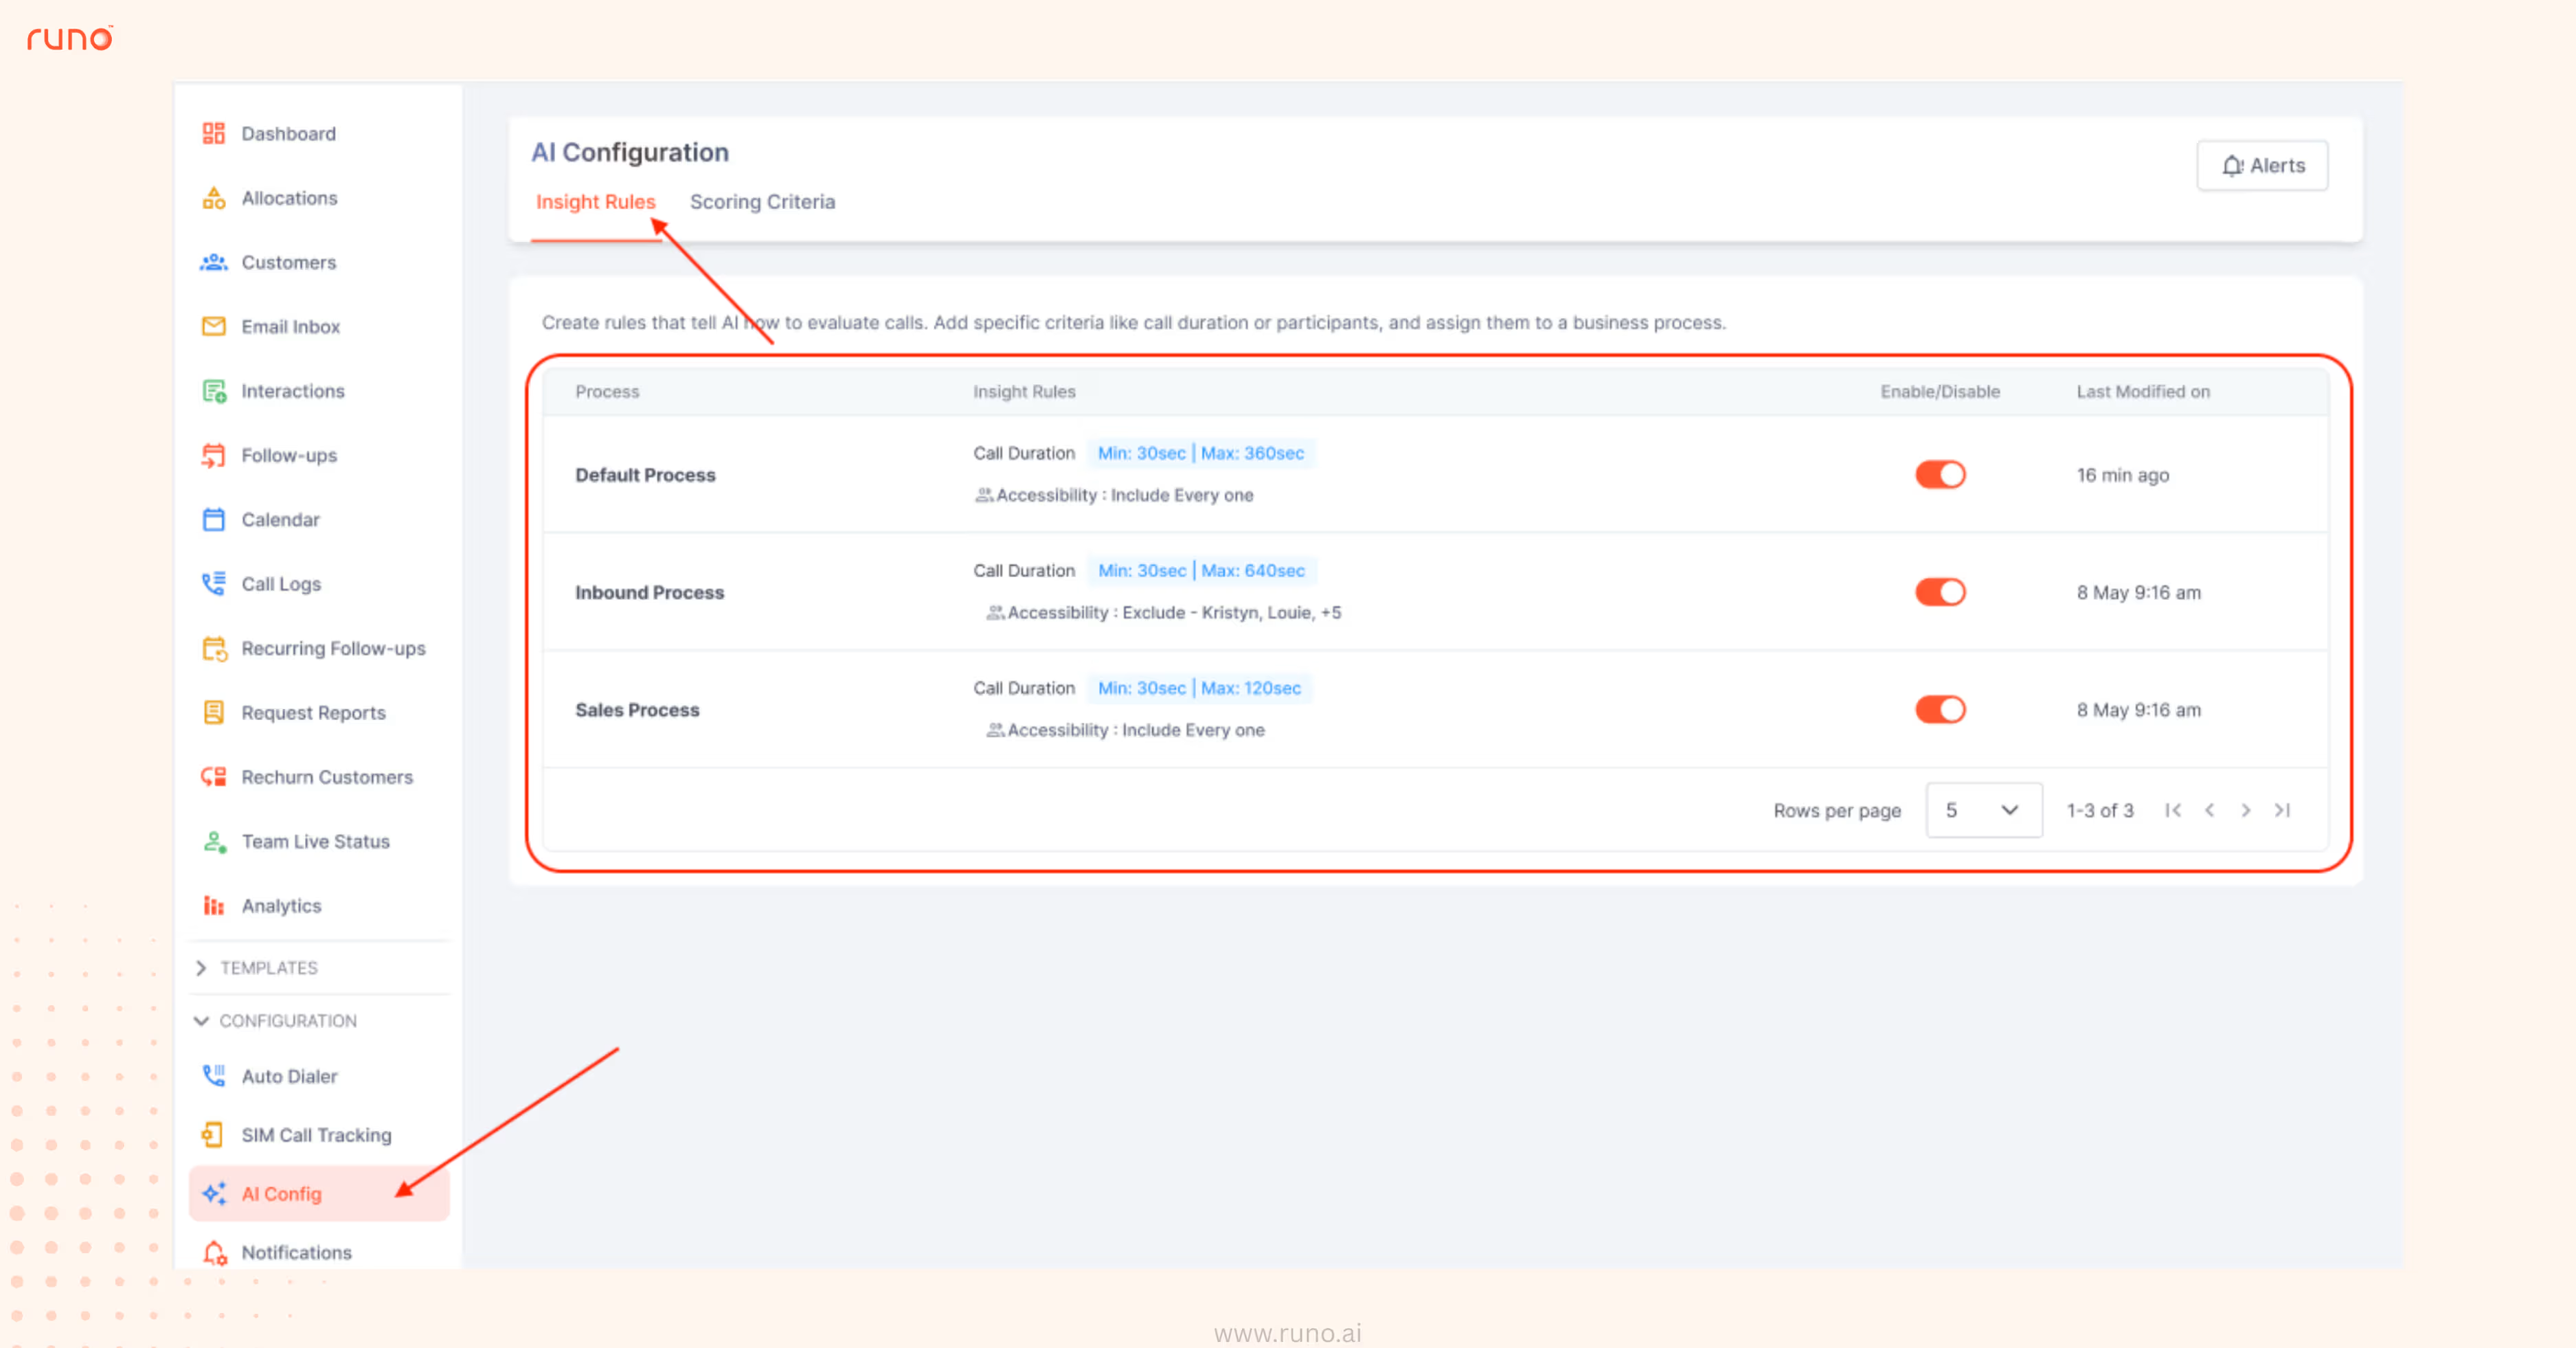
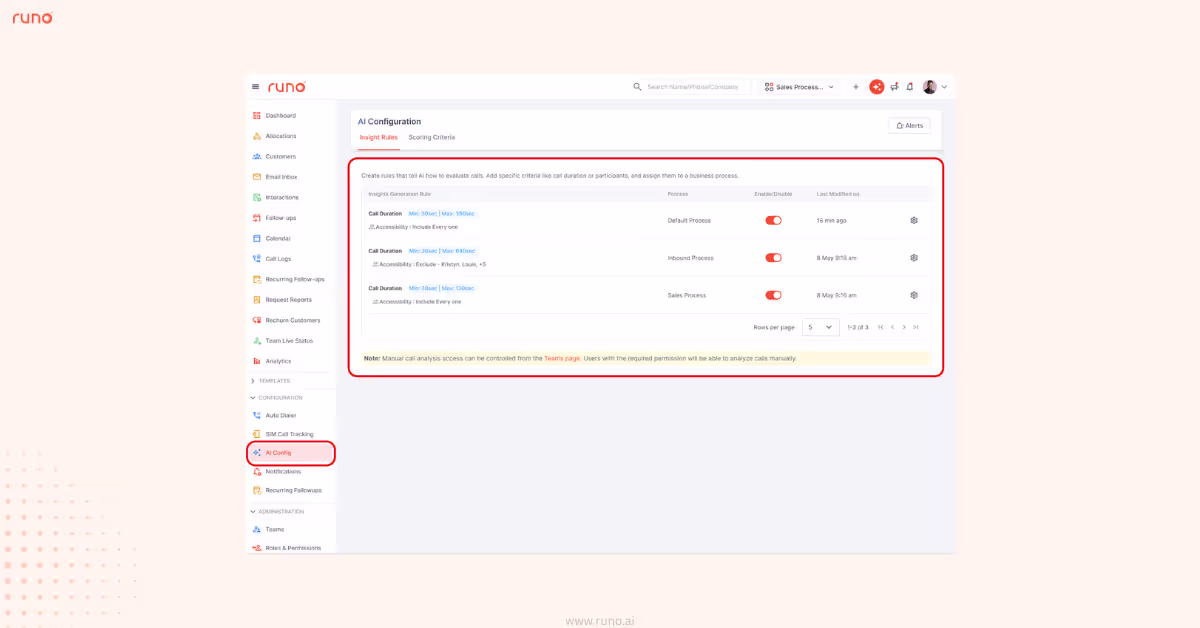
Call analysis is now more customizable. With Insight Rules, teams can define how calls should be evaluated across different processes.
What’s new
How to use it?
Manual Call Analysis:
Auto Call Analysis:
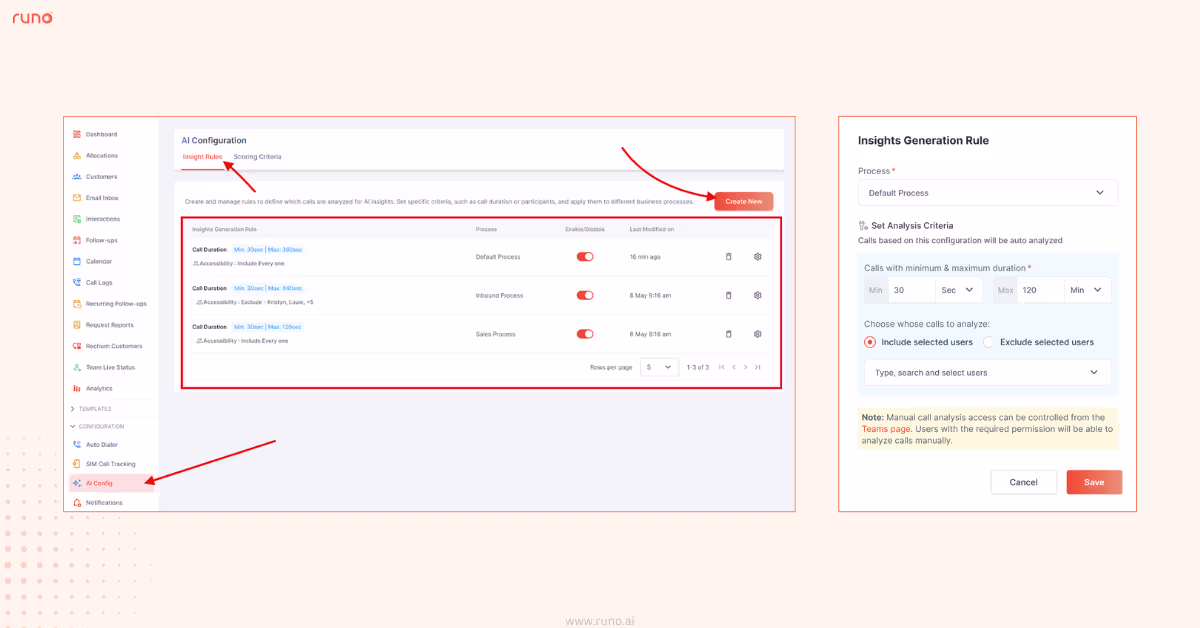
This feature gives teams control of how insights are generated, making AI analysis more relevant, configurable, and aligned with each process.
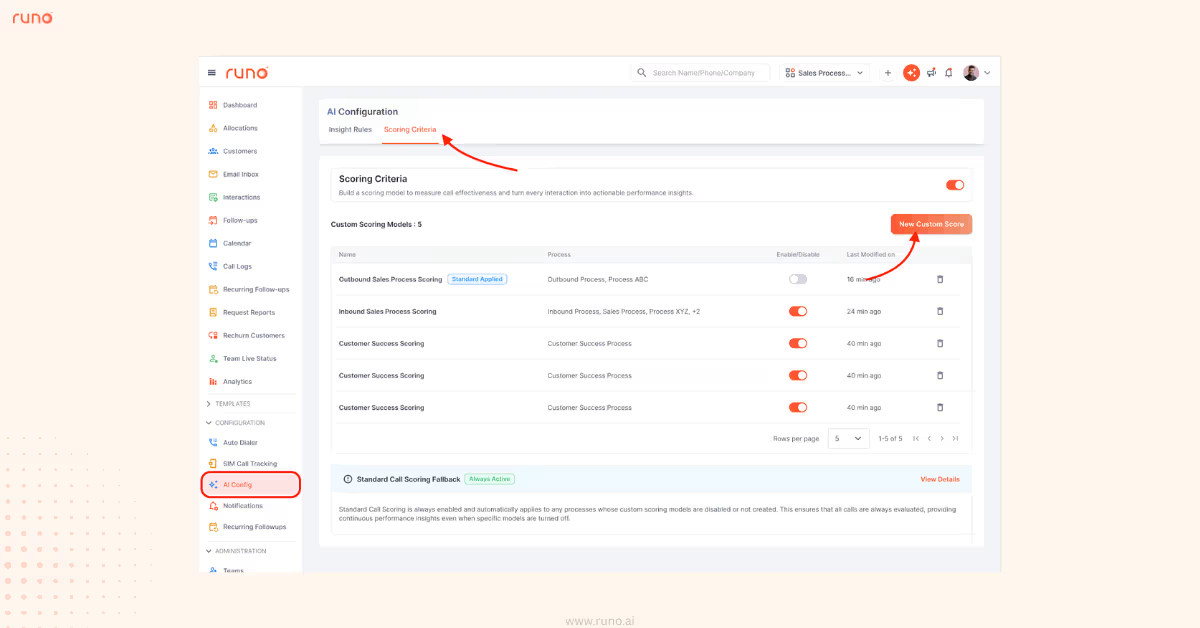
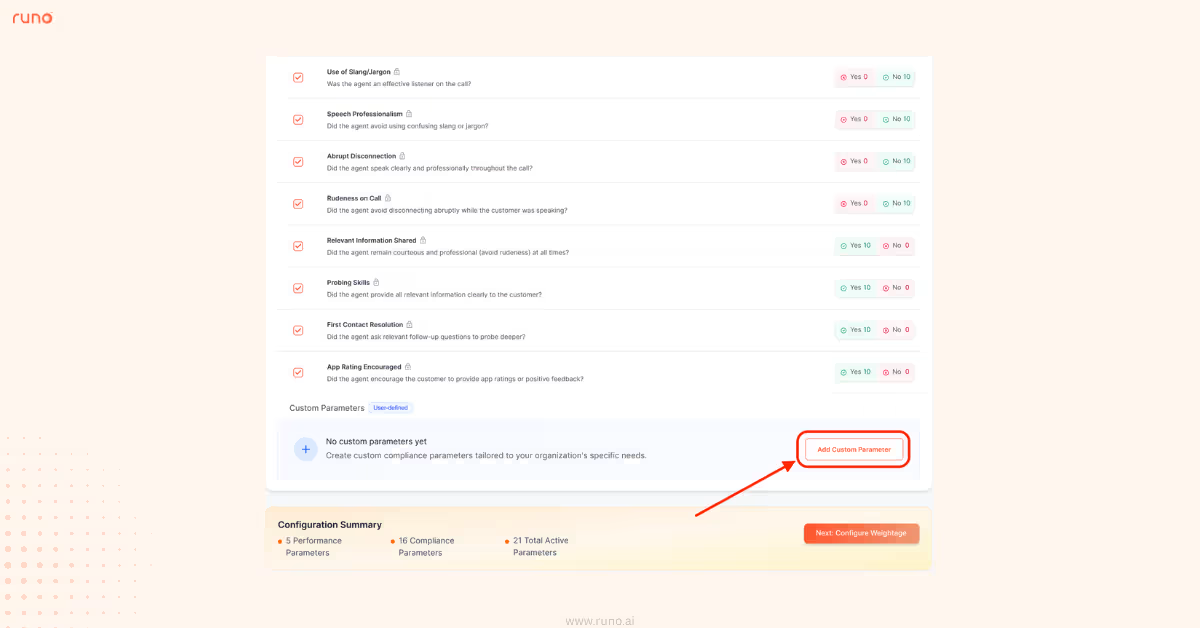
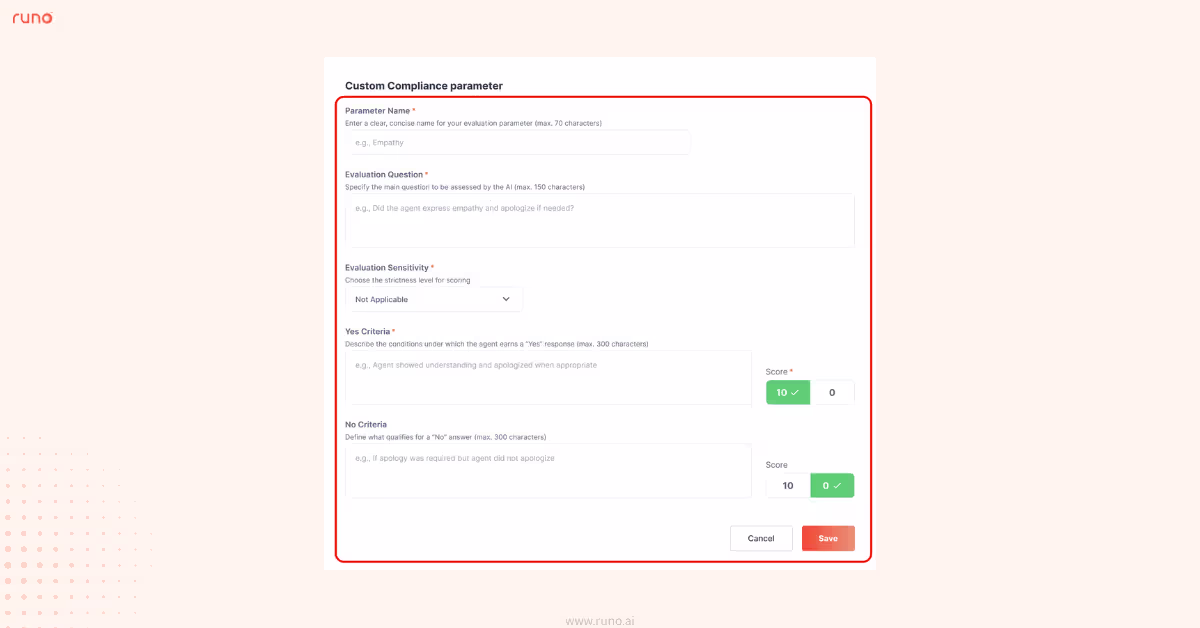
Call scoring now becomes fully customizable.
With the new Scoring Criterion setup, teams can define how calls should be evaluated. The scoring model reflects real business goals, compliance needs, and performance expectations.
What’s new
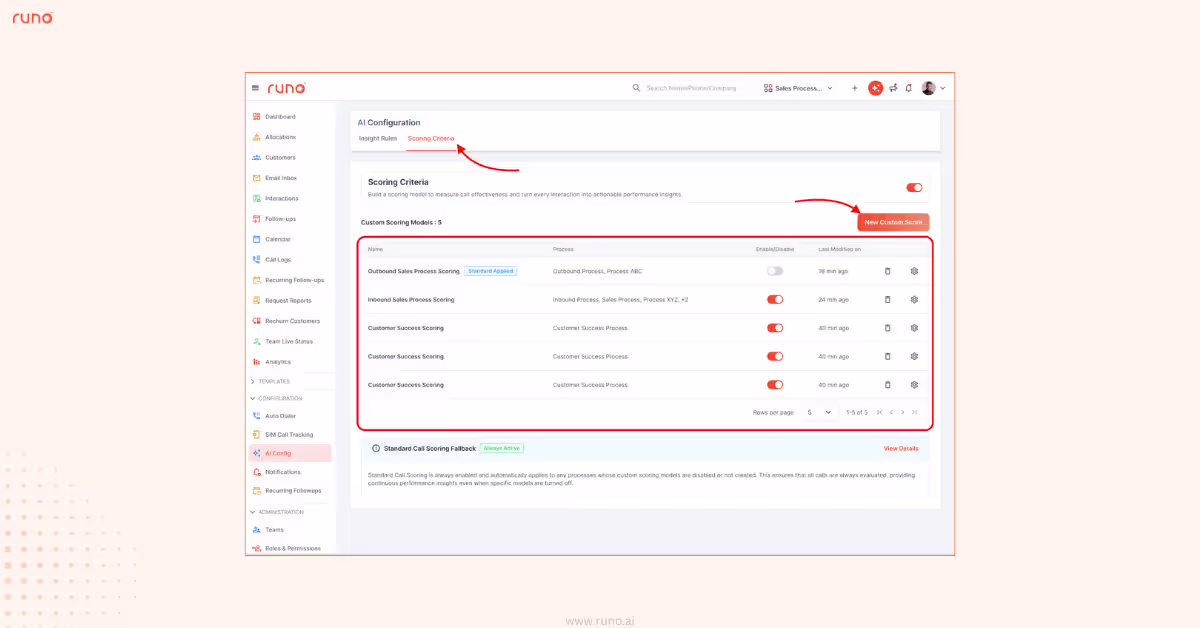
A scoring system that adapts to your workflow, not the other way around.
Evaluating call quality is now easier at a glance.
With the new ‘AI Score’ column in the Call Logs report, teams can instantly see how each call performed, without opening individual call recordings or details.
What’s new
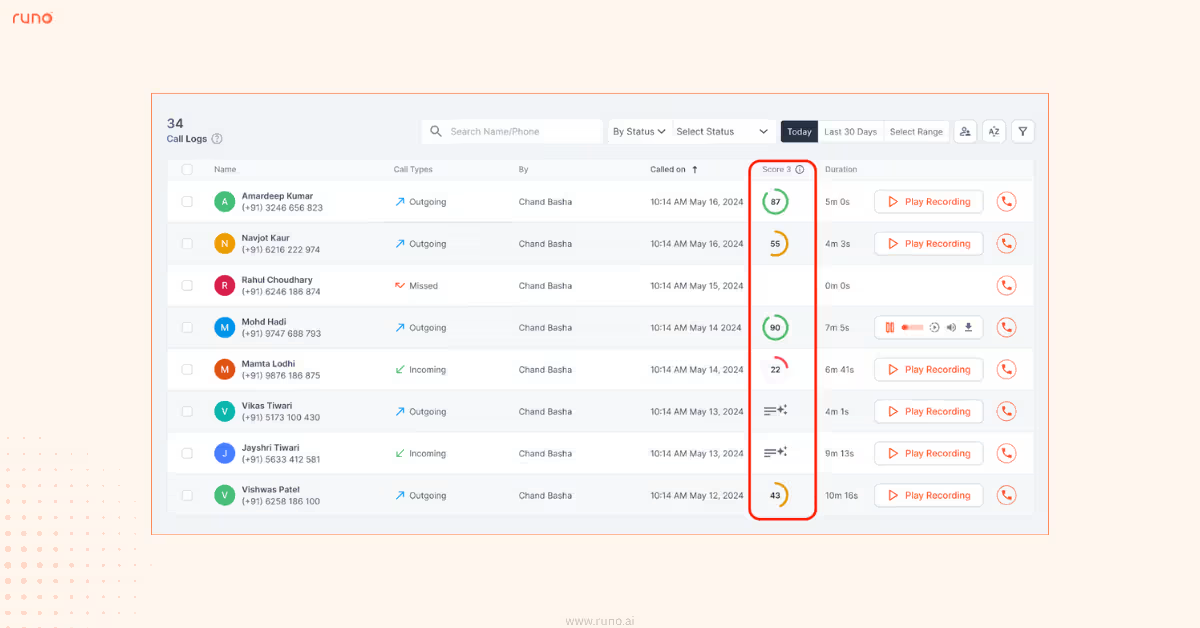
Better visibility. Smarter insights. Stronger performance tracking.
Side panels will now automatically close when you click anywhere outside the panel, making navigation smoother and reducing extra clicks.
Applies to side panels in:
Allocations, Customers, Interactions, Follow-Ups, Calendar, Call Logs, Rechurn Customers, Team Live Status, Analytics, Communication modules, Team Management, CRM Fields, Data Cleanup, and Data Transfer
A small UI improvement that makes the product feel faster and more intuitive to use.
Finding the right conversation just got faster and easier.
With the new search experience inside WhatsApp Business Messaging, users can now quickly locate messages, customer threads, and any previous interactions… without endless scrolling.
What’s new?
How to use it?
That’s it… fast, simple, and designed to save time.
Managing reporting structures is now faster and more efficient.
With this update, admins can update reporting managers for multiple users at once, eliminating the need to modify each profile individually.
Bulk select users and assign/change the reporting manager for all selected users in a single click.
How to use it?
Quick, simple, and efficient.
Assigning multiple customers to a user is now much simpler.
You can now bulk-assign customer ownership to a user directly from the Customers page without having to update them one by one.
This makes handovers, onboarding and rechurning leads faster and more seamless.
What’s new?
How to use it?
Smooth handovers, clearer ownership, and less manual bookkeeping.
Protecting customer privacy just got even better.
With number masking enabled, phone numbers across the app and reports are hidden by default. This prevents data loss of customers as the calling agents would be restricted from viewing the customer’s phone number.
What’s new?
How to use it?
Simple setup. Stronger privacy.
Calling through already-attempted leads is now more organized and efficient.
With this update, you can enable Auto-dialer for leads from the Attempted bucket.
This helps with rechurning leads and makes follow-up calling far more efficient, especially for larger lead pools.
What’s new?
How to use it?
Efficient dialing. Better rotation. Less manual effort.
WhatsApp inbox visibility now follows the same privacy level as the rest of Runo.
With this update, only select users, based on ownership, hierarchy, and permissions, can view or interact with WhatsApp conversations.
This ensures customer data stays protected and access remains aligned with internal workflows.
What’s new?
If the WABA add-on is disabled, WhatsApp history remains visible in Customer Details based on existing permissions, not inbox access.
Sending WhatsApp template messages is now more transparent than ever.
Instead of guessing why a message didn’t go through, users will now see clear error indicators and Meta-provided reasons, helping teams quickly fix issues and avoid repeated failed attempts.
What’s new?
This update ensures faster troubleshooting, better compliance, and more reliable WhatsApp communication.
Follow-ups should be consistent and not endless.
With this update, admins can now define the maximum number of call attempts allowed per lead.
What’s new?
Admin can:
Attempted Allocations:
Inactive Allocations:
How to use it?
A simple rule that brings structure and control to calling sequences.
Call analysis is now more customizable. With Insight Rules, teams can define how calls should be evaluated across different processes.
What’s new
How to use it?
Manual Call Analysis:
Auto Call Analysis:
This feature gives teams control of how insights are generated, making AI analysis more relevant, configurable, and aligned with each process.
Call scoring now becomes fully customizable.
With the new Scoring Criterion setup, teams can define how calls should be evaluated. The scoring model reflects real business goals, compliance needs, and performance expectations.
What’s new
A scoring system that adapts to your workflow, not the other way around.
Evaluating call quality is now easier at a glance.
With the new ‘AI Score’ column in the Call Logs report, teams can instantly see how each call performed, without opening individual call recordings or details.
What’s new
Better visibility. Smarter insights. Stronger performance tracking.
Side panels will now automatically close when you click anywhere outside the panel, making navigation smoother and reducing extra clicks.
Applies to side panels in:
Allocations, Customers, Interactions, Follow-Ups, Calendar, Call Logs, Rechurn Customers, Team Live Status, Analytics, Communication modules, Team Management, CRM Fields, Data Cleanup, and Data Transfer
A small UI improvement that makes the product feel faster and more intuitive to use.
The latest release of Runo Updates is here, and this is a game-changing one!
Designed for teams that thrive on efficiency, v6.2 makes every workflow smoother and every decision more precise.
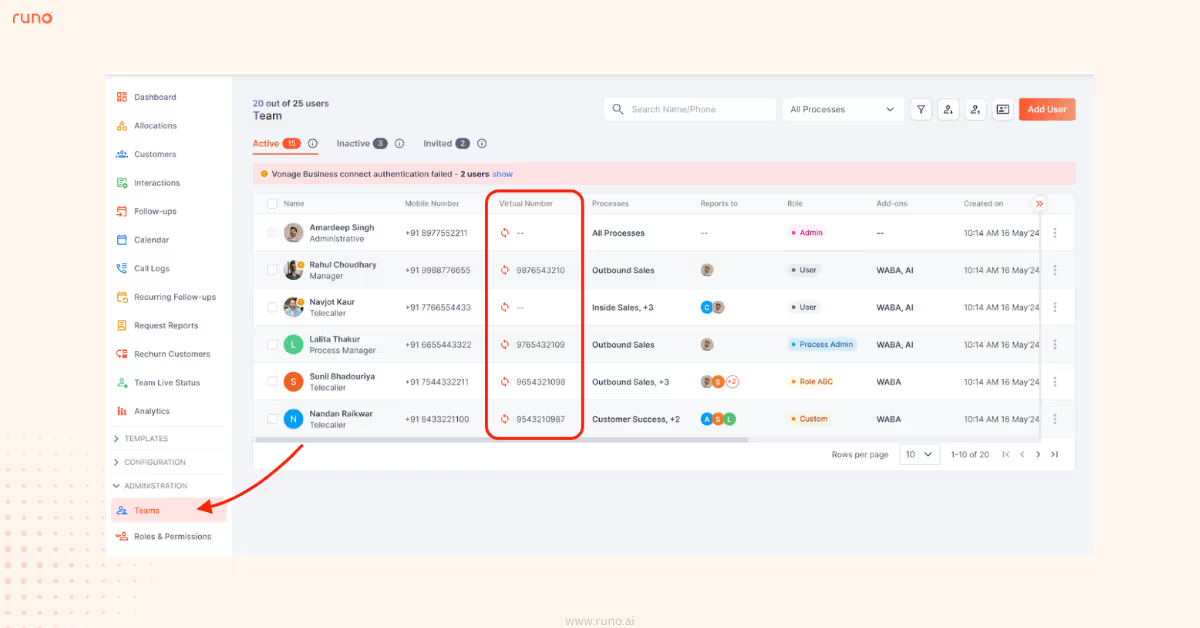
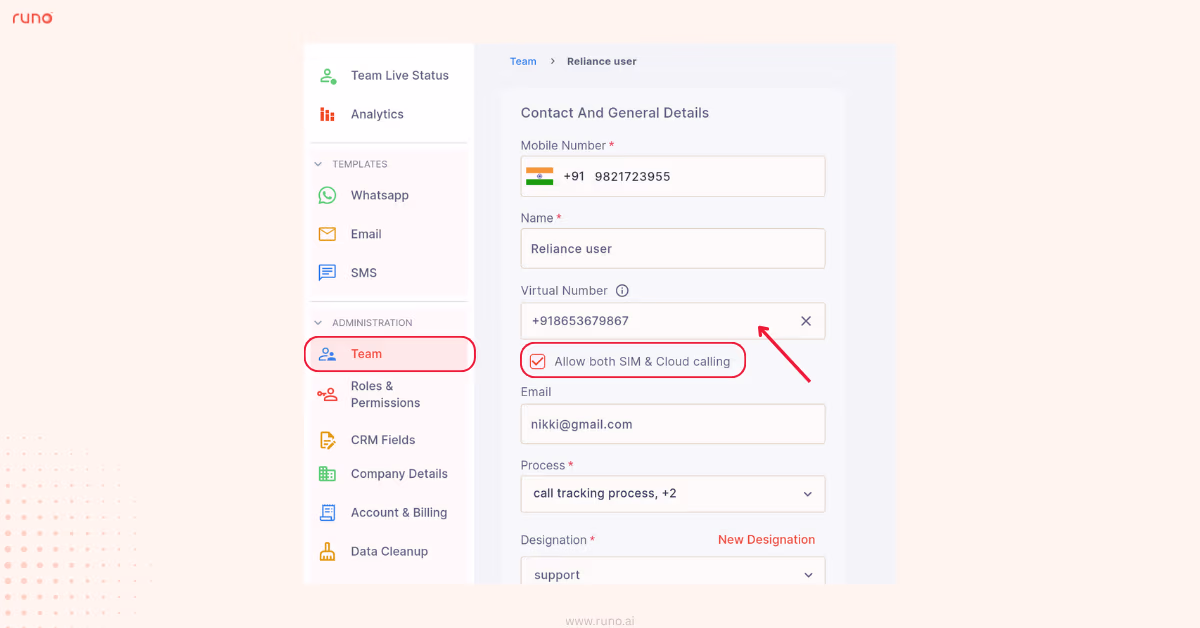
Runo v6.2 introduces Hybrid Calling - a powerful new addition for Cloud Telephony users! With this feature, users can now make calls using both SIM and Virtual Numbers, giving your team the flexibility to choose how they connect with customers.
Here’s what’s new:
How to use:
Giving access to multiple users at once:
From the ‘Team’ tab, select all the users you want to give access to → click on ‘Assign Virtual Numbers’ at the top → assign the desired number(s).
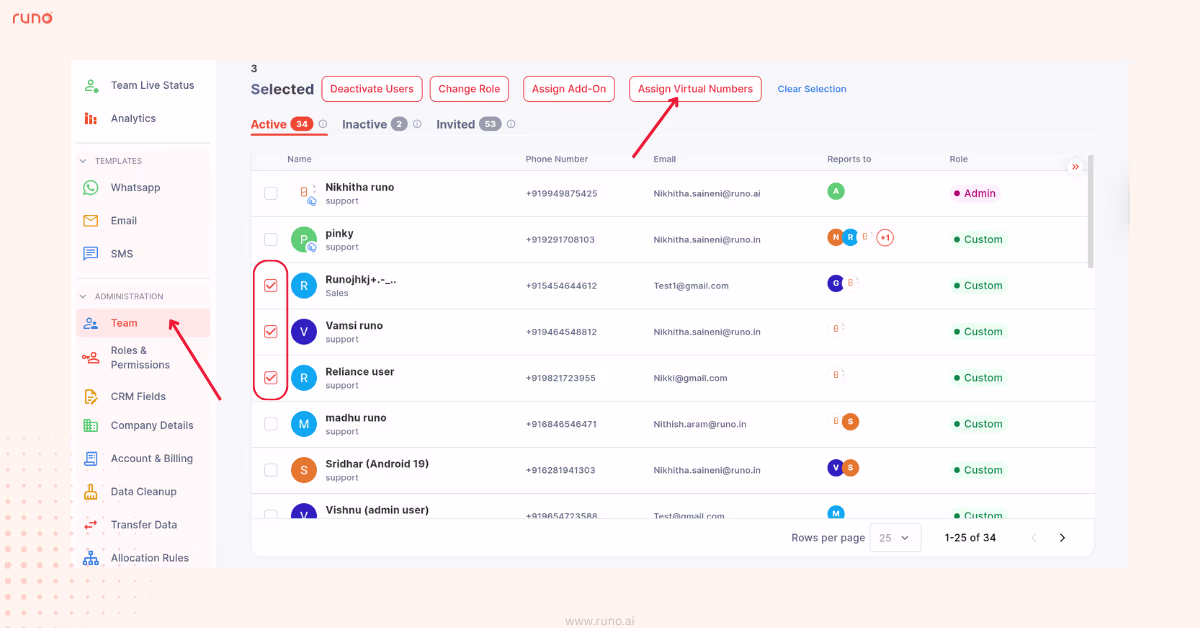
You can also give access on an individual user basis in 2 ways:
From the ‘Team tab’, click on the specific user → open the ‘User Details Page’ → assign a Virtual Number and enable the permission for both SIM and Cloud Calling.
Go to the Teams tab → scroll to the right → click ‘+ Virtual Number’ next to the user → select and assign the number.
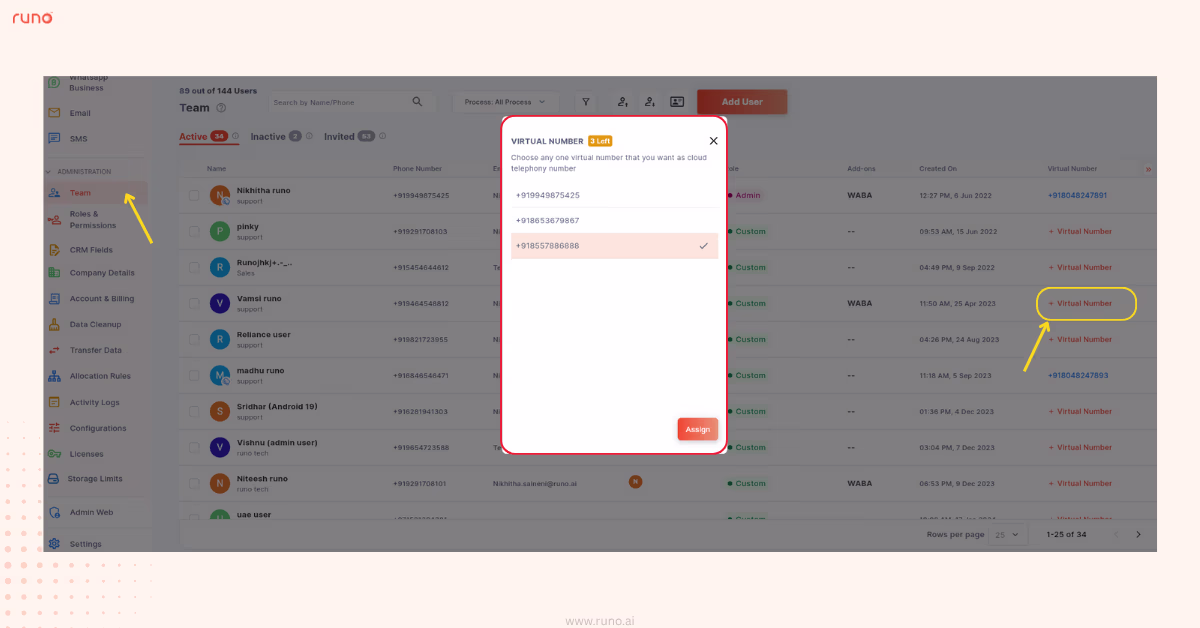


With Hybrid Calling, you get the best of both worlds — the reliability of SIM-based calls and the scalability of Cloud Telephony, all inside Runo. 🚀
Manually assigning leads is so last season.
With the new Allocation Rules , admins can now create filters that automatically route leads to the right agents - saving time and ensuring no lead slips through the cracks.
How to use:
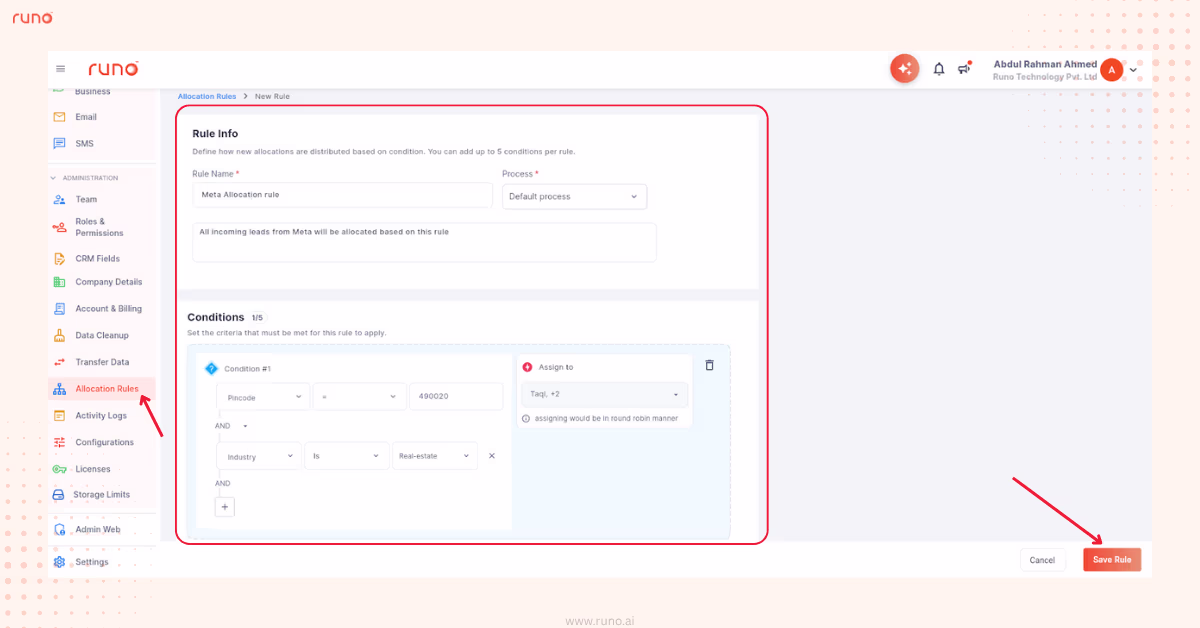

Using the rule in lead allocation:
For example, if an Allocation Rule named “Outbound Allocation” exists under the “Default Process”, your request body should include: "processName": "Default Process" and "ruleName": "Outbound Allocation"
This ensures that the incoming leads are automatically assigned according to the defined rule logic.
With Rule-Based Allocation Automation, lead routing becomes effortless without the need for manual sorting. Set your allocation rules, and Runo will handle the rest.
Not every number deserves to be tracked, and now, you decide which ones don’t.
With the new Do Not Track (DNT) List , admins can exclude up to 1000 numbers from SIM call tracking.
This lets admins disable tracking for sensitive or internal calls, ensuring privacy while keeping overall call tracking purposeful.
Admins can now:
How to use:

To add a single number: click ‘Add Number’, enter the contact, and save.
To upload in bulk: Click Upload Numbers → download the template → fill it with up to 1000 numbers → upload to add them all at once.
With the Do Not Track List, your tracking data stays completely in your control, just the way it should be.
Keeping your workspace organized just got easier!
With this update, admins can now deactivate team members directly from the ‘Team’ tab. Whether you’re restructuring teams, offboarding users, or just pausing access temporarily, you can now do it all in just a few clicks.
How to deactivate a user:
Head to the ‘Inactive’ tab to see all deactivated users and reactivate them whenever you’re ready, right from the same view.
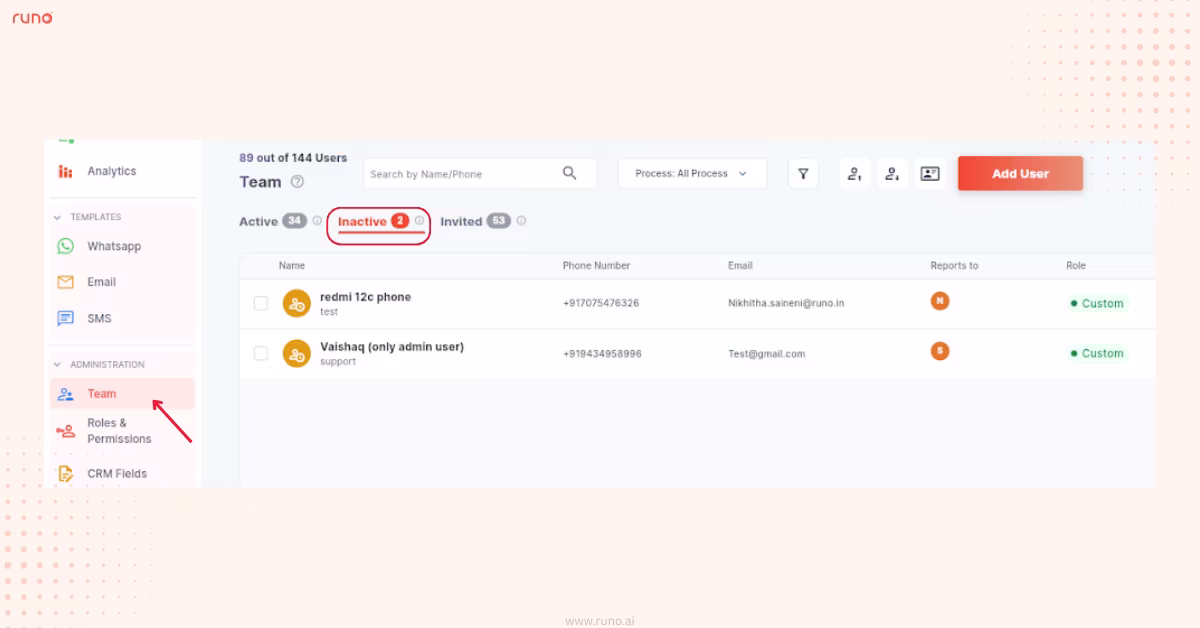
With quick access deactivation, managing your team’s activity is now simpler, faster, and completely in your control.
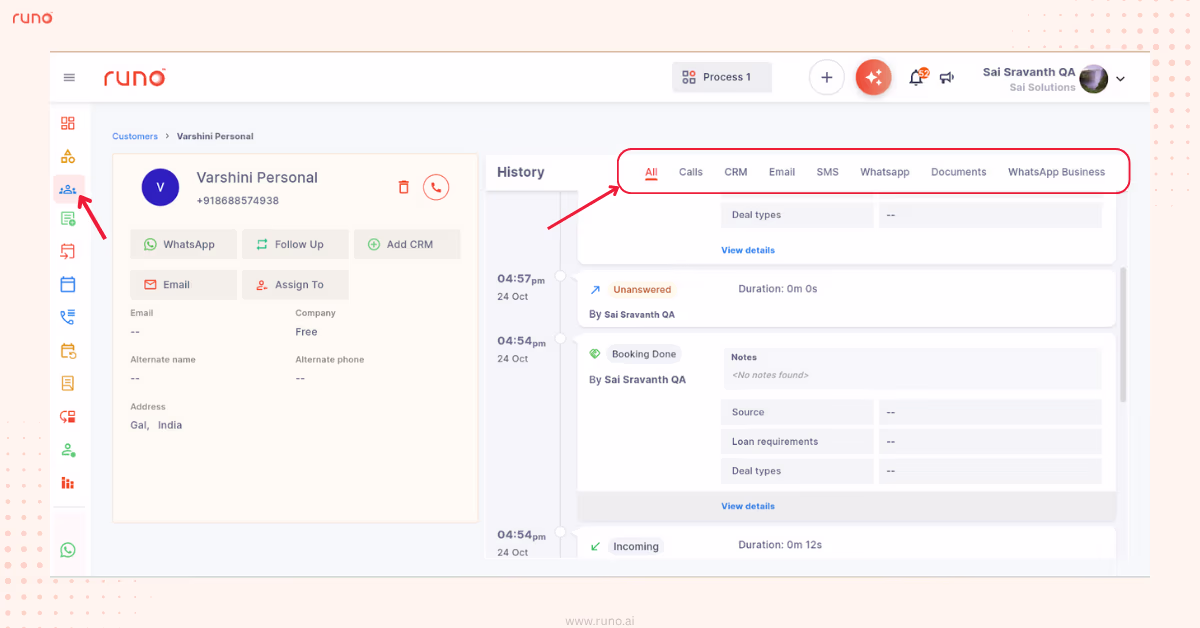
We’ve made navigating customer details smoother than ever!
Now, the top menu in the ‘Customers’ page stays fixed while you scroll through the interactions, so you can switch between tabs instantly without scrolling all the way back up.
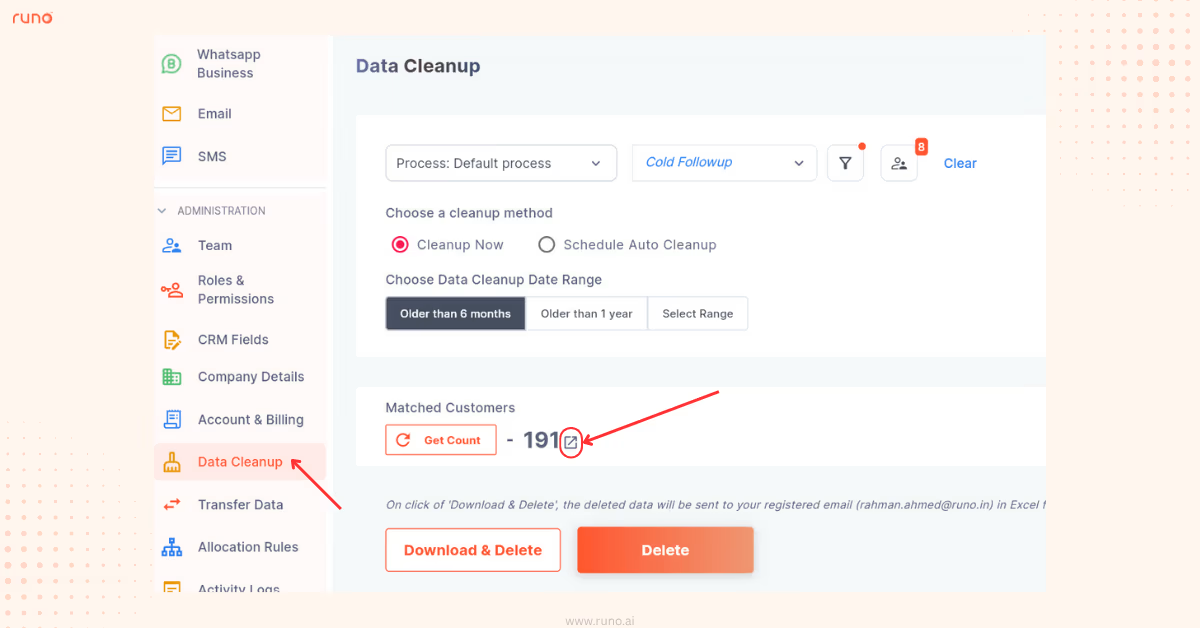
Having Second-guesses during the cleanup process? Not anymore!
Admins can now preview the list of all matched customers along with their count before proceeding with data cleanup.
This gives you full visibility into which records are being affected, so you can clean confidently without losing important data.
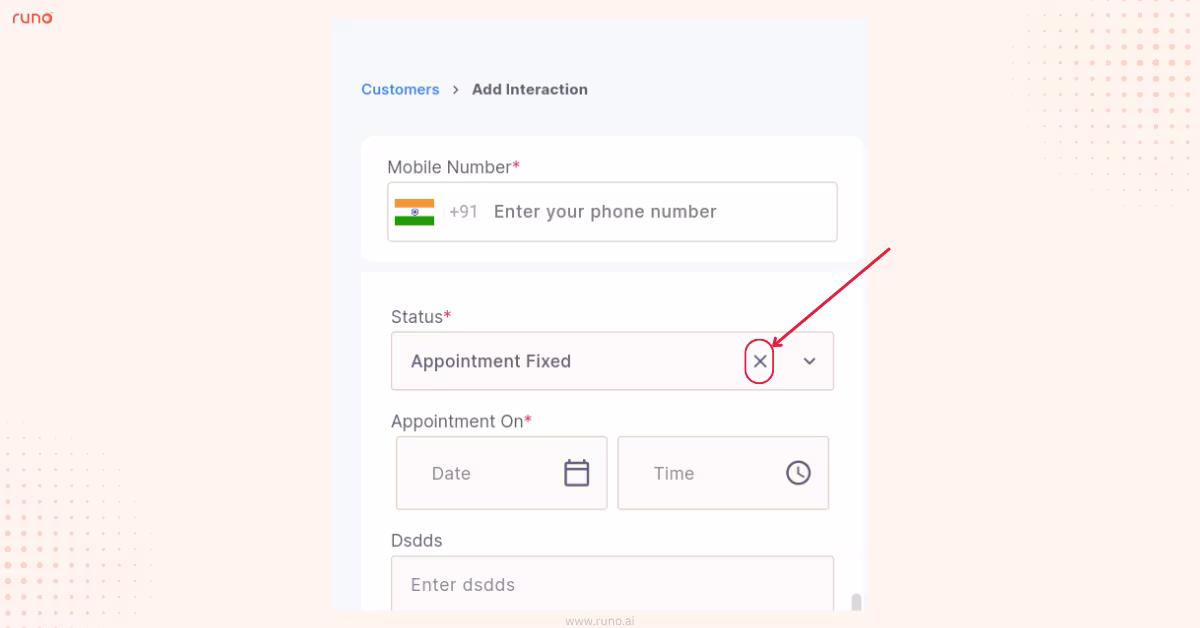
Ever selected the wrong option in the CRM form and wished you could just undo it?
Well, now you can!
All dropdown menus in the Interaction Form now come with an ‘x’ button that lets you instantly remove the selected option.
A tiny tweak that saves time and clicks because every smooth interaction counts!
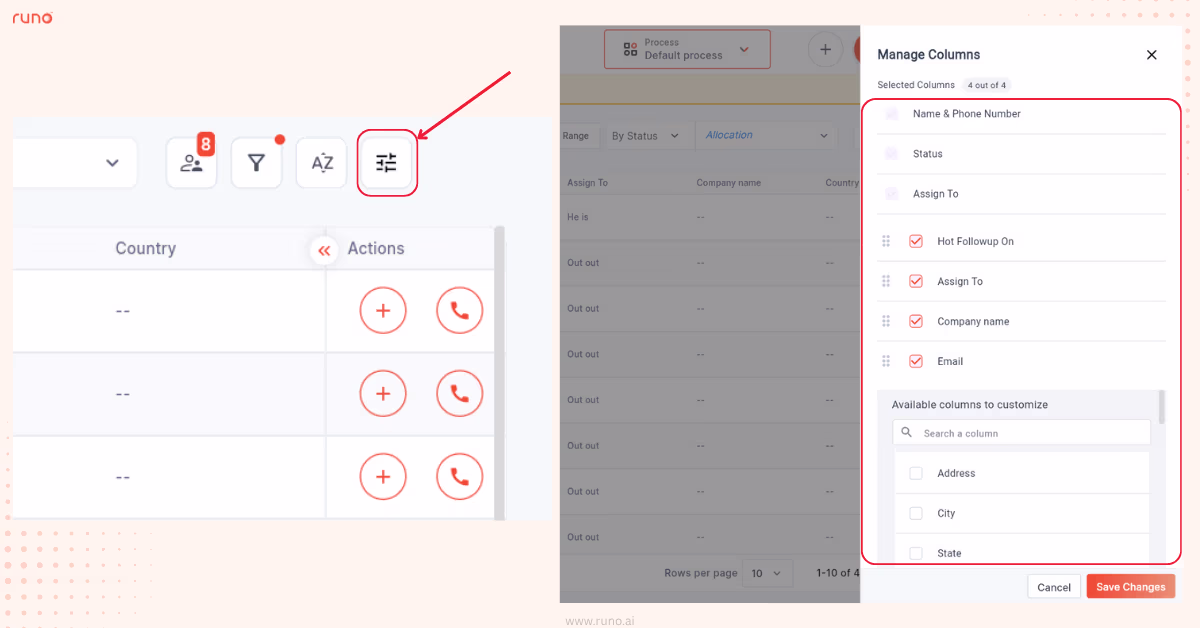
We get it… not every column matters every time. With the new Customize Columns feature, you can now choose exactly which columns to display on your tables, giving you a workspace that’s focused.
How to use:
The table view instantly gets updated.
You can declutter your view and focus only on what matters because productivity starts with clarity!
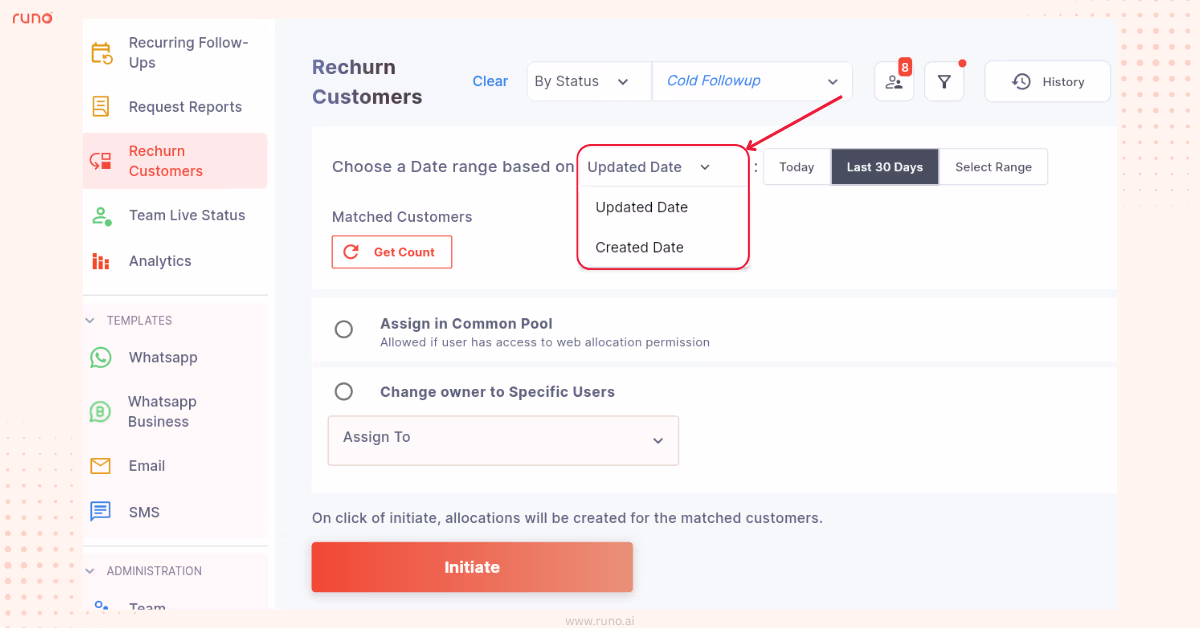
We’ve made Rechurn more flexible.
Now, users can rechurn customers based on either the Updated Date or Created Date, giving complete control over when and how leads re-enter your sales pipeline.
How to use:
When performing a Rechurn, you’ll see an option to select the date range:
Whether you want to reconnect with leads that were recently modified or those created earlier, you can now pick the logic that suits your process best.
Runo v6.2 introduces Hybrid Calling - a powerful new addition for Cloud Telephony users! With this feature, users can now make calls using both SIM and Virtual Numbers, giving your team the flexibility to choose how they connect with customers.
Here’s what’s new:
How to use:
Giving access to multiple users at once:
From the ‘Team’ tab, select all the users you want to give access to → click on ‘Assign Virtual Numbers’ at the top → assign the desired number(s).
You can also give access on an individual user basis in 2 ways:
From the ‘Team tab’, click on the specific user → open the ‘User Details Page’ → assign a Virtual Number and enable the permission for both SIM and Cloud Calling.
Go to the Teams tab → scroll to the right → click ‘+ Virtual Number’ next to the user → select and assign the number.
With Hybrid Calling, you get the best of both worlds — the reliability of SIM-based calls and the scalability of Cloud Telephony, all inside Runo. 🚀
Manually assigning leads is so last season.
With the new Allocation Rules , admins can now create filters that automatically route leads to the right agents - saving time and ensuring no lead slips through the cracks.
How to use:
Using the rule in lead allocation:
For example, if an Allocation Rule named “Outbound Allocation” exists under the “Default Process”, your request body should include: "processName": "Default Process" and "ruleName": "Outbound Allocation"
This ensures that the incoming leads are automatically assigned according to the defined rule logic.
With Rule-Based Allocation Automation, lead routing becomes effortless without the need for manual sorting. Set your allocation rules, and Runo will handle the rest.
Not every number deserves to be tracked, and now, you decide which ones don’t.
With the new Do Not Track (DNT) List , admins can exclude up to 1000 numbers from SIM call tracking.
This lets admins disable tracking for sensitive or internal calls, ensuring privacy while keeping overall call tracking purposeful.
Admins can now:
How to use:
To add a single number: click ‘Add Number’, enter the contact, and save.
To upload in bulk: Click Upload Numbers → download the template → fill it with up to 1000 numbers → upload to add them all at once.
With the Do Not Track List, your tracking data stays completely in your control, just the way it should be.
Keeping your workspace organized just got easier!
With this update, admins can now deactivate team members directly from the ‘Team’ tab. Whether you’re restructuring teams, offboarding users, or just pausing access temporarily, you can now do it all in just a few clicks.
How to deactivate a user:
Head to the ‘Inactive’ tab to see all deactivated users and reactivate them whenever you’re ready, right from the same view.
With quick access deactivation, managing your team’s activity is now simpler, faster, and completely in your control.
We’ve made navigating customer details smoother than ever!
Now, the top menu in the ‘Customers’ page stays fixed while you scroll through the interactions, so you can switch between tabs instantly without scrolling all the way back up.
Having Second-guesses during the cleanup process? Not anymore!
Admins can now preview the list of all matched customers along with their count before proceeding with data cleanup.
This gives you full visibility into which records are being affected, so you can clean confidently without losing important data.
Ever selected the wrong option in the CRM form and wished you could just undo it?
Well, now you can!
All dropdown menus in the Interaction Form now come with an ‘x’ button that lets you instantly remove the selected option.
A tiny tweak that saves time and clicks because every smooth interaction counts!
We get it… not every column matters every time. With the new Customize Columns feature, you can now choose exactly which columns to display on your tables, giving you a workspace that’s focused.
How to use:
The table view instantly gets updated.
You can declutter your view and focus only on what matters because productivity starts with clarity!
We’ve made Rechurn more flexible.
Now, users can rechurn customers based on either the Updated Date or Created Date, giving complete control over when and how leads re-enter your sales pipeline.
How to use:
When performing a Rechurn, you’ll see an option to select the date range:
Whether you want to reconnect with leads that were recently modified or those created earlier, you can now pick the logic that suits your process best.
Runo Updates is here with a powerful new release to make your experience twice as smooth.
Runo v6.1 is here, and it’s designed to give you more control, faster actions, and a smarter way to manage your day-to-day operations.
Forgot to log an interaction for an unknown number? Don’t worry, your lead is still within reach.
With this update, you can now add interactions anytime from the ‘Call Logs’ tab, even if you missed it right after the call.
Just open the unknown number’s call log, click ‘Add Interaction’, and fill in the lead details.
Once saved, Runo will automatically create a customer profile in your CRM and link all the details instantly.

A small change that ensures every call counts - because now, even unsaved numbers can turn into new leads.
Getting your analytics data out of Runo just got easier.
From the ‘Analytics’ tab, users can view detailed insights such as call trends, customer stages, top-performing teammates, etc, all in one place.
How it works:
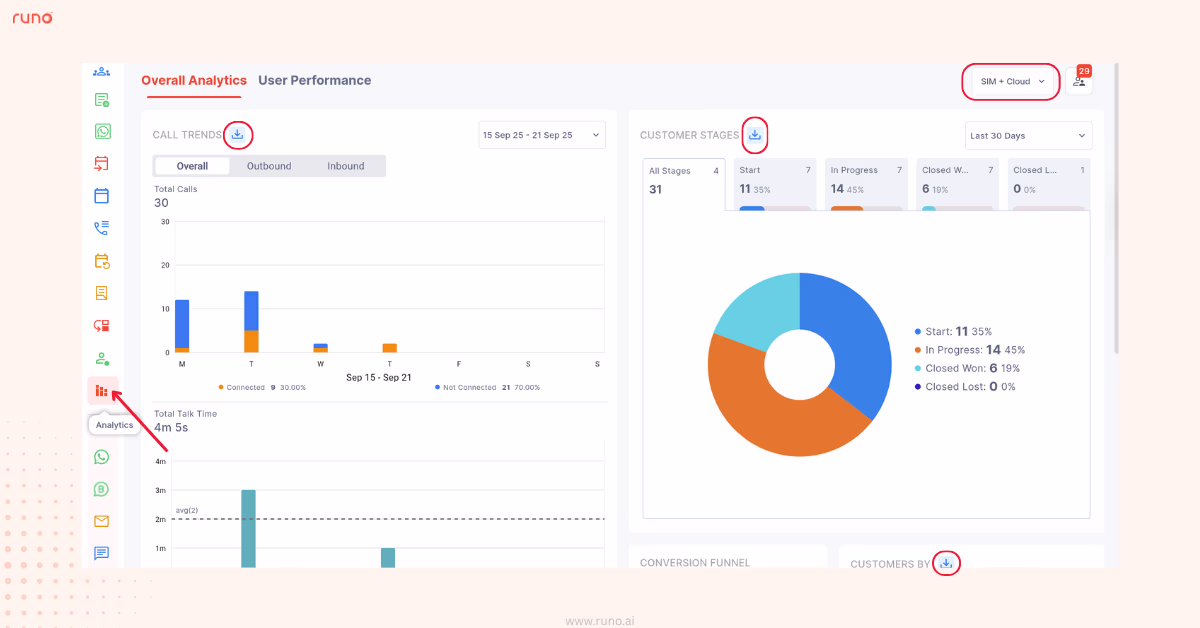
Whether you’re sharing reports with your team or analyzing performance offline, this update makes it effortless to get the exact data you need.
Admins now have the flexibility to delete call records for customers directly from the web app.
From the ‘Call Logs’ tab, select all the calls you wish to delete and click on the ‘Delete’ option at the top.

On the web app , all deleted logs can be easily viewed by clicking the ‘deleted list’ icon at the top of the page.
On the mobile app , you can access the same by opening the ‘Call Logs’ section and tapping the three-dot menu at the top.
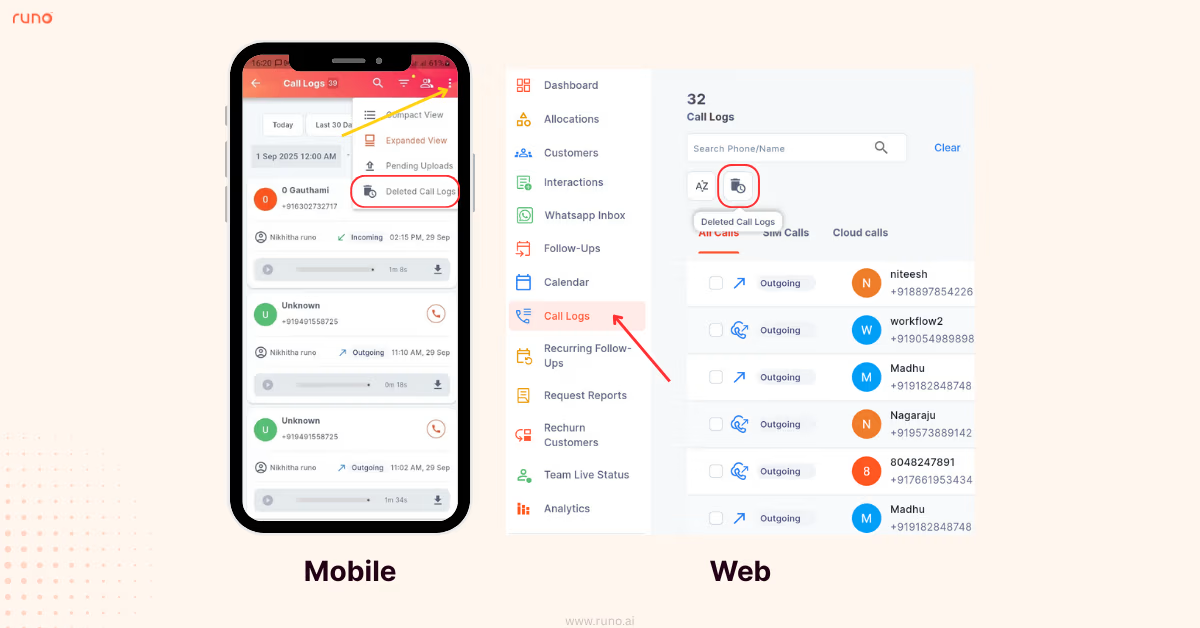
This gives admins a cleaner, more organized way to manage call data across both web and mobile without losing visibility into what’s been removed.
Switching between one Process to another in the web app just got a lot smoother.
No more returning to the dashboard to switch Processes, you can now toggle between them from any tab, like Analytics, Call Logs, or Customers.
So if you’re viewing the analytics for Process A and switch to Process B, the data on the page will instantly update to reflect the new Process.
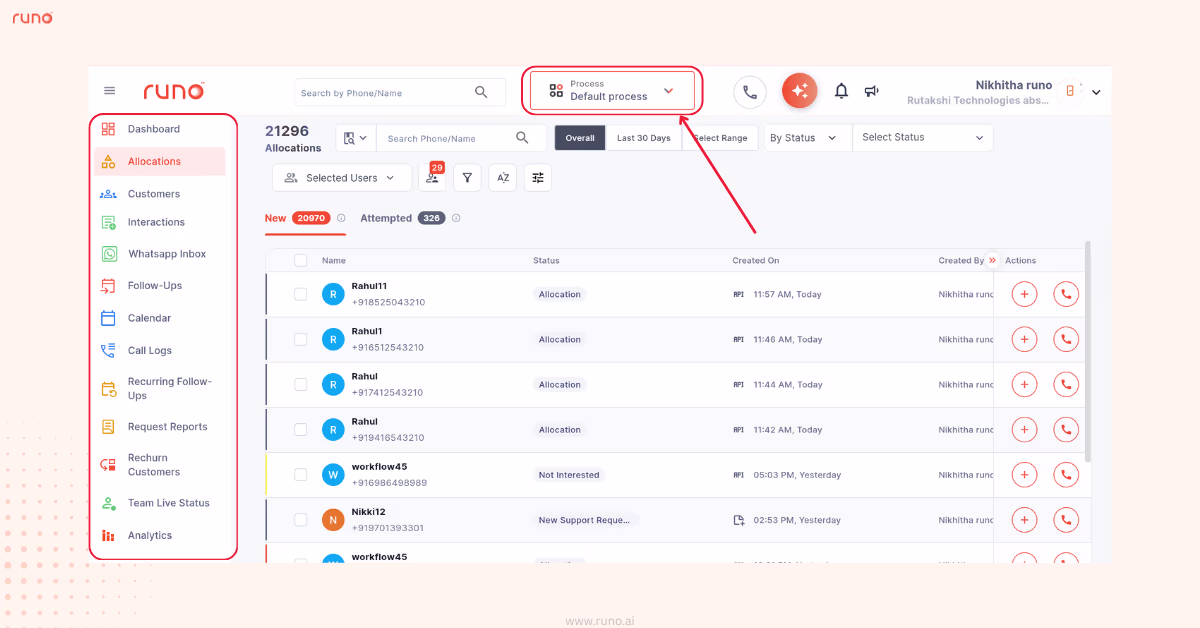
This makes moving between Processes faster and far more convenient.
Admins now have complete control over how webhook errors are managed.
When setting up or configuring a webhook, if an error occurs, you can choose whether the webhook should be automatically disabled or remain enabled for further troubleshooting.
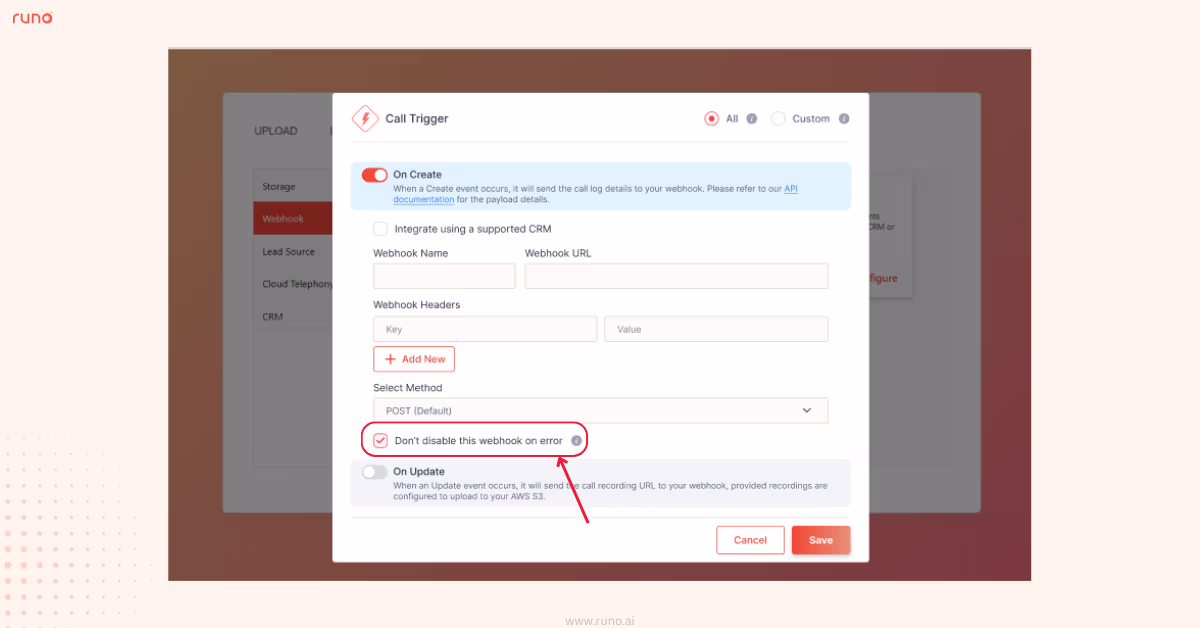
This flexibility helps you prevent unnecessary interruptions and manage webhook behavior in a way that best fits your workflow.
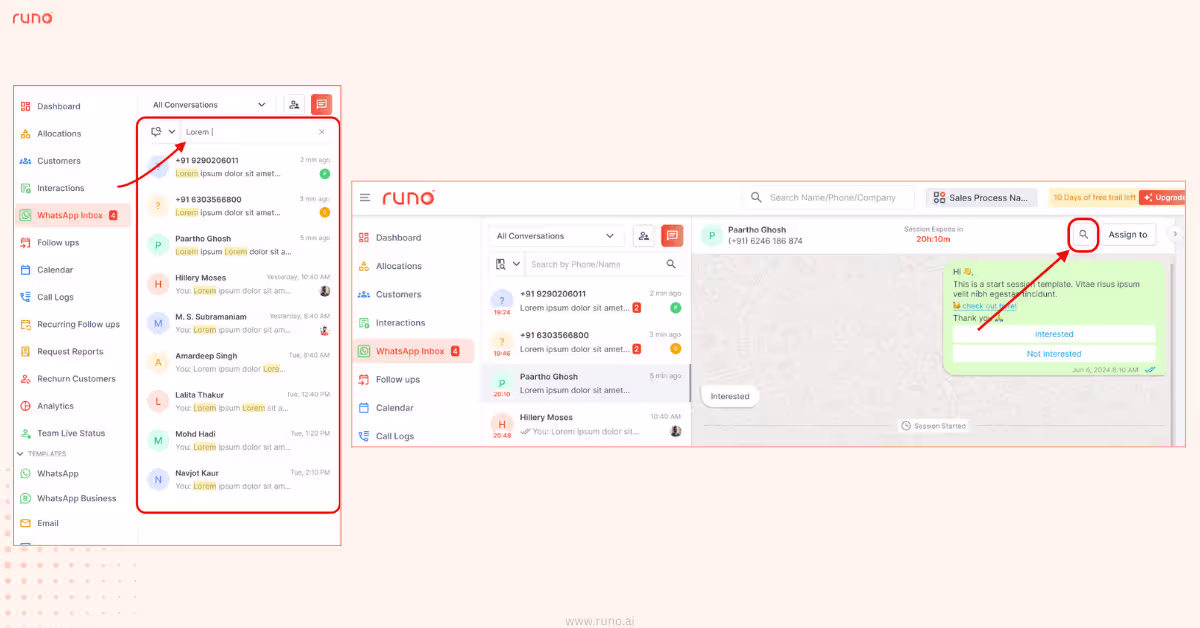
Searching for customers just got simpler.
In the ‘Allocations’ tab, you no longer need to switch between separate options for name and number.
Now, just type either the name or phone number, and Runo will automatically detect what you’ve entered and display the matching results instantly.
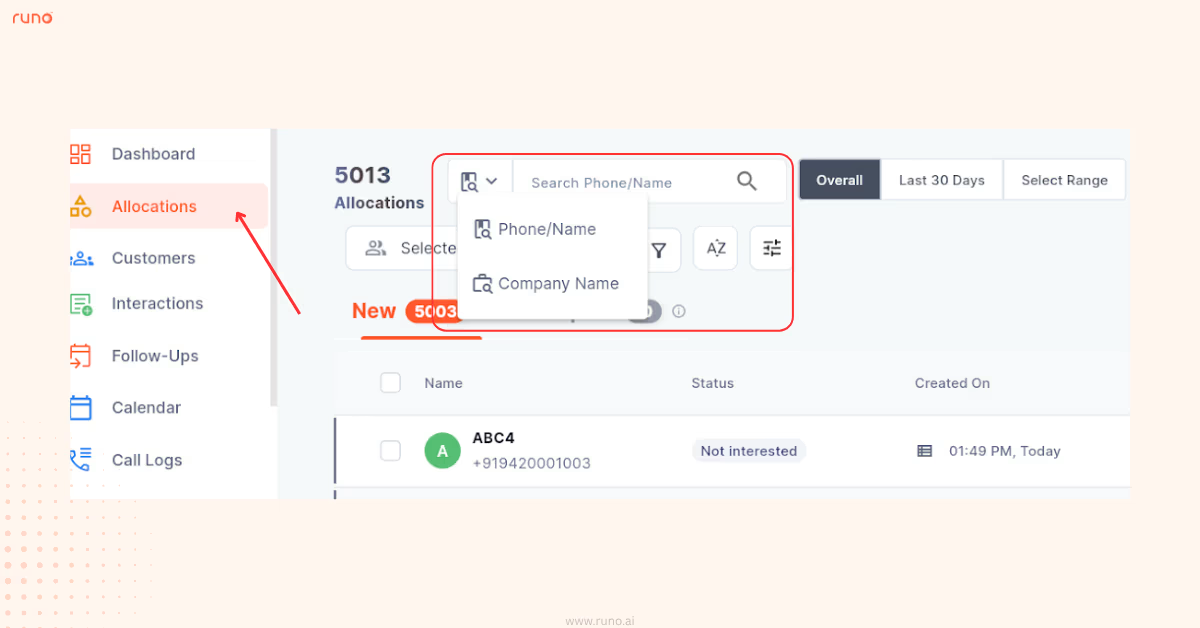
A faster, smarter search experience that helps you find the right contact in seconds.
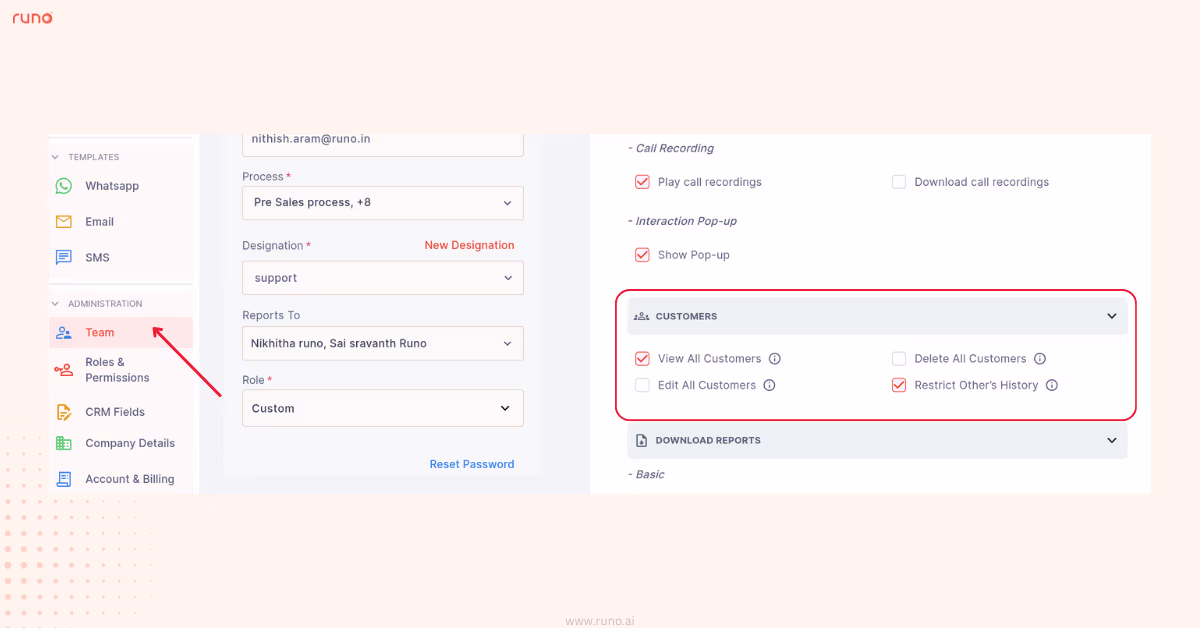
This update also brings finer control in data and permission management for the admins with:
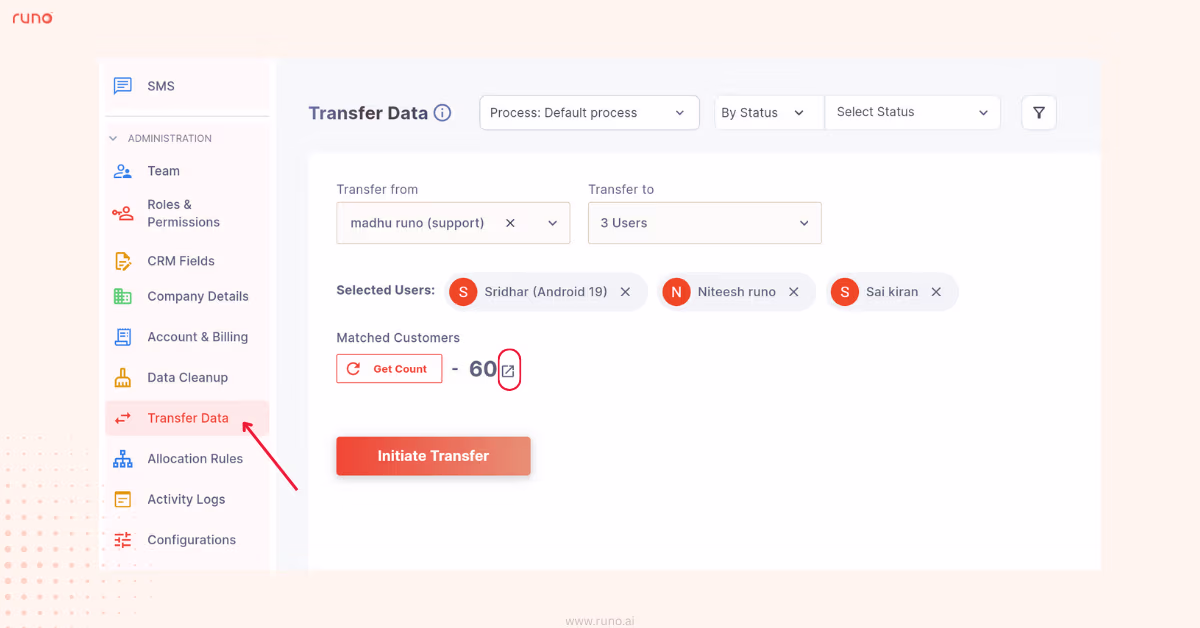
1. Transfer Data to Multiple Users: Admins can now transfer customer data from one agent to multiple agents at once, saving time and ensuring smooth handovers across teams.
2. Advanced User Permissions: Admins can now fine-tune user-level permissions - including the ability to enable or disable ‘Assign Customer’ and ‘Restrict Others History’ options.
Forgot to log an interaction for an unknown number? Don’t worry, your lead is still within reach.
With this update, you can now add interactions anytime from the ‘Call Logs’ tab, even if you missed it right after the call.
Just open the unknown number’s call log, click ‘Add Interaction’, and fill in the lead details.
Once saved, Runo will automatically create a customer profile in your CRM and link all the details instantly.
A small change that ensures every call counts - because now, even unsaved numbers can turn into new leads.
Getting your analytics data out of Runo just got easier.
From the ‘Analytics’ tab, users can view detailed insights such as call trends, customer stages, top-performing teammates, etc, all in one place.
How it works:
Whether you’re sharing reports with your team or analyzing performance offline, this update makes it effortless to get the exact data you need.
Admins now have the flexibility to delete call records for customers directly from the web app.
From the ‘Call Logs’ tab, select all the calls you wish to delete and click on the ‘Delete’ option at the top.
On the web app , all deleted logs can be easily viewed by clicking the ‘deleted list’ icon at the top of the page.
On the mobile app , you can access the same by opening the ‘Call Logs’ section and tapping the three-dot menu at the top.
This gives admins a cleaner, more organized way to manage call data across both web and mobile without losing visibility into what’s been removed.
Switching between one Process to another in the web app just got a lot smoother.
No more returning to the dashboard to switch Processes, you can now toggle between them from any tab, like Analytics, Call Logs, or Customers.
So if you’re viewing the analytics for Process A and switch to Process B, the data on the page will instantly update to reflect the new Process.
This makes moving between Processes faster and far more convenient.
Admins now have complete control over how webhook errors are managed.
When setting up or configuring a webhook, if an error occurs, you can choose whether the webhook should be automatically disabled or remain enabled for further troubleshooting.
This flexibility helps you prevent unnecessary interruptions and manage webhook behavior in a way that best fits your workflow.
Searching for customers just got simpler.
In the ‘Allocations’ tab, you no longer need to switch between separate options for name and number.
Now, just type either the name or phone number, and Runo will automatically detect what you’ve entered and display the matching results instantly.
A faster, smarter search experience that helps you find the right contact in seconds.
This update also brings finer control in data and permission management for the admins with:
1. Transfer Data to Multiple Users: Admins can now transfer customer data from one agent to multiple agents at once, saving time and ensuring smooth handovers across teams.
2. Advanced User Permissions: Admins can now fine-tune user-level permissions - including the ability to enable or disable ‘Assign Customer’ and ‘Restrict Others History’ options.
Welcome to a new edition of Runo Updates, and it’s a big one! 🎉
Runo v6.0 marks one of our most powerful updates yet, bringing communication, intelligence, and performance together like never before.
Whether it’s connecting smarter, analyzing faster, or collaborating better - Runo v6.0 is built to make every sales moment more intelligent and effortless.
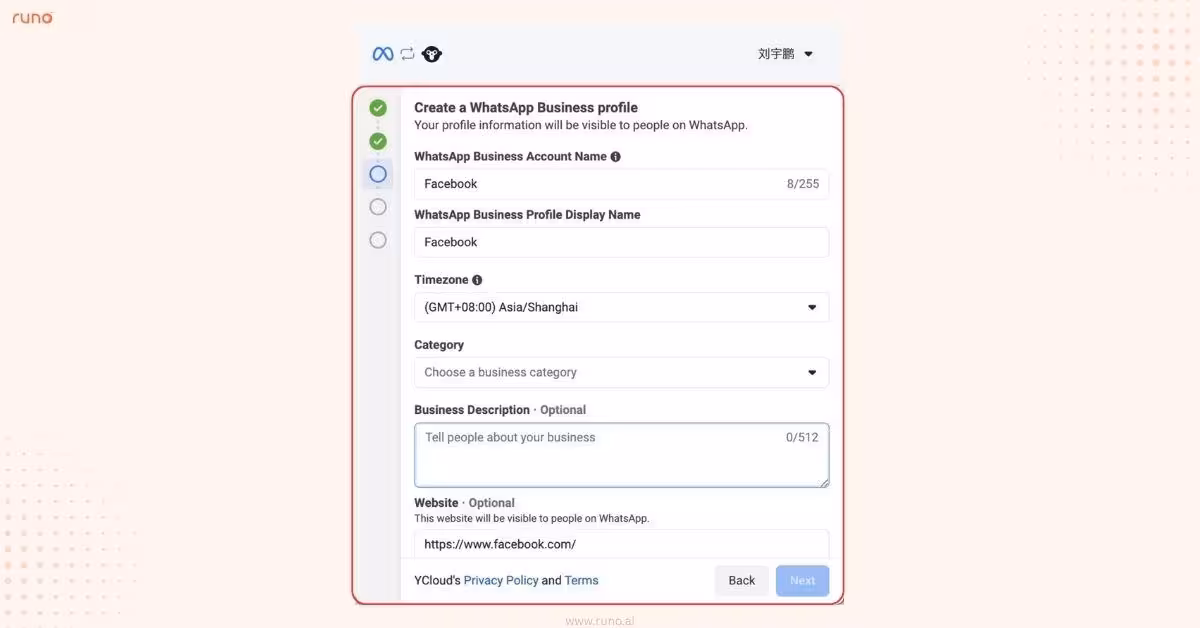
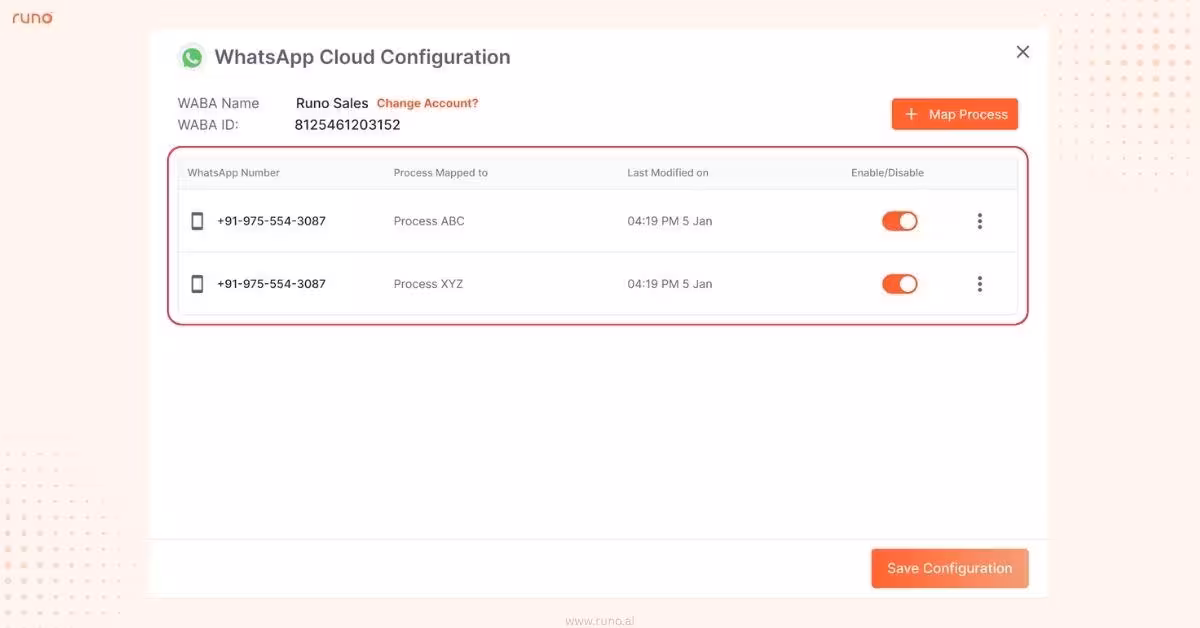
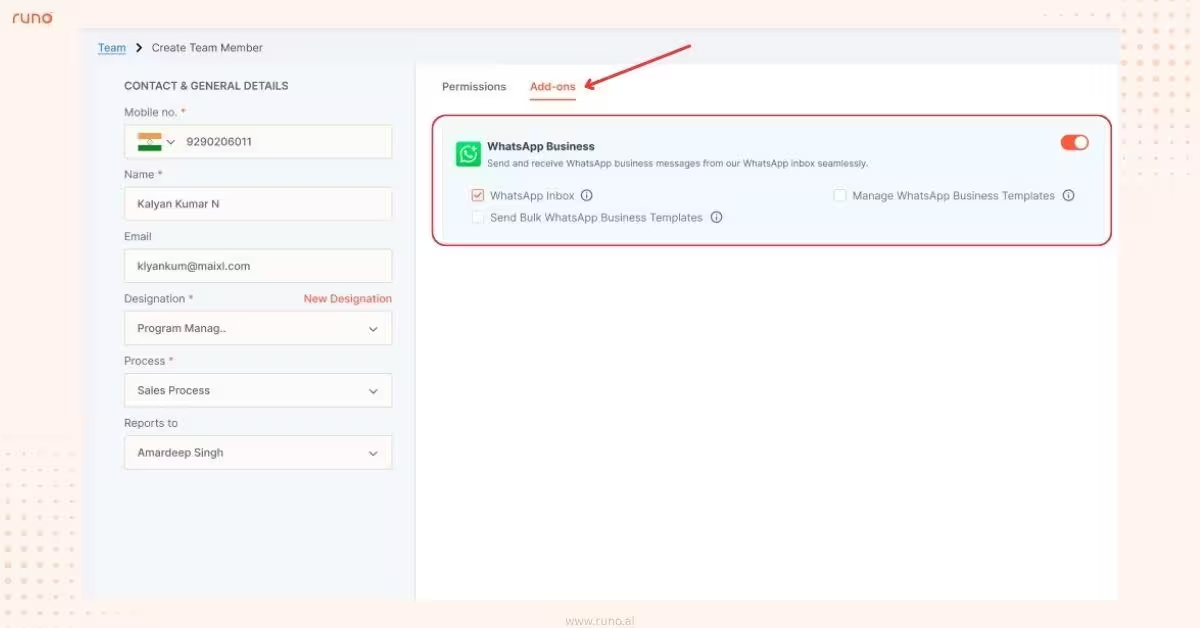
WhatsApp isn’t just for chats anymore… It’s now your team’s most powerful sales and engagement channel inside Runo.
With the all-new WhatsApp Business Integration , you can connect your business number directly to Runo and manage every customer conversation from one unified space.
Here’s what makes this integration a game-changer:
With Runo + WABA, WhatsApp becomes more than just a chat platform. It becomes a scalable, trackable sales and customer engagement engine. 🚀
Getting started is easy:

Introducing Runo AI Copilot – an AI Assistant designed to make your day-to-day work on Runo faster, smarter, and a whole lot easier.
Whether you’re exploring Runo for the first time or managing a full sales pipeline, AI Copilot is here to help you at every step. From answering your questions, surfacing key insights, to summarizing call data in seconds, it can do it all.
Here’s what it brings to your experience:
On web or mobile, Runo AI Copilot gives you instant clarity on every call, helping you save time, learn faster, and lead with insight.
How to Use Runo AI Copilot?
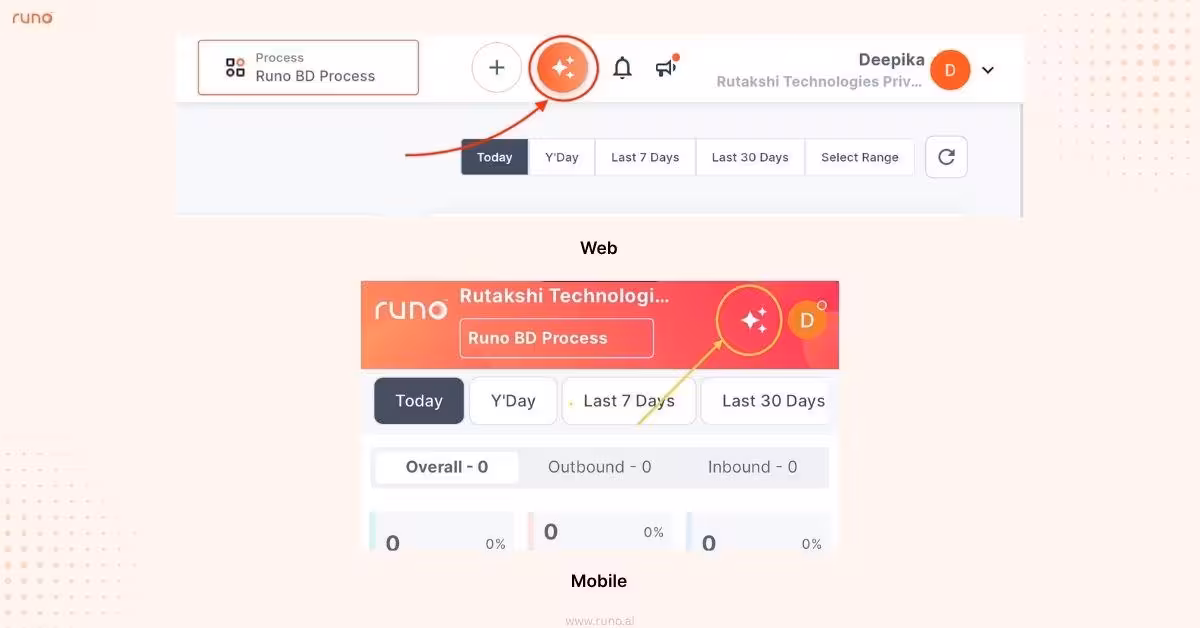
Once open, simply type your query. Copilot will respond instantly and even suggest follow-up prompts to guide you further.
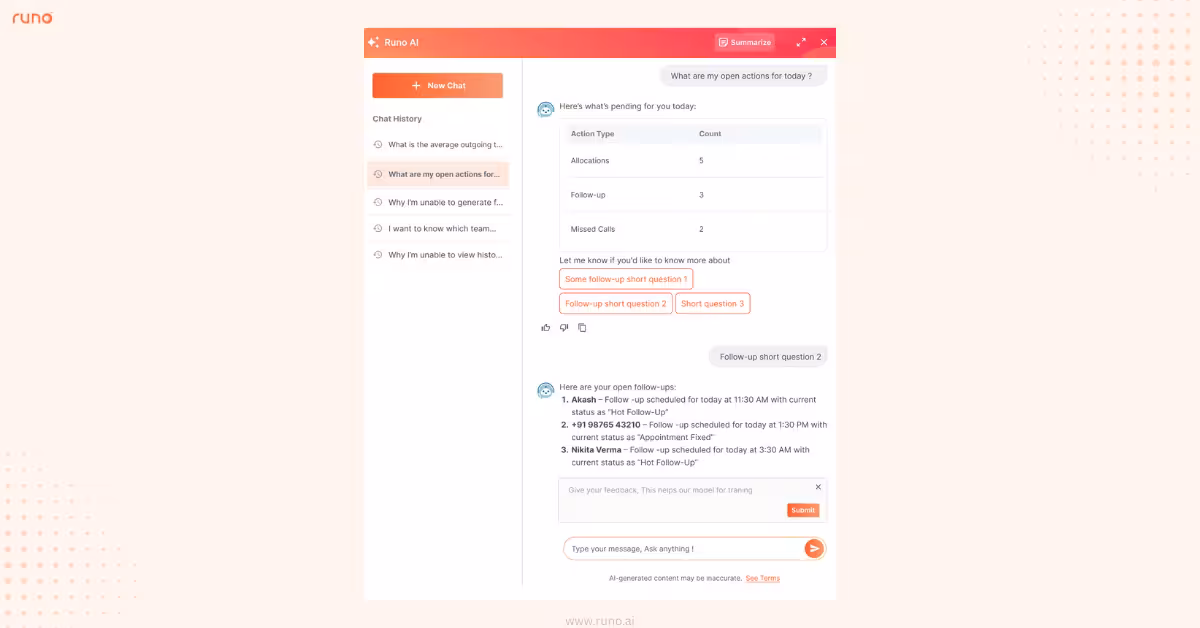
You can revisit your previous chats anytime or generate a summary of your conversation for quick reference.
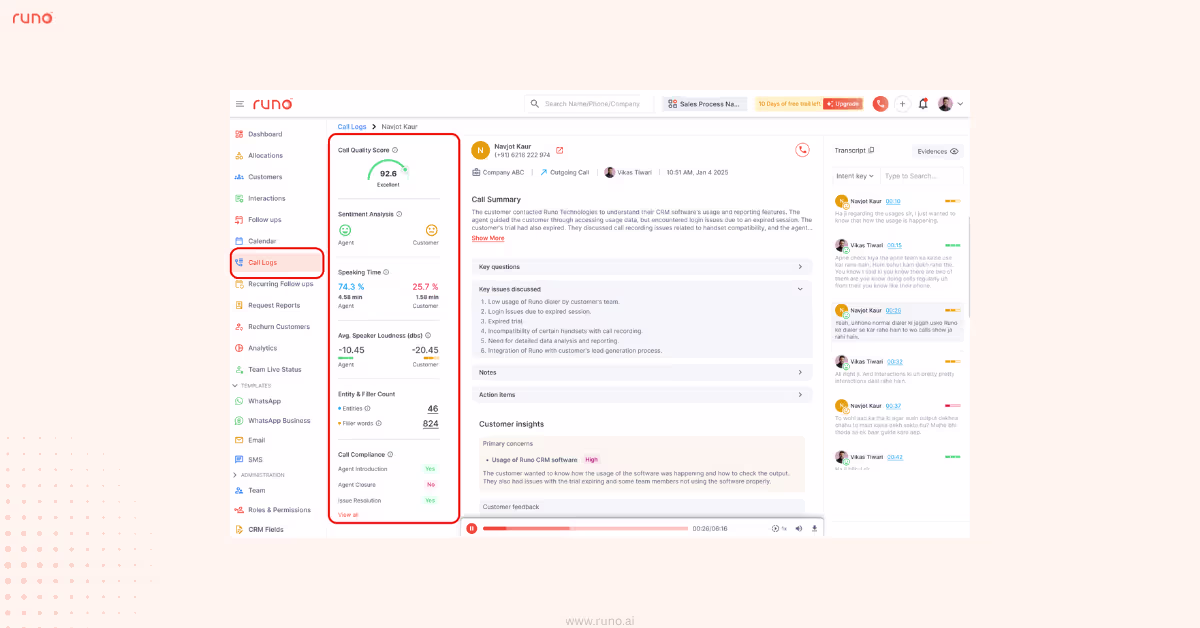
For every eligible call, get detailed insights including speaking time, loudness, sentiment, filler words, and call conduct reviews, along with auto-generated summaries, transcripts, and key discussion points.
For AI Call Insights , in the ‘Call Logs’ tab, look for the AI Insights icon on eligible call logs (defined by your admin).
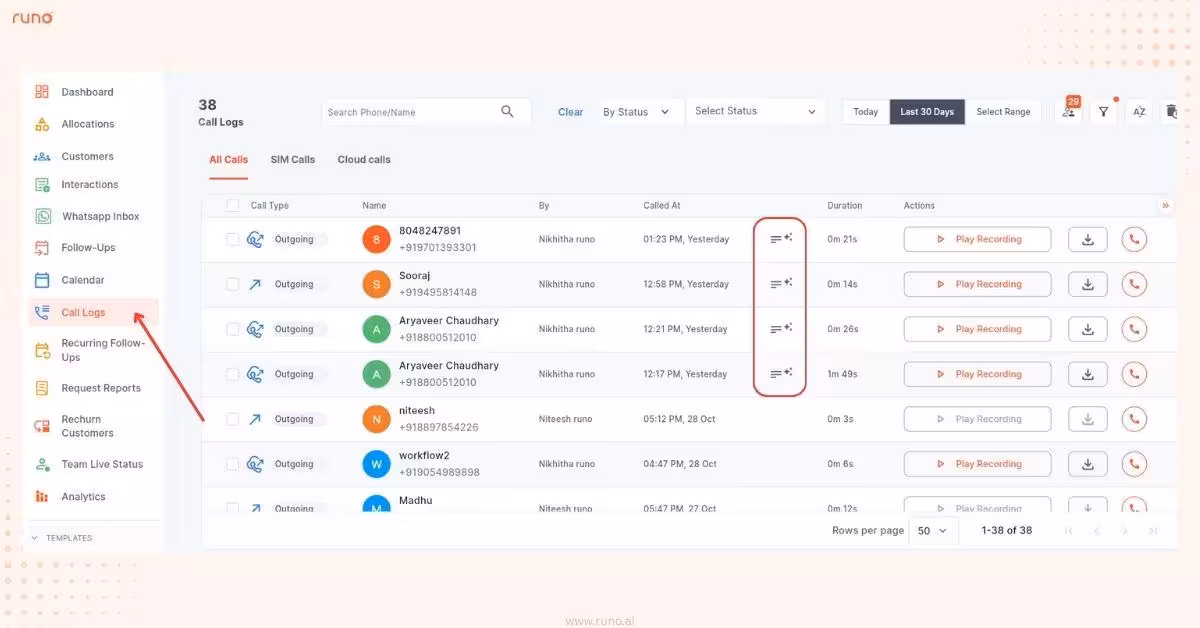
Here’s what the icons stand for:
Clicking the icon opens the detailed report, which includes:
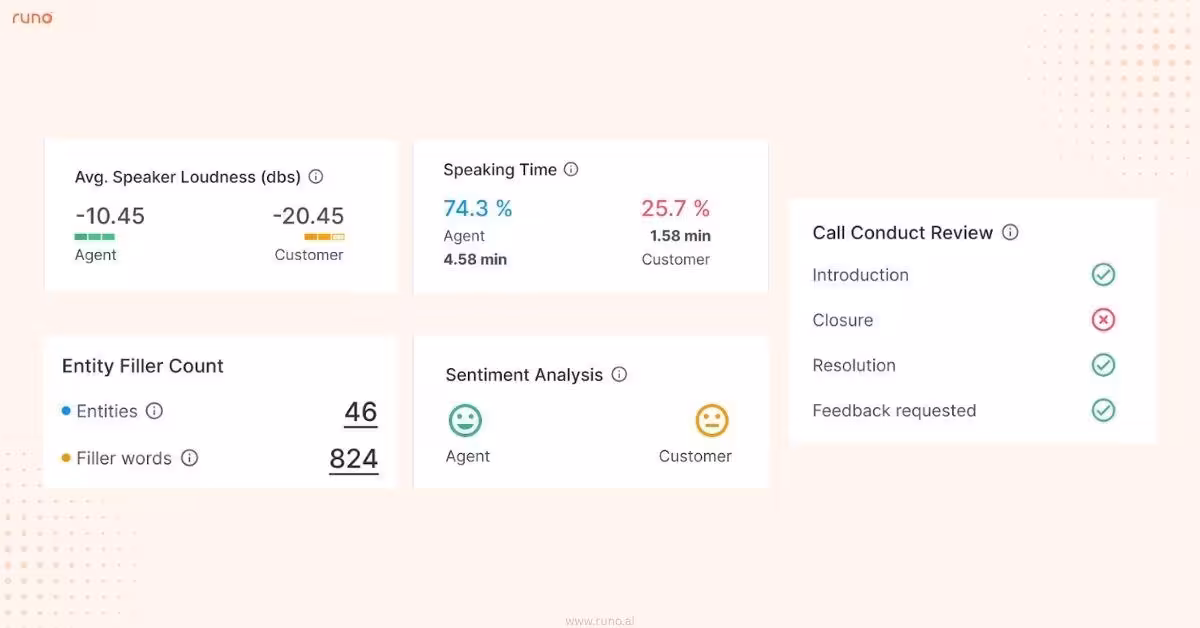
Plus, you’ll also see:
With Runo AI, every call tells a clear story… one that helps your team understand, improve, and perform better with data-driven confidence.
Understanding how your team performs just got a whole lot easier.
In the Analytics tab, under the User Performance section , you can now view detailed insights into each agent’s activity- from calls made to customers engaged… all in one place.
Performance metrics are now allocation-based , giving admins a clearer picture of how effectively leads are being handled and followed up on.
Simply click on the numbers next to any teammate’s name to dive into deeper insights for their individual calls and interactions.
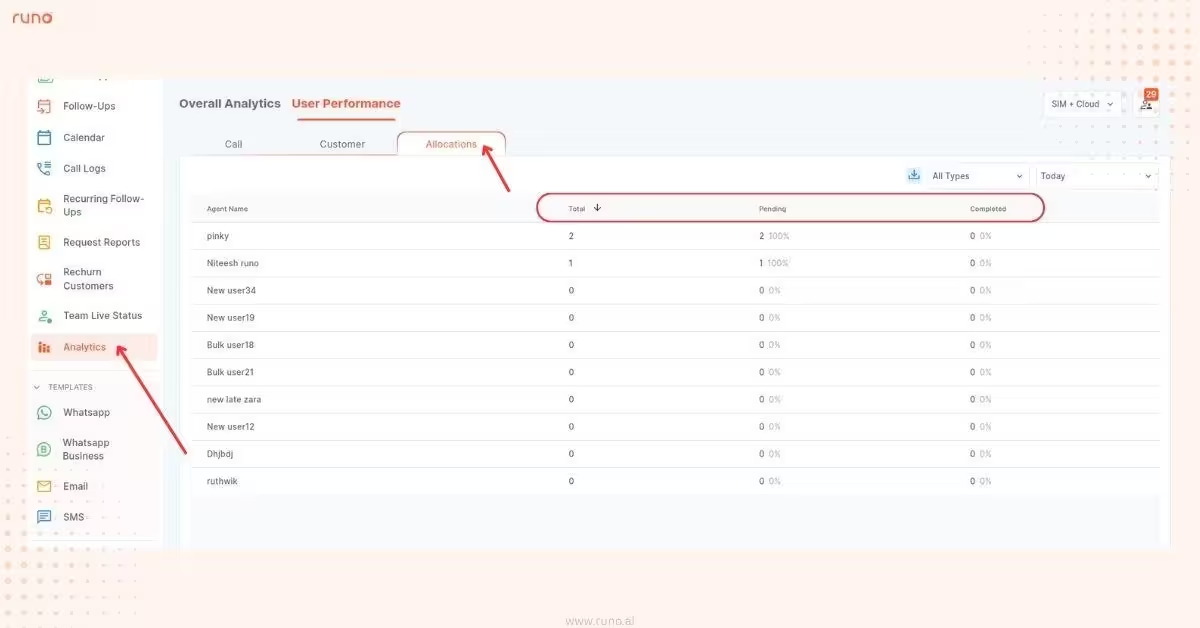
This update gives managers better visibility, helps identify top performers, and makes it easier to spot where training can make the biggest impact.
From the Transfer Data page, you can easily move all customer details (including interactions, follow-ups, etc.) from one teammate to another without losing any information.
With this update, you can now:
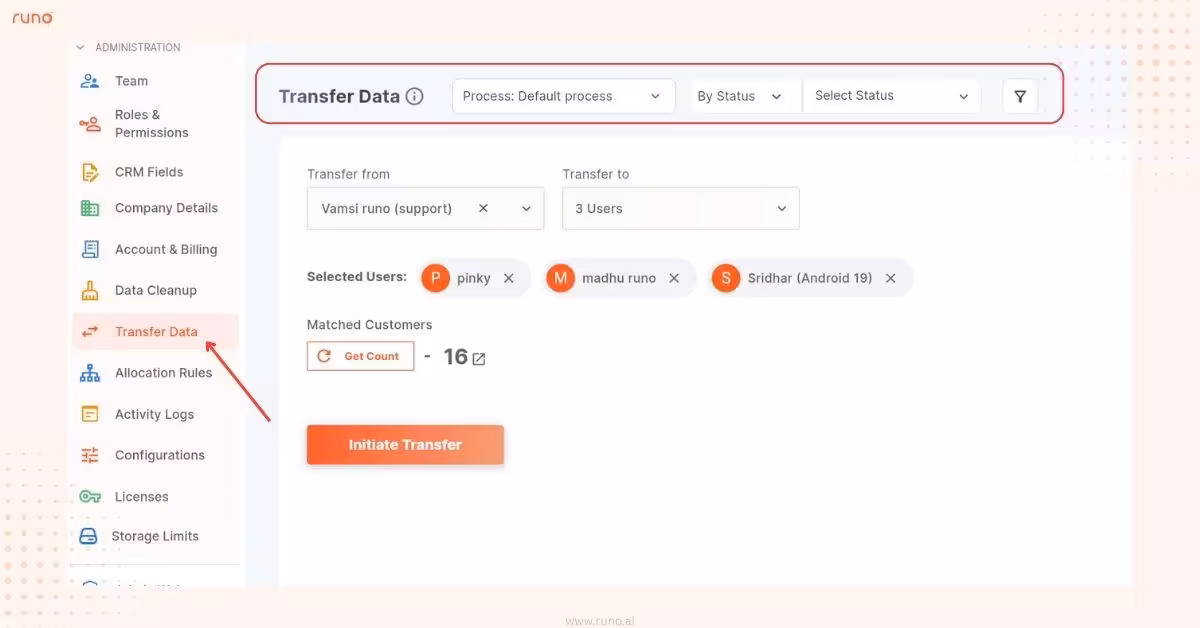
This ensures that every handover is seamless, transparent, and completely traceable, so no lead or follow-up ever slips through the cracks.
Stay in control of your schedule with smarter follow-up tracking.
You can now set a custom date range for your pending or upcoming follow-ups using the calendar icon.
Whether you’re planning your week or reviewing last month’s activities, this new ‘date range’ filter helps you focus on the right conversations at the right time.
Filling out customer details is now faster and more accurate than before.
You can now select the right city and state values from a dropdown list while adding or editing a customer.
And here’s the best part… once you enter a Pincode, Runo will automatically fill in the City and State for you.
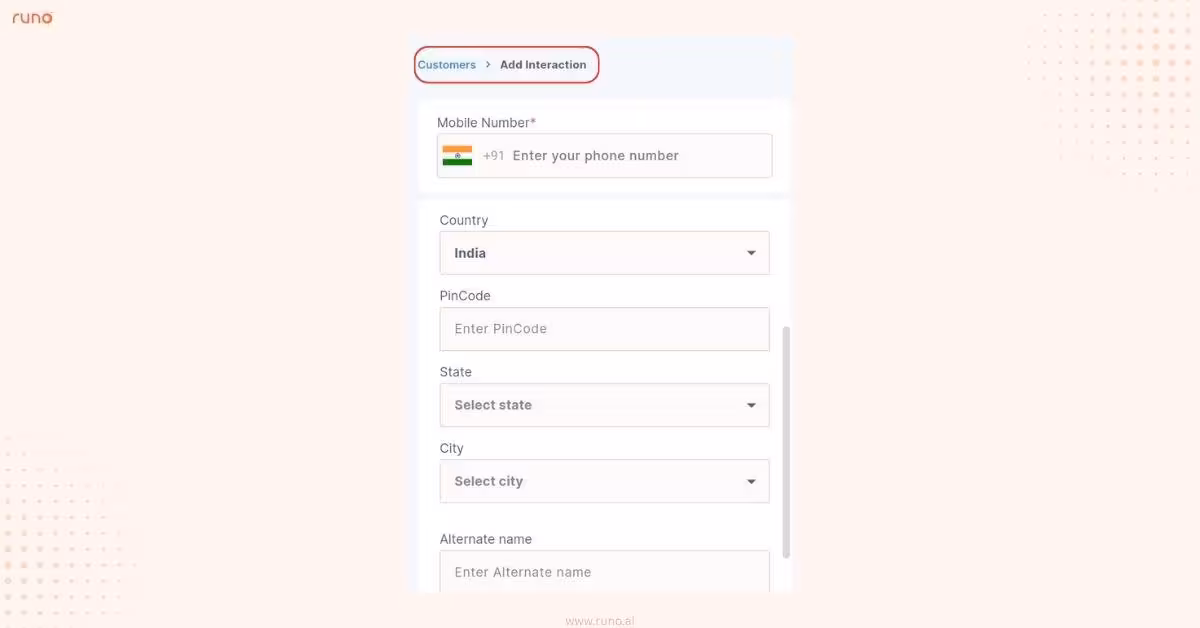
Lesser typing, fewer errors, and a lot more efficiency every time you add a lead.
Zoho integration in Runo got even stronger.
You can now connect not just leads, but also Accounts and Contacts modules from Zoho, so your CRM and calling data stay perfectly in sync.
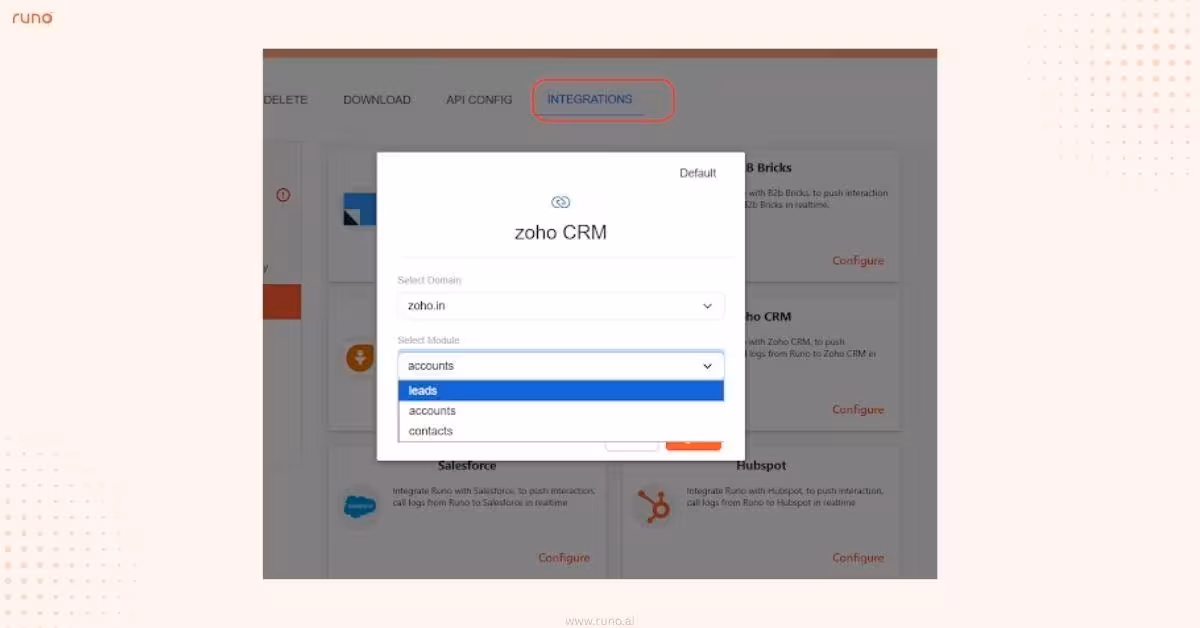
With this update, every contact and account you manage in Zoho stays perfectly aligned with your data in Runo, ensuring smoother handoffs, cleaner records, and zero duplication.
Get instant clarity on lead ownership without extra clicks with this new UI enhancement.
You can now see the ‘Assigned To’ field right under each customer’s information in the mobile app.
This lets you quickly identify which teammate a lead is currently assigned to, without having to open the full customer profile.
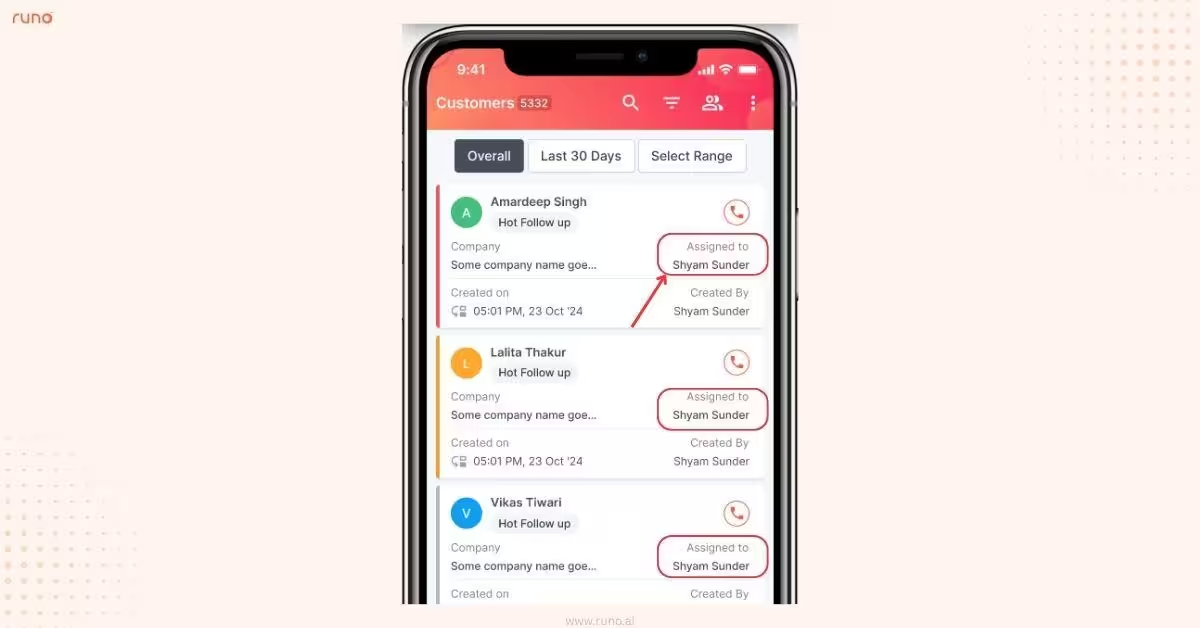
A small detail, but one that makes managing leads on the go a whole lot smoother.
Admins now have more control over team alerts and updates.
From the Configuration page, admins can easily set up and manage notifications for user activities and allocations, ensuring the right people are informed at the right time.
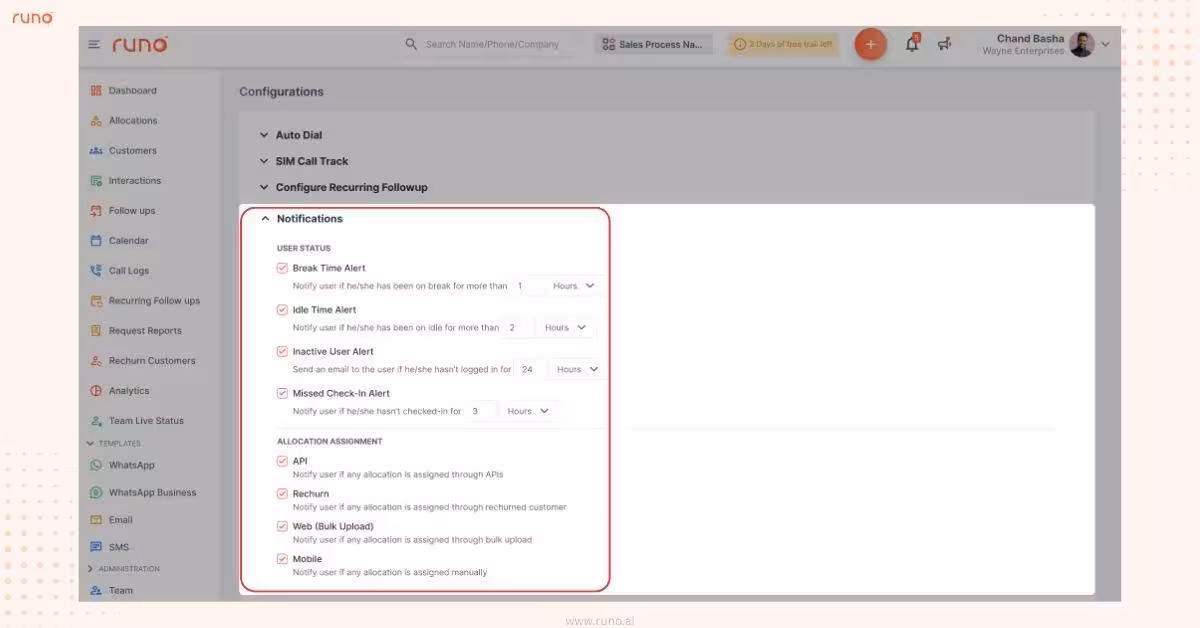
A simple way to stay on top of team actions and keep everyone aligned.
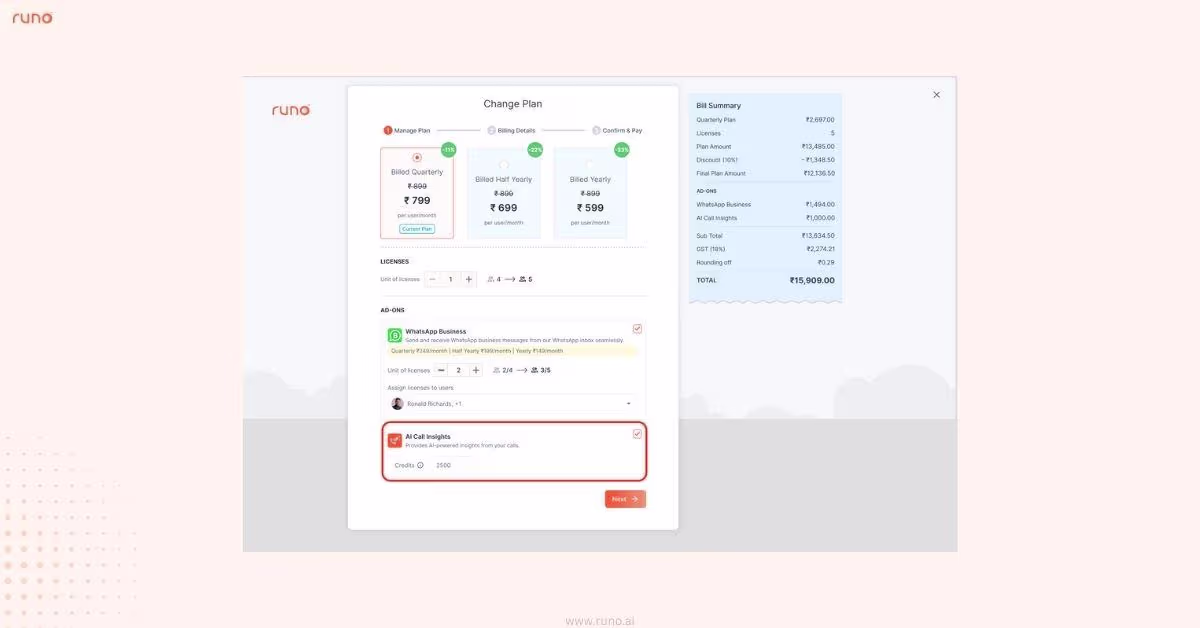
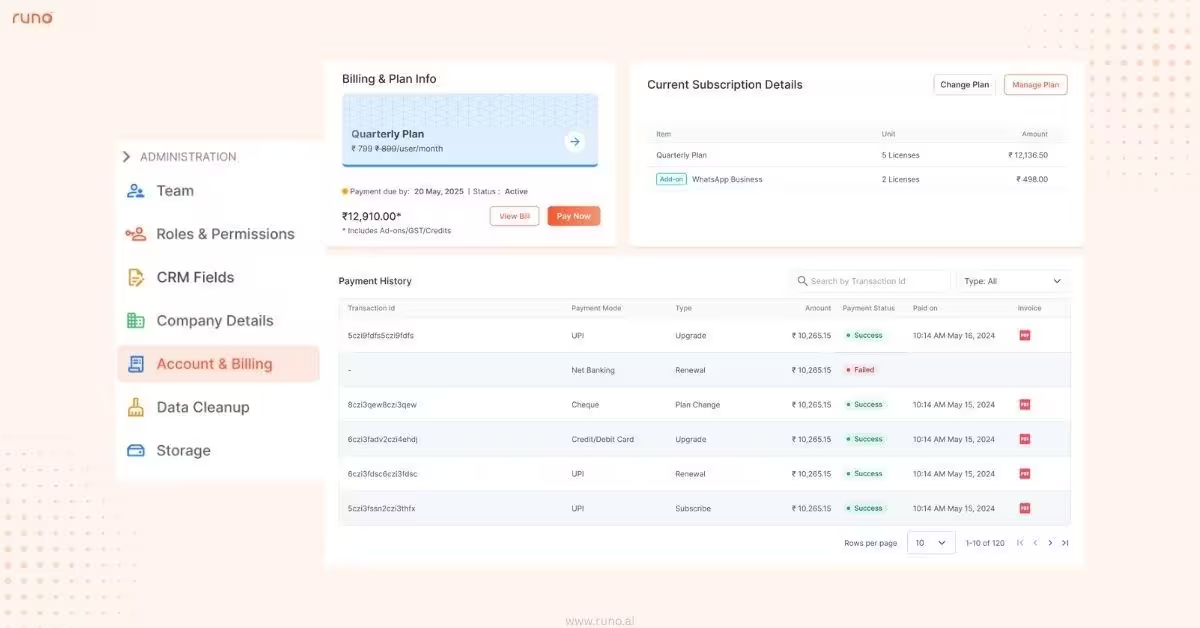
Admins can subscribe, manage, or review billing details - all from one centralized Account & Billing page.
Access & Permissions:
What You’ll See on the Billing Page:
The page is organized into three widgets:
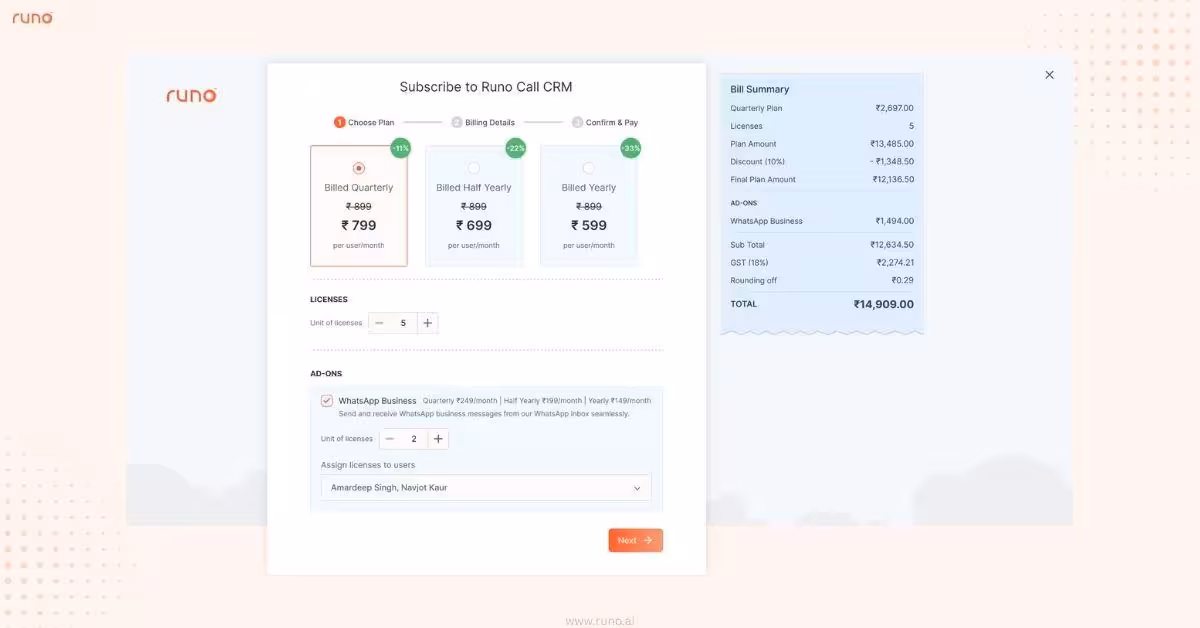
How to Subscribe:
Subscribing to a new plan takes just three quick steps:
Managing an Active Plan:
Even when your plan is active, you can increase the number of licenses, add new add-ons & upgrade existing add-on licenses.
Note: All changes are billed on a pro-rata basis.
Note: Downgrading licenses or changing the billing cycle isn’t allowed during an active plan.
Changing an Inactive Plan:
If your plan becomes inactive, you can:
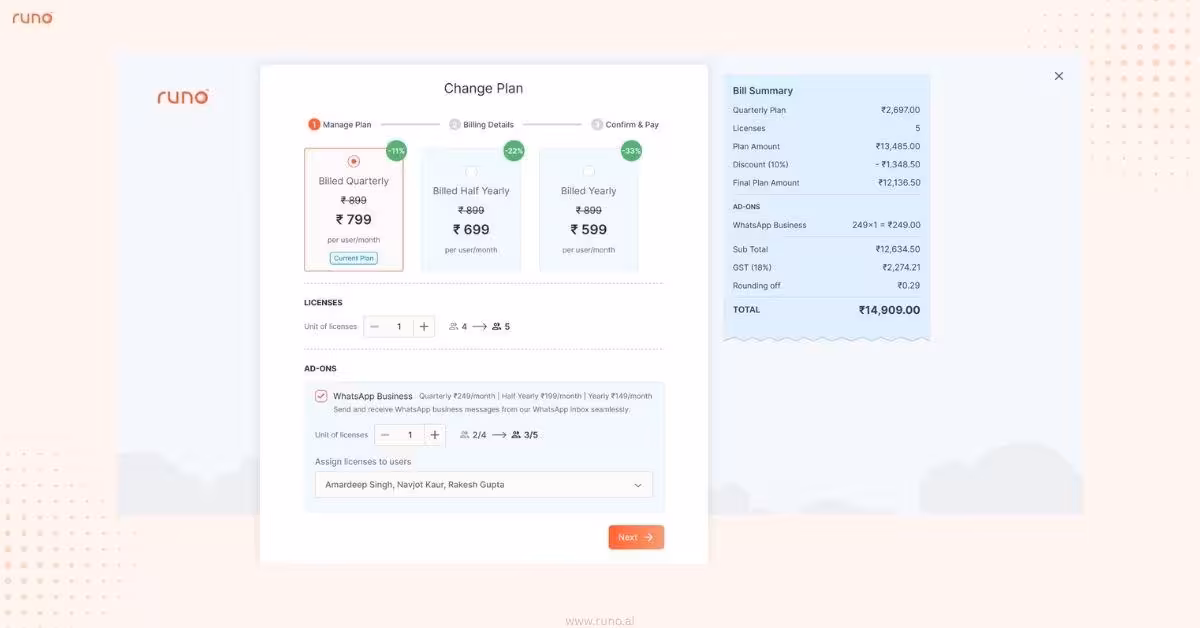
This flexibility ensures your plan always aligns with your team’s needs and growth.
WhatsApp isn’t just for chats anymore… It’s now your team’s most powerful sales and engagement channel inside Runo.
With the all-new WhatsApp Business Integration , you can connect your business number directly to Runo and manage every customer conversation from one unified space.
Here’s what makes this integration a game-changer:
With Runo + WABA, WhatsApp becomes more than just a chat platform. It becomes a scalable, trackable sales and customer engagement engine. 🚀
Getting started is easy:
Introducing Runo AI Copilot – an AI Assistant designed to make your day-to-day work on Runo faster, smarter, and a whole lot easier.
Whether you’re exploring Runo for the first time or managing a full sales pipeline, AI Copilot is here to help you at every step. From answering your questions, surfacing key insights, to summarizing call data in seconds, it can do it all.
Here’s what it brings to your experience:
On web or mobile, Runo AI Copilot gives you instant clarity on every call, helping you save time, learn faster, and lead with insight.
How to Use Runo AI Copilot?
Once open, simply type your query. Copilot will respond instantly and even suggest follow-up prompts to guide you further.
You can revisit your previous chats anytime or generate a summary of your conversation for quick reference.
For every eligible call, get detailed insights including speaking time, loudness, sentiment, filler words, and call conduct reviews, along with auto-generated summaries, transcripts, and key discussion points.
For AI Call Insights , in the ‘Call Logs’ tab, look for the AI Insights icon on eligible call logs (defined by your admin).
Here’s what the icons stand for:
Clicking the icon opens the detailed report, which includes:
Plus, you’ll also see:
With Runo AI, every call tells a clear story… one that helps your team understand, improve, and perform better with data-driven confidence.
Understanding how your team performs just got a whole lot easier.
In the Analytics tab, under the User Performance section , you can now view detailed insights into each agent’s activity- from calls made to customers engaged… all in one place.
Performance metrics are now allocation-based , giving admins a clearer picture of how effectively leads are being handled and followed up on.
Simply click on the numbers next to any teammate’s name to dive into deeper insights for their individual calls and interactions.
This update gives managers better visibility, helps identify top performers, and makes it easier to spot where training can make the biggest impact.
From the Transfer Data page, you can easily move all customer details (including interactions, follow-ups, etc.) from one teammate to another without losing any information.
With this update, you can now:
This ensures that every handover is seamless, transparent, and completely traceable, so no lead or follow-up ever slips through the cracks.
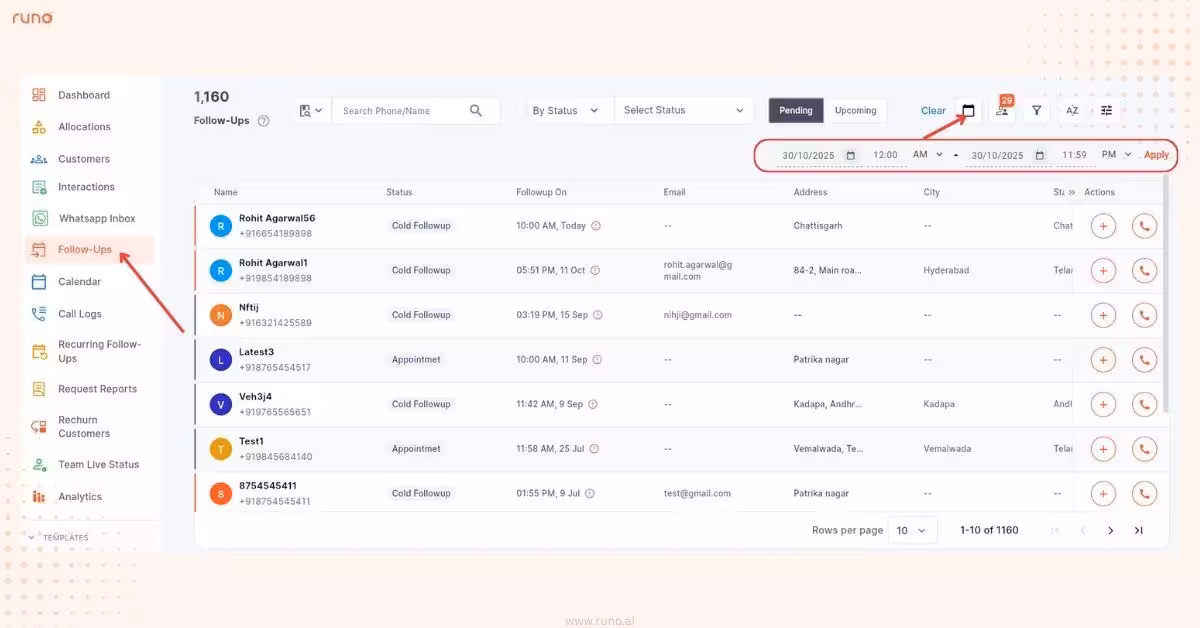
Stay in control of your schedule with smarter follow-up tracking.
You can now set a custom date range for your pending or upcoming follow-ups using the calendar icon.
Whether you’re planning your week or reviewing last month’s activities, this new ‘date range’ filter helps you focus on the right conversations at the right time.
Filling out customer details is now faster and more accurate than before.
You can now select the right city and state values from a dropdown list while adding or editing a customer.
And here’s the best part… once you enter a Pincode, Runo will automatically fill in the City and State for you.
Lesser typing, fewer errors, and a lot more efficiency every time you add a lead.
Zoho integration in Runo got even stronger.
You can now connect not just leads, but also Accounts and Contacts modules from Zoho, so your CRM and calling data stay perfectly in sync.
With this update, every contact and account you manage in Zoho stays perfectly aligned with your data in Runo, ensuring smoother handoffs, cleaner records, and zero duplication.
Get instant clarity on lead ownership without extra clicks with this new UI enhancement.
You can now see the ‘Assigned To’ field right under each customer’s information in the mobile app.
This lets you quickly identify which teammate a lead is currently assigned to, without having to open the full customer profile.
A small detail, but one that makes managing leads on the go a whole lot smoother.
Admins now have more control over team alerts and updates.
From the Configuration page, admins can easily set up and manage notifications for user activities and allocations, ensuring the right people are informed at the right time.
A simple way to stay on top of team actions and keep everyone aligned.
Admins can subscribe, manage, or review billing details - all from one centralized Account & Billing page.
Access & Permissions:
What You’ll See on the Billing Page:
The page is organized into three widgets:
How to Subscribe:
Subscribing to a new plan takes just three quick steps:
Managing an Active Plan:
Even when your plan is active, you can increase the number of licenses, add new add-ons & upgrade existing add-on licenses.
Note: All changes are billed on a pro-rata basis.
Note: Downgrading licenses or changing the billing cycle isn’t allowed during an active plan.
Changing an Inactive Plan:
If your plan becomes inactive, you can:
This flexibility ensures your plan always aligns with your team’s needs and growth.